UDO Super 6 — Owner’s Manual
17
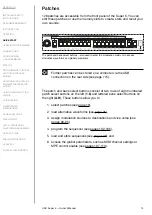
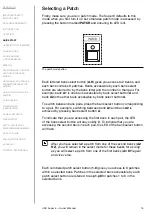
When a patch is selected, the LED of a numbered patch select button
(
1
-
8
) corresponding to the number of that patch in the selected bank will
be lit. The combination of bank and patch select button LEDs denotes
which patch is currently selected. If, for example, patch select button
2
is lit and bank select button
C is flashing, then the selected patch is p2
in bank
C2
.
When changing banks, the LED of the patch select button you last
selected will extinguish indicating that the current patch is not part of the
newly selected bank. Simply switching banks won’t launch a new patch.
You have to confirm a patch selection by pressing one of the numbered
buttons after a new bank is selected.
When a patch memory location is empty, the corresponding LED
won’t light up.
Selecting a Different Patch
Let’s say you would like to select patch
p8
in bank
B1
:
1. Make sure that the
PATCH
button’s LED is lit. If not then press
PATCH
.
2. Press the bank select button on the right marked
B
. If its LED is
flashing, you are in bank B2
. Press bank select button
B
again and
its LED will become solidly lit. You have now entered bank
B1
.
3. Press the patch select button on the left marked 8. Patches are
only loaded on release of patch select buttons. The LED of the
patch select button corresponding to the patch you selected will
then light up.
You have now selected patch
p8
in bank
B1
. Using this simple two-
button system, it’s easy to access all of the stored patches. Note that
if you attempt to access a patch that isn’t saved on the disk drive, the
corresponding patch select button’s LED won’t light. Why not spend some
time selecting different patches to get a flavour of the sounds the Super 6
is capable of producing?

