background image

46

Getting Started

Setting up your computer

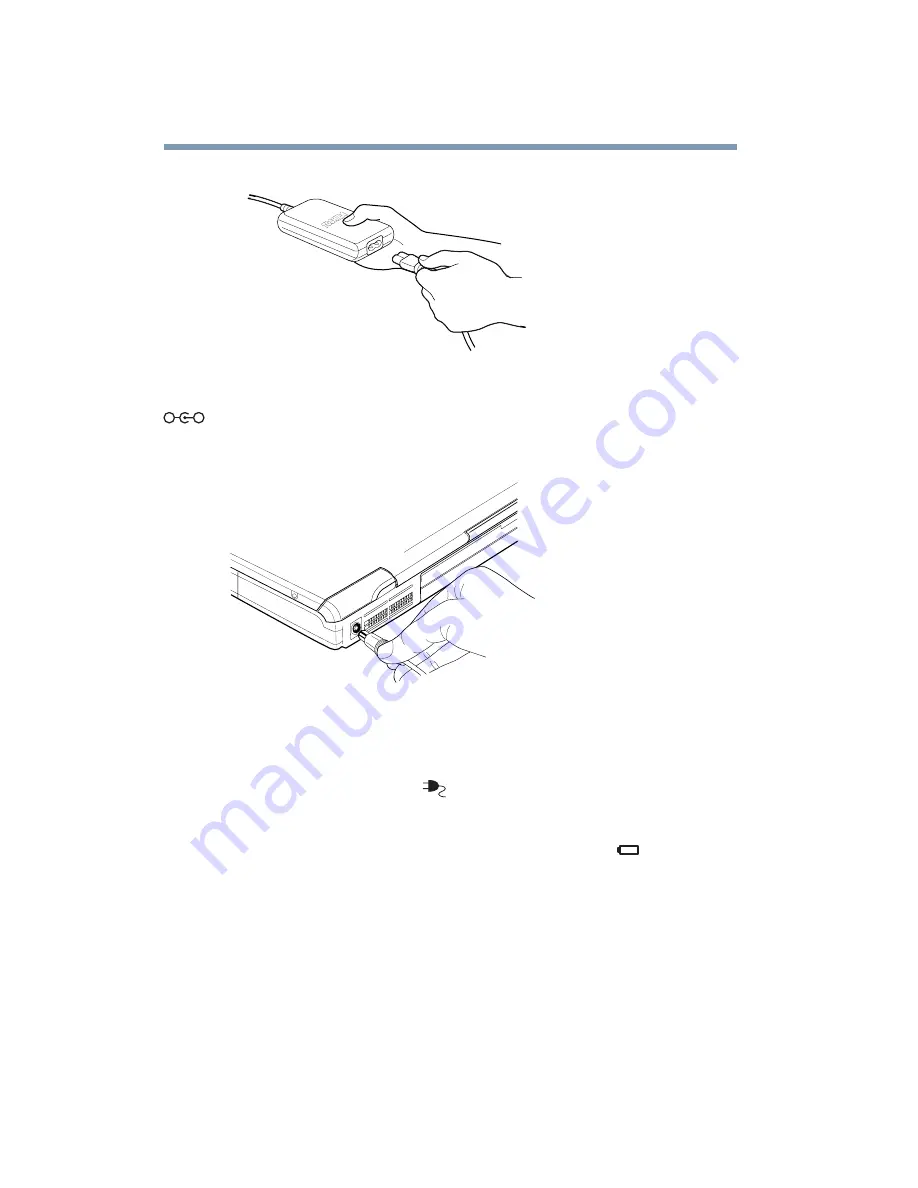
Connecting the power cable to the AC adapter

2

Connect the DC OUT end of the AC adapter cable to the 
DC IN jack at the back of the computer.

Connecting the AC adapter cable to the computer

3

Insert the plug end of the power cable into a live wall outlet.

The AC power light 


on the system indicator panel glows 

green.

If the main battery is present, the battery light 


glows:

Amber while the battery is charging

Green when the battery is fully charged

If the battery light flashes amber during charging, either the 
battery pack is malfunctioning, or it is not receiving input 
from the AC power supply. Disconnect the AC cable and 

_

+

Содержание SpectraLink 6000 System

Страница 1: ...ool Double click the desktop icon or visit the Web site http virtualtech answerteam com InTouchsm Center Calling within the United States 800 457 7777 Calling from outside the United States 949 859 4273 For more information see Chapter 9 on page 201 of this guide TOSHIBA C6602 1001M1 ...

Страница 2: ...of Stored Data For your important data please make periodic back up copies of all the data stored on the hard disk or other storage devices as a precaution against possible failures alteration or loss of the data IF YOUR DATA IS ALTERED OR LOST DUE TO ANY TROUBLE FAILURE OR MALFUNCTION OF THE HARD DISKDRIVEOR OTHER STORAGE DEVICESAND THE DATA CANNOT BE RECOVERED TOSHIBA SHALL NOT BE LIABLE FOR ANY...

Страница 3: ... or television reception which can be determined by turning the equipment off and on the user is encouraged to try to correct the interference by one or more of the following measures Reorient or relocate the receiving antenna Increase the separation between the equipment and receiver Connect the equipment to an outlet on a circuit different from that to which the receiver is connected Consult the...

Страница 4: ...ernal modems Installation When you are ready to install or use the modem call your local telephone company and give them the following information The telephone number of the line to which you will connect the modem The FCC registration number of the modem The Ringer Equivalence Number REN of the modem which is 0 6B The modem connects to the telephone line by means of a standard jack called the US...

Страница 5: ...e notified as soon as possible When you are notified you will be given the opportunity to correct the problem and informed of your right to file a complaint with the FCC In the event repairs are ever needed on your modem they should be performed by Toshiba Corporation or an authorized representative of Toshiba Corporation Disconnection If you should ever decide to permanently disconnect your modem...

Страница 6: ...ome situations Repairs to certified equipment should be coordinated by a representative designated by the supplier Any repairs or alterations made by the user to this equipment or equipment malfunctions may give the telecommunications company cause to request the user to disconnect the equipment Users should ensure for their own protection that the electrical ground connections of the power utilit...

Страница 7: ...s Ethernet Compatibility Alliance Wireless LAN and your Health Wireless LAN products like other radio devices emit radio frequency electromagnetic energy The level of energy emitted by Wireless LAN devices however is far much less than the electromagnetic energy emitted by wireless devices like for example mobile phones Because Wireless LAN products operate within the guidelines found in radio fre...

Страница 8: ... USA Federal Communications Commission FCC This device complies with Part 15 of FCC Rules Operation of the devices in a Wireless LAN System is subject to the following two conditions This device may not cause harmful interference This device must accept any interference that may cause undesired operation Caution Exposure to Radio Frequency Radiation The radiated output power of the Toshiba Wireles...

Страница 9: ...occur in a particular installation If this equipment does cause harmful interference to radio or television reception which can be determined by turning the equipment off and on the user is encouraged to try and correct the interference by one or more of the following measures Reorient or relocate the receiving antenna Increase the distance between the equipment and the receiver Connect the equipm...

Страница 10: ...instruction manual carefully and retain for future reference Should the unit ever require maintenance contact an authorized service location Use of controls adjustments or the performance of procedures other than those specified may result in hazardous radiation exposure To prevent direct exposure to the laser beam do not try to open the enclosure Australia Austria Belgium Canada Denmark Finland G...

Страница 11: ...rmance of procedures other than those specified in the owner s manual may result in hazardous radiation exposure Copyright This guide is copyrighted by Toshiba America Information Systems Inc with all rights reserved Under the copyright laws this guide cannot be reproduced in any form without the prior written permission of Toshiba No patent liability is assumed however with respect to the use of ...

Страница 12: ...ED HEREIN OR FOR DISCREPANCIES BETWEEN THE PRODUCT AND THE MANUAL IN NO EVENT SHALL TOSHIBA BE LIABLE FOR ANY INCIDENTAL CONSEQUENTIAL SPECIAL OR EXEMPLARY DAMAGES WHETHER BASED ON TORT CONTRACT OR OTHERWISE ARISING OUT OF OR IN CONNECTION WITH THIS MANUAL OR ANY OTHER INFORMATION CONTAINED HEREIN OR THE USE THEREOF Trademarks Satellite AccuPoint II Fn esse Noteworthy and SelectBay are registered ...

Страница 13: ... trademark of the U S Environmental Protection Agency Bluetooth is a trademark owned by its proprietor and used by Toshiba under license All other brand and product names are trademarks or registered trademarks of their respective companies Energy Star compliance As an Energy Star partner Toshiba has determined that this product is Energy Star Compliant Computer disposal information This product c...

Страница 14: ...14 Blank Page ...

Страница 15: ...ay Around 27 Making sure you have everything 27 Front with the display panel closed 28 Back with rear panel closed 29 Back with rear panel open 30 Right side 31 Left side 31 Underside 33 Keyboard and display features 34 Front with the display panel open 34 Indicator panel lights 36 Keyboard indicator panel lights 37 Chapter 2 Getting Started 39 ...

Страница 16: ...g Other External Devices 55 Using external display devices 55 Connecting the display device 56 Directing the display output when you turn on the computer 57 Adjusting the quality of the external display 58 Video limitations 58 Using an external keyboard 59 Making your external keyboard emulate the Fn key 59 Using a mouse 60 Setting up a PS 2 mouse with the AccuPoint II 60 Connecting a local printe...

Страница 17: ...onnecting your modem to a telephone line 78 Connecting to a phone line 78 Chapter 4 Learning the Basics 81 Computing tips 81 Using the keyboard 82 Character keys 83 Making your keyboard emulate a full size keyboard 83 Ctrl Fn and Alt keys 84 Function keys 84 Windows special keys 84 Overlay keys 85 Starting a program 87 Starting a program from the Start menu 87 Starting a program from Windows Explo...

Страница 18: ...g Standby 110 Toshiba s online resources 113 Chapter 5 Power Management 115 Toshiba s energy saver design 115 Running the computer on battery power 116 Charging the batteries 116 Monitoring battery power 117 What to do when the battery alarm sounds 119 Changing batteries 120 Taking care of your battery 123 Safety precautions 123 Maximizing battery life 123 Disposing of used batteries 124 Conservin...

Страница 19: ...t features 139 Uploading and downloading files from the Internet 140 Exploring audio features 140 Playing an audio CD 141 Creating a CD 142 Recording sounds 142 Using external speakers or headphones 144 Exploring audiovisual features 144 Playing DVDs 145 Using the WinDVD toolbar 146 Using the WinDVD status bar 147 Using the WinDVD control panel 147 Using the control panel playback buttons 148 Maxi...

Страница 20: ...g a USB mouse 167 Connecting a PS 2 mouse 168 Using a printer 169 Connecting a parallel printer 170 Setting up your printer 171 Using an external monitor 174 Connecting the display device 175 Directing the display output when you turn on the computer 177 Adjusting the quality of the external display 177 Video limitations 178 Using the Wi Fi Mini PCI module 178 Accessing the Wi Fi Mini PCI module 1...

Страница 21: ...197 Disabling a user password 198 Using a supervisor password 198 Setting a supervisor password 198 Deleting a supervisor password 199 Chapter 9 If Something Goes Wrong 201 Problems that are easy to fix 201 Problems when you turn on the computer 203 The Windows operating system is not working 204 Using Startup options to fix problems 205 Internet problems 206 The Windows XP operating system can he...

Страница 22: ... problems 229 Modem problems 230 Develop good computing habits 230 Using VirtualTech 232 If you need further assistance 232 Before you call 233 Contacting Toshiba 233 Other Toshiba Internet Web sites 234 Toshiba s worldwide offices 235 Appendix A Hot Keys 239 Appendix B Power Cable Connectors 247 Appendix C Video Modes 249 Glossary 251 Index 267 ...

Страница 23: ...rform the most demanding computing tasks from any location You will find that your operating system Microsoft Windows XP Professional is already installed on your computer It offers exciting features and easy Internet access This guide This guide introduces the computer s features You can Read the entire guide from beginning to end Skim through and stop when a topic interests you Use the table of ...

Страница 24: ...have been classified according to the seriousness of risk the following icons highlight these instructions DANGER This icon indicates the existence of a hazard that could result in death or serious bodily injury if the safety instruction is not observed WARNING This icon indicates the existence of a hazard that could result in bodily injury if the safety instruction is not observed CAUTION This ic...

Страница 25: ...e following documentation in addition to this user s guide An electronic version of the user s guide Look for the user s guide icon on your desktop or in the DOCS folder on the C drive Guides for other programs that may come preinstalled on your computer or that are available for installation on your Recovery and Configuration Builder CD Toshiba accessories information which lists accessories avai...

Страница 26: ...shiba offers a full line of service options built around its SelectServ warranty programs For more information visit Toshiba s Web site at Toshiba com If you have a problem or need to contact Toshiba see If Something Goes Wrong on page 201 ...

Страница 27: ...parts of the computer Making sure you have everything Before you do anything else consult the Quick Start card shipped with your computer to make sure you received everything If any items are missing or damaged notify your authorized Toshiba representative or your network administrator immediately For additional help see If Something Goes Wrong on page 201 ...

Страница 28: ...rared port provides a cable free connection for transferring data between your computer and another device such as a printer or another computer that has a compatible infrared port The headphone jack allows you to connect stereo headphones or other audio output devices such as external speakers to the computer Connecting headphones or other devices to this jack automatically disables the internal ...

Страница 29: ...de a connection for USB peripherals USB is a single cabling and connection standard that supports a data transfer rate of up to 12 million bits per second Mbps for peripherals such as keyboards pointing devices a diskette drive and a video camera USB allows hot swapping of peripherals which means that components may be plugged and unplugged while the computer is on DEFINITION USB is a peripheral e...

Страница 30: ... you connect an external monitor or projector Parallel port Lets you connect a parallel printer or other parallel device The Network port RJ45 jack provides access to a LAN via standard Ethernet network cable Modem port Lets you connect the computer s internal modem directly to a conventional telephone line Serial port Lets you connect a serial mouse serial printer or other serial device RGB port ...

Страница 31: ...larms and audible warnings associated with your software Video out port Lets you connect your computer to an external video device such as a standard television set The security lock slot allows you to attach the optional PORT Noteworthy Computer Lock cable to the computer to secure it to a large heavy object such as your desk Speaker HDD bay cover SD Media card slot Speaker Video out port PC Card...

Страница 32: ...formation see Inserting and removing PC Cards on page 73 CAUTION Keep foreign objects out of the PC Card slots A pin or similar object that accidentally gets into a slot can damage the computer s circuitry The PC Card eject buttons allow easy removal of PC Cards Slim SelectBay Lets you use one of several possible Slim SelectBay modules The DVD ROM drive is shown in place For more information see U...

Страница 33: ...lim SelectBay release Keeps the Slim SelectBay module secure in its compartment Memory module Lets you add more memory to your computer For more information see Adding memory on page 64 Slim SelectBay slot One of several interchangeable devices which offer exceptional system flexibility For more information see Using Slim SelectBay modules on page 69 PC Card lock Keeps the PC Cards secure in their...

Страница 34: ...ion on expanding your computer s memory see Adding memory on page 64 Keyboard and display features Front with the display panel open To view the front of the computer with the display panel open 1 Locate the display latch on the front of the computer Releasing the display latch 2 Slide the display latch to the right and lift the display panel Opening the display panel ...

Страница 35: ...n power to the computer For more information see Different ways to turn the computer on and off on page 104 Screen The computer s screen is a liquid crystal display LCD that provides clear sharp images Keyboard The 85 key keyboard provides all the functionality of a full size keyboard Ithas several built in hot key functions that Screen AccuPoint II AccuPoint II buttons indicator panel indicator p...

Страница 36: ...ing to remove your hands from the keyboard The AccuPoint II buttons Primary and Secondary work with the AccuPoint II pointing device For further information see Using the AccuPoint II pointing device on page 49 System indicator panel These lights provide status information about various system functions See the following section for a description of each panel light Indicator panel lights This pan...

Страница 37: ...ently in use Slim SelectBay indicator light Indicates the status of a secondary battery in the Slim SelectBay if installed Glows amber when the battery is charging Glows green when the battery is fully charged Does not glow if there is no battery in the Slim SelectBay Wireless indicator light Glows to indicate that wireless device is currently in use Keyboard indicator panel lights The keyboard in...

Страница 38: ...Glows when the numeric overlay is on When this light is on pressing an overlay key produces the white number printed on the right front of the key instead of the letter printed on the top of the key For more information see Using the overlay to type numeric data on page 85 ...

Страница 39: ...ons This section provides guidelines for setting up your computing environment Creating a computer friendly environment Place the computer on a flat surface that is large enough for the computer and any other items you need to use such as a printer Leave enough space around the computer and other equipment to give adequate ventilation otherwise they may overheat To keep your computer in prime oper...

Страница 40: ...ture or humidity and sources of temperature change such as air conditioner vents or heaters Extreme heat cold or humidity Operate the computer within a temperature range of 41 degrees to 95 degrees Fahrenheit 5 degrees to 35 degrees Celsius and 20 percent to 80 percent non condensing humidity Keeping yourself comfortable Strain and stress injuries are becoming more common as people spend more time...

Страница 41: ...ht and distance You should be able to type without twisting your torso or neck and look at the screen without slouching If you use an external monitor the top of the screen should be no higher than eye level If you use a paper holder set it at the same height and distance as the screen Seating and posture When using your computer maintain good posture with your body relaxed and your weight distrib...

Страница 42: ...ary use a footrest to raise the level of your knees and ease the pressure on the back of your thighs Adjust the back of your chair so that it supports the lower curve of your spine If necessary use a cushion to provide extra back support Lower back support cushions are available at many office supply stores Sit with your back straight so that your knees hips and elbowsformapproximately90 degreeang...

Страница 43: ...rain is to vary your activities If possible schedule a variety of tasks into your working day Finding ways to break up the routine can reduce stress and improve your efficiency Take frequent short breaks to change position stretch your muscles and relieve your eyes A break of two or three minutes every half hour is more effective than a long break after several hours Avoid performing repetitive ac...

Страница 44: ...C Card can result in errors or instability in the PC Card operation Be careful when you remove a PC Card that has been used for lengthy periods of time Setting up your computer Your computer comes with a rechargeable battery pack that must be charged before you can use it To use external power or to charge the battery you must attach the AC adapter See Connecting to a power source on page 45 To re...

Страница 45: ...wer the computer from an external AC power source and to charge the computer s batteries Power cable and AC adapter CAUTION Use of the wrong AC adapter could damage your computer Toshiba assumes no liability for any damage in such cases Never pull directly on the power cable to unplug it Hold the power plug when removing the cable from the outlet To connect the computer to an external power source...

Страница 46: ...3 Insert the plug end of the power cable into a live wall outlet The AC power light on the system indicator panel glows green If the main battery is present the battery light glows Amber while the battery is charging Green when the battery is fully charged If the battery light flashes amber during charging either the battery pack is malfunctioning or it is not receiving input from the AC power sup...

Страница 47: ... battery Your computer came with its battery already installed Before using the battery to power the computer you must charge it To charge the battery leave the computer plugged in to an AC power source for at least three hours with the computer turned off After that the battery will be completely charged and ready to power the computer CAUTION Once the battery is charged for the first time avoid ...

Страница 48: ...on the computer 1 Make sure any external devices such as the AC adapter if you plan to use AC power rather than battery power are properly connected and ready 2 Check to ensure that any floppy drives are empty 3 Press and hold the power button in until the on off light on the system indicator panel glows green about one second Turning on the power For the meaning of each light on the system indica...

Страница 49: ...uttons it provides the same functionality as a mouse it enables you to move the cursor and to select items on the screen AccuPoint II pointing system HINT If you would rather use a mouse or trackball you can connect one to the computer s serial port USB port or PS 2 port For information see Using a mouse on page 167 To move the cursor gently push the AccuPoint II pointing device in the direction y...

Страница 50: ...termine whether it uses the right mouse button For more information on programming buttons and keys see Fn esse on page 182 The small left button performs the Internet Back button The small right button performs the Universal scroll Setting up your software The first time you turn on your computer the Windows XP Professionaloperatingsystemguidesyouthroughseveralessential steps to set up your softw...

Страница 51: ...later time a reminder dialog box will appear after each startup until you register your product Read about Warranty Extensions and Upgrades This step provides important information from Microsoft Sign up for Internet access This step guides you through signing up for a new Internet account or assists you in setting up your computer to work with your existing Internet account Completing installatio...

Страница 52: ...at when you turn on the computer again you will automatically return to where you left off To leave the computer off for a longer period use the Windows Turn Off Computer command Alternatively use Hibernation mode to save the system settings to the hard disk For more information see Powering down the computer on page 105 CAUTION Never turn off the computer while any drive is in use Doing so may da...

Страница 53: ...puter If you have the audible warning set the computer will beep to notify you that it is still on If you have an action feature set the computer will perform either Nothing Standby Hibernate or Turn Off see Enabling Hibernation on page 195 ...

Страница 54: ...54 Getting Started Turning off the computer Blank Page ...

Страница 55: ...fferent types of external display devices to one of two available video ports A television via the video out composite port A video display device such as a video projection unit via the video out composite port An external monitor or projector via the RGB port Before connecting a television video projector monitor or other display device configure your computer for the type of device you re conne...

Страница 56: ...deo cable For the best video quality always use a properly shielded cable HINT Toshiba recommends using a cable no longer than 20 feet approximately 6 meters Using a poor quality cable may result in a dull or fuzzy picture poor color ghosting video noise or loss of video Connecting to the video out composite port To connect the device 1 Connect one end of the video cable to the external video devi...

Страница 57: ...xternal device 4 Set the display mode by pressing Fn F5 or by setting the Display Properties settings For more information see Directing the display output when you turn on the computer on page 57 Directing the display output when you turn on the computer Once you veconnected an externaldisplay device you can choose to use the internal display only the external device only or both simultaneously T...

Страница 58: ...ne of the simultaneous modes you must set the resolution of the internal display panel to match the resolution of the external display device The external display device must support a resolution of 640 X 480 or higher Video limitations Keep in mind that the quality of the display will be limited to the capabilities of the external video device If the external video device such as an SVGA monitor ...

Страница 59: ...ard when you turn the computer on CAUTION When connecting any PS 2 device turn off your computer to prevent any possible hardware damage HINT You can only connect one PS 2 device at a time unless you purchase an optional Y cable Connecting a Y cable to the computer s PS 2 port allows you to connect a PS 2 compatible mouse and a PS 2 compatible keyboard simultaneously Making your external keyboard ...

Страница 60: ...ble mouse A serial mouse disables the AccuPoint II A PS 2 compatible mouse allows you to have the AccuPoint II active at the same time Setting up a PS 2 mouse with the AccuPoint II When you connect a PS 2 compatible mouse to the PS 2 port you may use the mouse the AccuPoint II or both CAUTION When connecting any PS 2 device turn off your computer to prevent any possible hardware damage NOTE If you...

Страница 61: ...mentation If the printer can be switched between serial and parallel mode choose parallel because it is faster You also need a suitable printer cable which may come with your printer Otherwise you can purchase one from a computer or electronics store NOTE If your printer is ECP or IEEE compliant make sure your printer cable is an IEEE 1284 cable These instructions assume you have a parallel printe...

Страница 62: ...onal configuration steps For more information on getting your printer to print see Printing your work on page 92 Connecting an external diskette drive Some operations such as creating a password service diskette require a diskette drive designed for use with 3 5 inch diskettes An external USB diskette drive To connect an optional external USB diskette drive connect the cable to one of the USB port...

Страница 63: ...o device into the headphone jack The headphone jack requires a 3 5 mm 16 ohm stereo jack When the headphone is inserted the internal speakers are automatically disabled For more information on using headphones or external speakers see Using a compact disc drive on page 93 Connecting a microphone To record high quality sounds you can attach a microphone 1 Locate the microphone jack on the front of ...

Страница 64: ...sing your computer away from your desk When you return you can quickly connect your computer and have immediate access to all the devices Toshiba offers the following expansion devices for the Satellite Pro 6000 Series Advanced Port Replicator For more information see the documentation that comes with the device To purchase a docking solution see the accessories information packaged with your syst...

Страница 65: ... additional help Since your computer was built to order it should have enough memory to run your current applications However if your requirements change you can install extra memory up to a maximum of 512 MB Memory module sizes Additional memory is easy to install Memory modules come in the following sizes 128 MB PC133 DDRAM 256 MB PC133 DDRAM 512 MB PC133 DDRAM The computer has two memory expans...

Страница 66: ...standard Phillips no 1 screwdriver that is in good condition The computer has two memory expansion slots Slot A and Slot B You can install one or two memory modules 1 Shut down your computer completely using the Shut Down command See Powering down the computer on page 105 2 Unplug the computer CAUTION Installing a memory module with the computer s power on may damage the computer the module or bot...

Страница 67: ...odule Before you handle the module touch a grounded metal surface to discharge any static electricity you may have built up To avoid damaging the memory module be careful not to touch its pin connector on the side you insert into the computer 6 Remove the new memory module from its antistatic packaging 7 Insert the memory module in the slot and gently press it down into place The clips on either s...

Страница 68: ...and restart it When you turn on the computer it automatically recognizes the additional memory Removing a memory module If you need to remove a memory module 1 Complete steps 1 6 in Installing a memory module to shut down the computer and open the memory module cover 2 Pull the clips away from the memory module The memory module pops partially out of the slot ...

Страница 69: ...SelectBay modules The Slim SelectBay gives you additional flexibility By inserting and removing Slim SelectBay modules you can configure your computer for the task at hand without having to carry unnecessary components with you when you travel For example any one of several modules can be used in the Slim SelectBay CD ROM drive DVD ROM drive The DVD ROM drive can also be used as a standard CD ROM ...

Страница 70: ... HINT Items from this list that did not come with your computer can be purchased separately See the accessories information packaged with your system or visit toshibaaccessories com Removing a module from the Slim SelectBay 1 Slide the Slim SelectBay ejection bar towards the front of the computer Unlatching the Slim SelectBay 2 Slide the module out of the computer ...

Страница 71: ...tBay Inserting and removing hard drives Your Satellite Pro 6000 can use 20GB 30GB and 40GB hard drives Depending upon the original hard drive installed in your computer you may wish to increase storage capacity by changing the internal drive or you can also add additional hard drive space by inserting a drive into the select bay module To change the internal hard drive 1 Shut down your computer co...

Страница 72: ...e cover screw 6 Lift the hard drive bay cover to expose the hard drive 7 Grasp the plastic tab on the exposed edge of the hard drive and pull it to remove the hard drive from the computer Removing the hard drive from the computer 8 Install the new hard drive by sliding it into the hard drive bay and pressing it firmly until it locks Do not force the drive into the computer ...

Страница 73: ...Card slots and supports three types of PC Cards Type I cards You can install up to two of these cards one in each slot Type II cards You can install up to two of these cards one in each slot Type III cards You can install just one of these cards Inserting a PC Card Before you insert a PC Card refer to the documentation that comes with the card to see if you need to do anything before you insert it...

Страница 74: ... Type III card insert it into the lower part of the slot If you have a Type I or Type II card insert it into either the upper or lower part of the slot Inserting a PC Card 4 When the card is almost all the way into the slot push firmly but gently to ensure a firm connection with the computer Do not force the card into position 5 To lock the PC Card in its slot turn the computer over and locate the...

Страница 75: ...he computer over locating the PC Card lock and sliding it into the unlocked position 2 Locate the PC Card ejection button that corresponds to the slot in which your PC Card is installed The top tab releases a card in the upper slot The bottom tab releases a card in the lower slot 3 Press the PC Card eject button once to extend it and push it in to remove the PC Card ...

Страница 76: ...vice Provider Setting up a PC Card for your computer Some PC Cards are ready to use as soon as you install them Others such as hard disk cards network cards and SCSI adapters may need to be set up to work with your computer To set up your PC Card refer to the documentation that came with the card or refer to your operating system manual or online help Using Secure Digital cards Your computer suppo...

Страница 77: ...uld expose the storage area to static electricity which can destroy data Do not remove an SD Media card while data is being written or read Even when the message copying in the windows disappears writing to the card might still be in progress and your data could be destroyed Wait for the SD Media indicator light to go out Removing an SD Media card To remove an SD Media card 1 Right click the Secur...

Страница 78: ... Internet Communicatewithyouroffice s localareanetwork LAN or a larger corporate wide area network WAN For specific information about connecting to a LAN or WAN consult your network administrator Send a fax directly from your computer Connecting to a phone line Before you can communicate using the modem you need to connect it to a telephone line Your computer s built in modem port provides an RJ11...

Страница 79: ...nnecting the telephone cable to the modem port 2 Connect the other end to the RJ11 wall jack Connecting to a wall jack CAUTION The modem is designed for use with a standard analog telephone line Don t connect the modem to a digital telephone line A digital line will damage the modem ...

Страница 80: ... send a fax or use the modem to connect to an online service or the Internet HINT If you re using a telephone line at home disable Call Waiting before connecting through the modem Call Waiting interrupts transmission For more information on using a modem see Setting up for communications on page 131 ...

Страница 81: ...to the disk If the network you are using goes down and you must restart your computer to reconnect or your battery runs out of charge while you are working you will lose all work since you last saved See Saving your work on page 90 for further information HINT Some programs have an automatic save feature that can be activated This feature saves your file to the hard disk at preset intervals See yo...

Страница 82: ...petitive motion injuries and eyestrain Don t turn off the computer if a drive indicator light indicates a drive is active Turning off the computer while it is reading from or writing to a disk may damage the disk the drive or both Before turning off the computer use the Turn Off Computer command or Standby command See Powering down the computer on page 105 to learn more about Standby NOTE The Wind...

Страница 83: ...ard layout is compatible with a standard full size keyboard it has fewer keys A standard full size keyboard has two Enter Ctrl and Alt keys editing keys cursor positioning keys and a numeric keypad Pressing the Fn key simultaneously in combination with one of the specially marked keys allows you to emulate a full size keyboard Your computer s keyboard has only one Enter and one Ctrl key Most of th...

Страница 84: ...ram you are using For more information see your program documentation Function keys The function keys not to be confused with the Fn key are the 12 keys at the top of the keyboard The function keys F1 through F12 are called function keys because they execute programmed functions when pressed Used in combination with the Fn key function keys marked with icons execute specific functions on the compu...

Страница 85: ...nd cursor overlay This overlay lets you enter numeric data or control the cursor as you would using the 10 key keypad on a desktop computer s keyboard Numeric and cursor control overlay Using the overlay to type numeric data The keys with the numbers on their right front are the numeric overlay keys To turn the numeric overlay on press Fn and F11 simultaneously The numeric mode light on the keyboa...

Страница 86: ... numeric mode light on the keyboard indicator panel goes out Using the overlay for cursor control The keys with the gray arrows and symbols on their left front are the cursor control overlay keys To turn the cursor control overlay on press Fn and F10 simultaneously The cursor control mode light on the keyboard indicator panel glows when the cursor control overlay is on To type alphabetic character...

Страница 87: ...or My Computer to locate the program file Use the Run dialog box The next three sections explain how to start a program from the Start menu Explorer and the Run dialog box Starting a program from the Start menu When you install a program the operating system usually puts an icon in the All Programs menu To start a program that has an icon in the All Programs menu follow these steps which use the W...

Страница 88: ...ile ends with exe This example opens Wordpad using its file name wordpad exe 1 Click Start then point to All Programs 2 Click Windows Explorer 3 In the left part of the window under the C icon double click the folder containing the program in this case Program Files Windows Explorer shows the contents of the Program Files folder on the right side of the window The left side of the window shows all...

Страница 89: ...ogram in the Windows folder type just the program name Otherwise type the full file path For example to access Wordpad type c Program Files Accessories Wordpad then click OK If you don t know the location click Browse In the Browse dialog box enter the file name for example wordpad exe and select the drive to search When the operating system has found the file click Open HINT To run the same progr...

Страница 90: ...s is quick and easy so it is a good idea to get in the habit of saving frequently Many programs offer a feature that saves documents at regular intervals Check your program s documentation to see if it has an automatic save feature Saving files 1 On the File menu of your Windows program click Save If you are working with a document that already has a file name that s all there is to it If you crea...

Страница 91: ...upports file names of up to 255 characters the names can include spaces Some applications still require MS DOS file names File names If you plan to share your files with a computer using a pre Windows 95 version of the Windows operating system the file name must be no more than eight characters long Typically the file name also has an extension consisting of a period and up to three additional cha...

Страница 92: ...is unlikely to recognize a strange extension and may refuse to handle your file correctly Printing your work Ensure the operating system is set up for your printer as described in Using a printer on page 170 HINT You only need to set up the printer the first time you connect it If you use more than one printer or are changing printers you will need to set up the Windows XP Professional operating s...

Страница 93: ...to print 4 Click Print Using a compact disc drive Your Satellite Pro 6000 Series computer may have a CD ROM CD RW DVD ROM or DVD CD RW drive If a CD ROM or DVD ROM drive is not currently installed in the Slim SelectBay follow the instructions in Using Slim SelectBay modules on page 69 HINT Your DVD ROM drive is designed to play Region 1 North America DVD ROMs ...

Страница 94: ...d it Doing so could cause the drive to malfunction Manual eject hole Use if you need to release the disc tray when the power is off Use a straightened paper clip or other narrow object to press the manual eject button located inside the hole CAUTION Never use a pencil to press the eject button Pencil lead can break off inside the computer and damage it Inserting compact discs To insert a compact d...

Страница 95: ... if the computer s power is off 4 Grasp the tray and pull it fully open The drive tray fully extended 5 Hold the disc by its edges and check that it is free of dust If the disc is dusty clean it as described in Caring for CDs and DVDs on page 97 6 Place the disc carefully in the disc tray label side up Positioning the disc in the drive ...

Страница 96: ...may jam the drive If this happens contact your Toshiba support for assistance 9 Push the disc tray in by pressing gently on the center of the tray until it clicks into place You are ready to use the disc Removing compact discs To remove a compact disc CD or DVD with the computer turned on 1 Press the eject button on the drive CAUTION Do not press the eject button while the in use indicator light i...

Страница 97: ...hes and keep them clean Do not bend a disc or place heavy objects on top of it Do not apply a label to or otherwise mar the surface of a disc Hold a disc by its outside edge Fingerprints on the surface can prevent the DVD ROM drive from reading the data properly Do not expose discs to direct sunlight or extreme heat or cold To clean a disc that is dirty wipe it with a clean dry cloth The most effi...

Страница 98: ...eplace one PC Card with another while the computer is on This is called hot swapping Hot swapping precautions Although you can insert a PC Card at any time remember not to remove a card while it is in use Otherwise you could lose valuable information For example Do not remove a hard disk card while the system is accessing it Do not remove a network card while you are connected to a network Do not ...

Страница 99: ...4 Copy the contents of the source SD Media card into the temporary folder you created in step 3 5 Remove the source SD Media card 6 Insert the target SD Media card created in step 1 7 Copy the file contents from the temporary folder to the target SD Media card 8 Eject the target SD Media card Using your computer at the office By connecting an external monitor external full size keyboard and a mous...

Страница 100: ...the cable through or around some part of a heavy object Make sure there is no way for a potential thief to slip the cable off the object 2 Pass the locking end through the loop 3 Slide the PC Card lock located underneath the PC Card slots to secure your PC Cards in place 4 Insert the cable s locking end into the security lock slot on the computer then give the key a quarter turn and remove it The ...

Страница 101: ... battery power on page 116 Cleaning the computer CAUTION Keep liquids including cleaning fluid out of the computer s keyboard speaker and other openings Never spray cleaner directly onto the computer Never use harsh or caustic chemical products to clean the computer To keep your computer clean gently wipe the display panel and exterior case with a lightly dampened cloth Ask your Toshiba dealer for...

Страница 102: ...ur Toshiba dealer through the accessories information packaged with your system or visit toshibaaccessories com Backing up your work Your computer comes with a Recovery and Configuration Builder CD that enables you to reinstall software that was preinstalled This CD can be used to install or reinstall particular Toshiba applications utilities and drivers Back up all the files you create in case so...

Страница 103: ...p program Look in the online Help or your operating system documentation for information on restoring files TECHNICAL NOTE When restoring files the backup program prompts you if you try to overwrite a file that already exists on the hard disk Make sure the backup version is the one you want before overwriting the existing file Preparing for communications To connect to the Internet use an online s...

Страница 104: ...t You can set the computer to turn on and send or receive the files while you are asleep This option is called Auto Power On Turn the computer on and off by opening and closing the display panel This option is a convenient way to turn on the power and prevents you from closing the display panel while the computer is on This option is called Panel Power On Off NOTE Pushing the power button before s...

Страница 105: ...omputer The Turn Off Computer command shuts the computer down completely When you start up again the computer runs a self test and loads the operating system You must open any programs and files you want to use Factors when choosing Turn Off Computer No power is used while the computer is shut down This is the most efficient mode if you will be away from your computer for an extended time Restarti...

Страница 106: ...ddition you can shut down the computer by either pressing the power button or closing the display panel To use either of these methods you first need to turn it on in Toshiba s Power Saver utility 1 Open the Start menu then click Control Panel 2 In the Control Panel window double click the Toshiba Power Saver icon NOTE The Control Panel window must be set to Classic View to access the Toshiba Powe...

Страница 107: ...en I close the lid Set this option to Power Off to have the computer shut down when you close the display panel Sample system power mode settings 5 Click the Override all Modes with settings here button Click DC only to apply the settings only when you are using battery power Click All to apply the settings whenever when you are using battery power or outlet power 6 Click OK ...

Страница 108: ...equire power to maintain the saved information the system settings are retained indefinitely Restoring information from the hard disk takes longer than restoring it from memory When you start up again the computer runs a self test loads the operating system and then returns to the mode in which you left it Factors to consider when choosing Hibernation While in Hibernation mode the computer uses no...

Страница 109: ...the Details button 4 Click the System Power Mode tab 5 Select Hibernation for the options you want When I press the power button SetthisoptiontoHibernation so that the computerwillgo into Hibernation mode when you press the power button When I close the lid SetthisoptiontoHibernation so that the computerwillgo into Hibernation mode when you close the display panel 6 Click the Override all Modes wi...

Страница 110: ... from Hibernation mode press the power button until the on off light turns green The computer returns to the screen you were using If you put the computer in Hibernation mode by closing the display panel you can start it again by opening the display panel Using Standby The Standby command puts the computer into a power saving mode Standby holds thecurrentmode of the computer in memory so that when...

Страница 111: ...d By Sample Turn Off Computer Windows dialog box The computer saves the status of all open programs and files turns off the display and goes into a low power mode The on off light blinks amber indicating the machine is in Standby mode Going into Standby mode more quickly In addition you can put the computer into Standby mode by either pressing the power button or closing the display panel You can ...

Страница 112: ... to put the computer into Standby mode when you press the power button When I close the lid Set this option to Standby to put the computer into Standby mode when you close the display panel 5 Click Override all Modes with settings here 6 In the Set to range dialog box click on one of these options Click DC only to apply the settings only when you are using battery power Click All to apply the sett...

Страница 113: ...en you were using If you put the computer in Standby mode by closing the display panel you can start it again by opening the display panel Toshiba s online resources Toshiba maintains a number of online sites to which you can connect These sites provide information about Toshiba products give help with technical questions and keep you up to date with future upgrades For more information see Contac...

Страница 114: ...114 Learning the Basics Toshiba s online resources Blank Page ...

Страница 115: ...ower standby mode when it is not being used thereby conserving energy Many of these energy saving features have been set by Toshiba or your network administrator We recommend you leave these features active so that your computer will operate at its maximum energy efficiency For more information on managing your power usage see Power usage modes in Windows XP Professional on page 125 This chapter c...

Страница 116: ...RTC battery The RTC battery powers the RTC memory that stores yoursystem configuration settings and the current time and date information It maintains this information for up to a month while the computer is turned off TECHNICAL NOTE For optimum DVD performance always play DVDs while your computer is connected to AC power Charging the batteries To charge the main battery while it is in your comput...

Страница 117: ...ast 24 hours Monitoring battery power The computer s main battery light gives you an indication of the main battery s current charge Green indicates the AC adapter has fully charged the battery Amber indicates the AC adapter is charging the battery Off indicates that the battery is not being charged NOTE Battery life and charge time may vary depending upon power management settings applications an...

Страница 118: ...ge as it operates based on your current rate of power use To show remaining power 1 Click Start then click Control Panel 2 In the Control Panel window double click the Toshiba Power Saver icon NOTE The Control Panel window must be set to Classic View to access the Toshiba Power Saver icon The Toshiba Power Saver Properties dialog box appears Sample Toshiba Power Saver Properties Dialog Box ...

Страница 119: ... capacity and perform its calculations WARNING The computer drains battery power more quickly at low temperatures Check your remaining charge frequently if you re working in temperatures below 50 degrees Fahrenheit The Windows operating system has additional power management options that can be accessed through an icon in the Control Panel For more information see Toshiba Power Saver utility on pa...

Страница 120: ... of battery power save your data and take one of the following actions Suspend or shut down your computer Shut down your computer and replace the main battery with a charged one Install a secondary battery module in the computer s SelectBay Connect your computer to an AC power source Changing batteries CAUTION When handling battery packs don t drop or knock them Also be careful not to damage the c...

Страница 121: ...f the battery lock is in the locked position towards the center of the computer slide it towards the edge of the computer to unlock it 6 Slide the battery release latch to release the battery Battery release latch 7 Pull the discharged battery module out of the computer ...

Страница 122: ...ry with a clean cloth to ensure a good connection 9 Insert the charged battery into the slot until the latch clicks The battery pack has been designed so that you cannot install it with reverse polarity CAUTION If the battery does not slide into the slot easily move the battery release lock to the unlocked position and try again Do not force the battery into position 10 Reset the battery lock to t...

Страница 123: ...ng the battery will cause it to overheat and may do permanent damage Never incinerate a spent battery as this will cause it to explode releasing toxic materials If a battery is leaking or damaged replace it immediately Use protective gloves when handling a damaged battery When you need to replace the main battery use an identical battery from the same manufacturer Maximizing battery life If you re...

Страница 124: ...xplode if not handled or disposed of properly Putting spent batteries in the trash is not only irresponsible it may also be illegal Dispose of the battery as required by local ordinances or regulations Conserving power How long a fully charged battery pack lasts when you are using the computer depends on a number of factors such as How the computer is configured How much you use the hard disk DVD ...

Страница 125: ... power usage mode and discuss each power saving option Power usage modes in Windows XP Professional In Windows XP Professional you can choose from predefined power usage modes or select your own combination of power management options To do this Click Start then Control Panel and click on the Toshiba Power Saver icon NOTE Control Panel must be set to Classic View for the Toshiba Power Saver icon i...

Страница 126: ... re now in the selected mode For more information on setting the battery power usage mode see Toshiba Power Saver utility on page 195 Additional options for power Depending on the amount of time you spend away from external power sources the capacity of one battery pack may be sufficient for your needs However if you need more portable power Toshiba provides these options Purchase extra battery pa...

Страница 127: ...erating system You use its features to start programs find documents set up system components and perform most other computing tasks HINT The illustrated examples in this guide may appear slightly different from the screens displayed by your system The differences are not significant and do not indicate any change in the functionality of your system Finding your way around the desktop Common deskt...

Страница 128: ...vated by double clicking the icon The icons initially displayed on your Windows XP Professional operating system desktop include My Documents Shows the most recent documents you ve created or edited My Computer Shows the file system for your computer and the network if any Network Neighborhood Shows the current Network sites you are connected to Start button Taskbar Icons ...

Страница 129: ...irtualTech A Toshiba utility to help answer technical questions and troubleshoot system problems For more information about VirtualTech see Using VirtualTech on page 232 Your desktop may contain other icons depending on your configuration See Windows XP Professional online Help for more specific information on each icon and how to use it Start button You use the Start button to Start programs Acce...

Страница 130: ...ator which is the address that defines the route to a file on the Web or any other Internet facility Generically it is known as the Web site address System tray The System tray displays icons of tasks or programs that run continuously in the background To learn more about each task position the cursor over the icon for a few moments and a short description of the task appears Typical tasks in the ...

Страница 131: ... transferring files close the programs on both computers Getting help transferring files 1 Click Start then Help and Support 2 Click the Index icon on the toolbar 3 In the dialog box type direct cable connection 4 Follow the online guide instructions Setting up for communications In order to connect to the Internet use an online service or communicate across the telephone lines with another comput...

Страница 132: ...rt on the back of the computer The COM port is a unique identifier the computer uses to communicate with the serial port or other serial devices If you re having trouble connecting through the modem you may need to determine the current COM port name and possibly change it To find out which port your modem is connected to 1 Click Start and click Control Panel Windows XP opens the Control Panel 2 D...

Страница 133: ...shooting sections of your modem and Windows XP documentation 7 Click OK to close the properties dialog box for that specific modem 8 Click OK to close the Modem Properties dialog box 9 Close the Control Panel Connecting the modem to a telephone line Before you can use the modem you must connect it to a standard voice grade telephone line For more information see Connecting to a phone line on page ...

Страница 134: ...tion or contact your authorized Toshiba service provider Setting up the connection To set up an office connection consult your network administrator for network settings and additional considerations To set up a dial up connection use the New Connection Wizard 1 Click Start and point to All Programs 2 Point to Accessories then to Communications and click New Connection Wizard 3 Enter the phone num...

Страница 135: ...OK Your LAN port is now disabled To enable the Ethernet LAN port repeat steps one through four Select the Use this device enable check box and click OK Setting up a wireless connection For information on how to set up a wireless connection refer to your wireless networking device documentation or your network administrator Using Bluetooth Your system may come with an optional Bluetooth module Blue...

Страница 136: ...r Wi Fi Mini PC or Bluetooth module your computer may display a PC Card icon in the desktop s system tray to indicate that it is in use Do not confuse the system tray s icon with other removable PC Card devices you may have installed You can use the system tray s PC Card icon to turn off your Wi Fi Mini PCI or Bluetooth module However if you do so you will need to restart the computer in order to ...

Страница 137: ...con on the desktop 2 Follow the instructions on your screen to set up a connection to the network An overview of using the Internet The following sections give a quick introduction to the Internet and some of its exciting features under these headings The Internet The World Wide Web Internet Service Providers Connecting to the Internet Surfing the Internet Internet features Uploading and downloadi...

Страница 138: ...rvice Providers To connect a computer directly to the Internet many people and businesses use an Internet Service Provider ISP An ISP is a company that has the equipment and the telecommunication lines necessary to maintain an Internet connection You can connect to the Internet by using a telephone and modem or through other higher speed communication methods such as Digital Subscriber Lines DSL c...

Страница 139: ...rfing the Internet Once connected to the Internet the Web browser displays a home page for example your ISP s home page on the Internet or your company s Web site home page To visit a desired Web site type in the Web address The Web address or Uniform Resource Locator URL is a unique identifier for that computer system linked to the Internet Web addresses can also appear within a Web page s text a...

Страница 140: ...ghouse where all the messages are placed like a gigantic bulletin board Online shopping Many Web sites offer products and services for sale Uploading and downloading files from the Internet Transferring files from one computer to another is termed uploading transferring data from your computer to a site on the Web or downloading transferring data from a site on the Web to your computer There are s...

Страница 141: ...access the Windows Media Player you can open it through the Start menu or activate it from the taskbar Sample Windows Media Player screen The CD Player control panel works much like an ordinary compact disc player To play the CD or to pause click the Play pause button on the CD Player control panel To stop the CD click the Stop button WARNING Before using headphones to listen to an audio CD turn t...

Страница 142: ...icon is located on the desktop To prepare a CD R or CD RW disc for file read and write operations use DirectCD Its icon is located on the taskbar You can also right click this icon to eject a disc For details on how to use these programs please refer to the respective Online Help menus Recording sounds You may record sounds as wav files by connecting an external microphone or other sound source to...

Страница 143: ... only record 60 seconds at a time 6 To hear what you just recorded click the Play button 7 To save the file select Save from the File menu Adjusting recording quality The better the quality of the recording the more disk space the sound file requires Experiment to find a balance that fits your needs 1 Open Sound Recorder if necessary Click Start point to All Programs Accessories Entertainment then...

Страница 144: ...kers TECHNICAL NOTE Use amplified speakers that require an external power source Other types of speakers will be inadequate to produce sound from the computer To play back sound files through external speakers or headphones 1 Locate the headphone jack on the computer 2 Using any necessary adapters plug the cable from the headphones or external speakers into the headphone jack The headphone jack re...

Страница 145: ...olume could damage your ears To turn the volume down use the Volume Control program click Start point to All Programs Accessories Entertainment and click Volume Control or Volume Control dial TECHNICAL NOTE You cannot play DVD movies on a TV and on the LCD CRT at the same time Insert a DVD into the drive following the instructions in Inserting compact discs on page 94 The computer automatically de...

Страница 146: ... bottom If the toolbar or status bar does not appear you candisplaythembyfollowingtheinstructionsin Setting general properties on page 154 The toolbar contains basic DVD playback controls Pause the pointer over a button to display its definition The toolbar also contains an adjustment button see Adjusting the color balance on page 163 for more information Time slider Playback speed slider Current ...

Страница 147: ...e it to the right to play the DVD faster Placing the slider in the center plays the DVD at normal speed and enables the audio The audio is automatically muted at any other playback speed The current chapter indicator displays the DVD chapter that is currently playing Using the WinDVD control panel The WinDVD control panel resembles the control panel of a standard home DVD player TECHNICAL NOTE The...

Страница 148: ...er displays the current chapter and elapsed time in hours minutes seconds format From the WinDVD control panel you can open an expanded control panel by clicking the expanded controls button The expanded control panel contains several advanced features See Using WinDVD advanced features on page 158 for an explanation of these features Using the control panel playback buttons Once you have inserted...

Страница 149: ... the control panel counter The DVD continues to repeat until you click the repeat button again and the repeat sym bol no longer displays on the control panel None Eject open the DVD ROM drive disc tray E Pause temporarily stop play ing a DVD Spacebar Play start playing a DVD Spacebar Step move forward through the DVD one frame at a time Each time you click this button the DVD moves forward one fra...

Страница 150: ...ch the desired location click the play button to resume playing the DVD R Previous move to the begin ning of the previous chapter and resume playing the DVD PgUp Next move to the next chap ter and resume playing the DVD PgDn Fast forward move quickly forward through the DVD con tent When you reach the desired location click the play button to resume playing the DVD F Time move to a specific time s...

Страница 151: ...Unsupported features appear gray and you cannot select them A playlist is a customized list of DVD files in the order in which you want to view them For example you may want to create a playlist for DVDs that contain music files so you can play the music selections you want in the order you want to hear them You can only save one playlist at a time Creating playlists 1 On the WinDVD control panel ...

Страница 152: ...e from the playlist select the file in the Selected files list then click Delete To delete the entire list and start over click Delete All 5 When you have finished creating your playlist click Save Playlist to save it You do not assign a name to the saved playlist as you can only save one playlist at a time After saving the playlist a confirmation dialog box appears 6 Click OKto close the confirma...

Страница 153: ...inDVD You can control several general WinDVD characteristics such as whether the toolbar and status bar are visible as well as numerous audio and display features You control these general audio and display features from the Properties dialog box 1 Launch WinDVD if it is not already running 2 On the WinDVD control panel click the Properties button WinDVD displays the Properties dialog box with the...

Страница 154: ...limit the region code cannot be changed again Pay careful attention to the Remaining times until permanent box on the General properties tab 1 To change the region code select the desired option in the Current regions list The Remaining times until permanent box displays the remaining number of times you can change the current region before the setting becomes permanent 2 In the Player settings De...

Страница 155: ...and the computer s hardware configuration some of the control panel features may be unavailable when playing a DVD Unsupported features appear gray and you cannot select them 1 Launch WinDVD if it is not already running 2 On the WinDVD control panel click the Properties button WinDVD displays the Properties dialog box with the General tab on top 3 In the Properties dialog box click the Audio tab T...

Страница 156: ...Dolby Pro Logic Surround sound 3D audio provides standard 3D audio sound If you have four speakers select 4 speaker mode WinDVD distributes four unique sound channels to the speakers providing a true surround sound experience If you have six speakers select 6 speaker mode WinDVD automatically distributes 5 1 sound channels to these speakers for enhanced surround sound If you have an S PDIF complia...

Страница 157: ...lect the Always enable check box to enable Dolby Pro Logic Clear the check box to disable it 7 To test Dolby Pro Logic click the Test button Setting display properties 1 Launch WinDVD if it is not already running 2 On the WinDVD control panel click the Properties button WinDVD displays the Properties dialog box with the General tab on top 3 In the Properties dialog box click the Display tab The Di...

Страница 158: ...he pointer over the control panel then click the secondary button to display a shortcut menu of control panel options You can select a new control panel background color or selectWinDVD to display the control panel in a different format You can also select About to display copyright and version information Using WinDVD advanced features TECHNICAL NOTE The DVD author determines which features the D...

Страница 159: ...navigate the WinDVD menus as you would the arrow keys on the keyboard The center button represents Enter Up Right Down Left Enter Numeric keypad use these buttons to select a chapter by entering the chapter number After you have entered a chapter number click the enter button checkmark on the middile right side of the numeric keypad to begin playing that chapter You can clear an entry by clicking ...

Страница 160: ...st of all the chapters in the currentDVD Selectthechapter you want to play or use the numeric keypad to enter the chapter number C Title button displays a list of all the titles on the current DVD Click the title you want to play T Audio tracks displays a list of all the audio track options This feature is most commonly used with multi language content to change the spoken heard language This butt...

Страница 161: ...a angles displays a list of all the available camera angles Duetodifferencesinthe DVD mastering process some multi angle views may not function properly G Bookmark save an unlimited number of locations on the DVD for quick reference On the bookmark shortcut menu click Add to open the Add Bookmark dialog box Type a bookmark name then click OK The bookmark name appears on the bookmark shortcut menu ...

Страница 162: ...nd the area you wish to view 4 Release the primary button WinDVD automatically fills the window with the selected area Zooming out To return the video to normal size click the zoom button The video also returns to normal size when you reach the zoom limit Panning Once you are zoomed in on an area of the WinDVD video window you can move the zoom window location using the pan feature 1 With the vide...

Страница 163: ...olor control 1 slider to the right to increase the blue and decrease the yellow color values Move the slider to the left to increase the yellow and decrease the blue color values Move the Color control 2 slider to the right to increase the red and decrease the green color values Move the slider to the left to increase the green and decrease the red color values Launching an Internet browser from W...

Страница 164: ...164 Exploring Your Options Exiting WinDVD Exiting WinDVD Click the control panel Exit button or click the Close button to exit WinDVD ...

Страница 165: ...fice computing By connecting optional devices such as an external monitor a full size keyboard and a mouse you can work with your notebook as if it were a standard office computer An optional port replicator allows you to connect your computer quickly and easily t o all the additional equipment you use at the office You can connect any of these optional devices Expansion memory modules Standard 10...

Страница 166: ...PS 2 mouse through the PS 2 port on the back of your computer If you use an optional Y cable you can connect both a mouse and a keyboard to the port You can connect a serial mouse through the serial port on the back of your computer You can connect a USB keyboard and mouse to the USB ports on the back of your computer You can connect a local parallel printer through the parallel port on the back o...

Страница 167: ...cable Connecting a Y cable to the computer s PS 2 port allows you to connect a PS 2 compatible mouse and a PS 2 compatible keyboard simultaneously Alternatively you can connect a USB keyboard and mouse to the USB ports Using a mouse If you prefer you can use a mouse instead of the computer s built in pointing device the AccuPoint II You can use a PS 2 compatible mouse a serial mouse or a USB mouse...

Страница 168: ...ing a mouse after you have started using the computer begin at step 1 Otherwise go to step 2 1 Click Start Turn Off Computer then select Turn Off The operating system shuts off the computer 2 Attach the PS 2 mouse cable to the PS 2 port on the computer HINT Using an optional Y cable allows you to connect a PS 2 mouse and a PS 2 keyboard to the PS 2 port simultaneously 3 Refer to your mouse documen...

Страница 169: ...or the AccuPoint II to work otherwise Auto selected is normally the default option Simultaneous configures both the AccuPoint II mouse and PS 2 mouse to work with the computer at the same time You must reboot the computer for the settings to take effect HINT When Auto selected is the default the computer can t detect a PS 2 mouse if you connect it after booting the computer This can be changed in ...

Страница 170: ...from a computer or electronics store TECHNICAL NOTE If your printer is ECP or IEEE compliant make sure your printer cable is an IEEE 1284 cable Connecting a parallel printer Parallel printers are the most common type of printer in use today These instructions assume you have a parallel printer 1 If you have been using the computer turn it off 2 If the computer is connected to an AC power source di...

Страница 171: ...cts as a translator that turns your document into a form the printer can understand If you are using any non Windows programs set up a printer driver for each of those programs Refer to your program s documentation for more information TECHNICAL NOTE If you have the manufacturer s disk that came with your printer you can use it to install the printer on your computer The manufacturer s disk may in...

Страница 172: ...172 Expansion Options Using a printer Sample Printers and Faxes window 2 Click Add Printer The Add Printer Wizard appears Sample Add Printer Wizard dialog box 3 Click Next ...

Страница 173: ...ther computer 5 Click Next The Add Printer Wizard looks for a Plug and Play printer If it does not locate one click Next The Add Printer Wizard prompts you for the printer port 6 Select the port settings according to the instructions in your printer s documentation and the port to which your printer is connected then click Next The wizard prompts you to select your printer 7 From the list of manuf...

Страница 174: ...ome printers require a specific installation process In this case the Windows XP Professional operating system Add Printer Wizard will display an error message If this happens refer to your printer installation guide for further instructions Using an external monitor Your computer comes with a built in LCD display but you can also connect other external display devices to one of two available vide...

Страница 175: ... to the following section for guidelines on choosing a video cable then refer to Connecting a device to the television jack on page 175 If you re connecting an SVGA monitor skip to Connecting an external monitor on page 176 Selecting video cables To connect a device to the television jack you need a video cable not included with your system For the best video quality always use a properly shielded...

Страница 176: ... Directing the display output when you turn on the computer on page 177 TECHNICAL NOTE If you are connecting to a television you may need to change the display properties Most televisions use or support an 800 x 600 standard resolution Connecting an external monitor You can easily attach an external monitor to your computer if you need a larger screen To do this 1 Connect the video cable to the vi...

Страница 177: ...nitor simultaneously External monitor only Built in display and TV or other external video device simultaneously only when in dual controller mode TV or other external video device only 3 Release the Fn key TECHNICAL NOTE You can also change these settings using the Display Properties Box Set the option for the video controller by clicking Start then Control Panel and clicking Display Choose the S...

Страница 178: ...he edge of the desktop by scrolling to it Using the Wi Fi Mini PCI module Your computer may have an integrated Wi Fi Mini PCI module It is recommended that you do not remove the module from your computer For assistance contact a Toshiba Wireless Authorized Service Partner Accessing the Wi Fi Mini PCI module When using your Wi Fi Mini PCI module your computer may display a PC Card icon in the deskt...

Страница 179: ...eports from your computer or use a mouse instead of the AccuPoint II Connecting cables for each of these devices every time you return to the office is time consuming and inconvenient With an expansion device you can leave external devices connected while you are using your computer away from your desk When you return you can quickly connect your computer and have immediate access to all the devic...

Страница 180: ...180 Expansion Options Using an expansion device Blank Page ...

Страница 181: ...ividual needs Together these allow you to determine certain system details set additional options or change default options This chapter describes the utilities supplied by Toshiba Fn esse Hotkey utility Toshiba Console Toshiba Hardware Setup Toshiba Power Saver utility Enabling Hibernation Setting user passwords Using a supervisor password ...

Страница 182: ...quickly access your programs and files With Fn esse you can assign an Fn key combination to Open a Windows XP Professional operating system program Open a file in its associated program Display a customized folder of programs and or files from which to choose Fn esse also has several keys known as hot keys that perform preassignedoperations Formoreinformation see Hot Keys on page 239 You can assig...

Страница 183: ...yboard or pointing device The method most often used is drag and drop Using drag and drop to assign a key To assign a key to a program or document 1 Start both Fn esse and Windows Explorer or the program supporting drag and drop 2 Resize the Explorer window so that you can see both the Fn esse keyboard and Explorer at the same time 3 In the Explorer window highlight the program or document file yo...

Страница 184: ... the key you just selected To open the program or document press Fn plus the appropriate key from within any Windows program Using the keyboard or pointing device to assign keys To assign a key to open a program or document start Fn esse and either Using the keyboard press and hold the Fn key then press the desired assignment key Using the pointing device move the cursor over the desired key in th...

Страница 185: ...tems that will appear in the popup list 3 To create a popup list with items from various folders or to pick only a few items from a folder create a new folder containing only the desired programs and documents If you are unsure how to do this refer to your Windows XP Professional operating system documentation 4 Click OK to associate the folder with the key you just selected To open a popup list s...

Страница 186: ...button Fn esse displays the Assignment Type dialog box To change the key assignment click Direct or Popup and continue as if you were creating a new assignment To remove the key assignment click Clear Hotkey utility The hotkey utility allows you to receive a confirmation message when you use the hotkey combination for Standby Fn F3 and Hibernation Fn F4 To activate 1 Click Start Toshiba Utilities ...

Страница 187: ...ired option 4 Click OK Toshiba Console The Toshiba Console provides quick access to computer functions and allows you to customize a range of computer settings To access the control panel 1 Click Start then click All Programs 2 Point to Toshiba Console then click the resulting Toshiba Console selection The Toshiba Console window appears ...

Страница 188: ...nsole offers three categories of features Customizing Your Computer Network Security Customizing Your Computer The features available in this category are Power Management Mouse Hotkey assignment for detailed information see Fn esse on page 182 Slim SelectBay Docking Toshiba Hardware ...

Страница 189: ...features available in this category are Supervisor password User password Power Management The Power Management feature enables you to control your computer s power usage regardless of the source and use the many preset power modes or create one yourself To access Power Management through the Toshiba Console double click the Power Management icon The Toshiba Power Saver Properties window appears ...

Страница 190: ...ate and use your own customized mode The preset modes cannot be deleted By changing the options that appear in the Toshiba Power Saver Properties window and clicking OK you can reconfigure that function Any options that you change become effective when you click either OK or Apply Plugged in section This section has a single preset power usage mode Full Power You can create other AC power modes bu...

Страница 191: ...the properties for any of these modes this is not recommended If you need a customized mode create a new mode with the properties you require The DVD Playback mode applies only when the WinDVD 2000 program is playing Creating a new power mode 1 Highlight one of the preset modes 2 Click Create copy 3 A new mode appears with the title Copy Name where Name is the title of the mode you copied Delete t...

Страница 192: ...k system safely from your PC Plus you may remove or install a Slim SelectBay device while your computer is on or hibernating Mobile Extension Service The Warm Undock service allows you to dock or to remove the computer from the Port Replicator without turning the computer off Toshiba Mobile Extensions will provide two selections in the Start menu when the computer is docked to the Port Replicator ...

Страница 193: ...allows the Slim SelectBay device to be removed while the computer is in Standby or Hibernate modes Toshiba Hardware Setup Toshiba Hardware Setup is the Toshiba configuration management tool available through Windows To access it open the Start menu click Control Panel then double click Toshiba HWSetup NOTE The Control Panel window must be set to Classic View to access the Toshiba HWSetup icon Samp...

Страница 194: ...ult settings for the built in LCD display CPU Allows you to enable or disable accessing the processor s serial number Boot Priority Allows you to change the sequence in which your computer searches the drives for the operating system Keyboard Allows you to configure an external keyboard to emulate the Fn function key USB Allows you to enable or disable USB Legacy Emulation LAN Allows you to set ne...

Страница 195: ...r icon is visible By changing the options that appear in the Power Saver Properties dialog box and clicking OK you can reconfigure that function You may choose a power saving management strategy to best suit your computing needs If you are running on batteries and the programs that you are using do not require a lot of system resources you may experience longer work sessions by enabling the Normal...

Страница 196: ... user passwords Setting a password leaves your computer secure so that nobody can access your files You must enter the password before you can work on your computer Toshiba supports the several types of passwords on your computer An instant password Secures your open programs and files when leaving the computer temporarily A power on password Prevents unauthorized users from starting or restarting...

Страница 197: ...tered a user password press Enter If you have registered a user password press Enter Type your password then press Enter If you enter the password correctly the computer returns to where it was when you enabled the instant password Setting a user password To register a password for the instant and power on password functions 2 Open the Start menu click Control Panel then click Toshiba HWSetup NOTE...

Страница 198: ...pe your password in the Enter Password box and click OK TECHNICAL NOTE You have three tries to enter the correct password After an incorrect try an Incorrect Password dialog box will appear Click OK to reenter the password After three incorrect tries this message appears Sorry access denied Reboot is required to regain access You will need to turn off the computer then reboot 12 Click Exit Using a...

Страница 199: ...ears 3 Select Security Sample Toshiba Console Security window 4 Click the Supervisor password icon 5 Select Registered 6 Enter a password then enter it again to verify 7 Click OK Deleting a supervisor password 1 Click Start then click All Programs 2 Point to Toshiba Console then click the resulting Toshiba Console selection The Toshiba Console window appears ...

Страница 200: ...ties Using a supervisor password 3 Select Security Sample Toshiba Console Security window 4 Click the Supervisor password icon 5 Select Not Registered 6 Enter the correct password 7 Click OK then click OK again to exit ...

Страница 201: ...er assistance and solutions use Toshiba s support tool VirtualTech to help diagnose and solve possible problems If all else fails contact Toshiba You will find information on Toshiba s support services at the end of this chapter Problems that are easy to fix Your program stops responding If you are working with a program that suddenly freezes all operations chances are the program has stopped resp...

Страница 202: ...rn off computer 6 The Turn off computer window appears 7 Click Turn off The computer turns off Your program performs an illegal operation If you receive the message Your program has performed an illegal operation you should record the details of the message and consult the software manufacturer To record the details 1 Click the Details button and select the text the operating system displays The D...

Страница 203: ...computer starts but when you press a key nothing happens You are probably in Stand By mode and have a software or resource conflict When this happens turning the power on returns you to the problem instead of restarting the system To clear the condition press Ctrl Alt and Del simultaneously Clearing the condition may get the computer running but it won t solve a resource conflict Read the document...

Страница 204: ...essing any key does not work press Ctrl Alt and Del to restart the computer The Windows operating system is not working Once you are familiar with the desktop and used to the way the operating system responds to your work routine you can easily detect if the operating system is not working correctly For example The operating system fails to start after the Starting Windows XP message appears The o...

Страница 205: ...is section describes each option and when to use the procedure To open the Startup menu 1 Restart your computer 2 Press F8 when your computer starts The Windows Advanced Options menu displays these options Safe Mode Safe Mode with Networking Safe Mode with Command Prompt Enable Boot Logging Enable VGA Mode Last known good configuration your most recent settings that worked Directory Services Resto...

Страница 206: ...u separated the domain names of the address with the forward slash Check the spelling of each name and the syntax of the address carefully A single incorrect letter or missed character comma instead of period dot or other mistake makes it impossible for your browser to locate the site My browser can t find a site I bookmarked The World Wide Web is constantly changing A site you bookmarked yesterda...

Страница 207: ... to troubleshoot the problem first For help on hardware conflicts 1 Click Start then click Help and Support 2 Click the Hardware link in the window s left pane A list of category links appear 3 Click the Fixing a hardware problem 4 Choose from specific topics and follow the steps If there is still a problem the operating system should display a message that explains what the conflict is A plan of ...

Страница 208: ...rrupt Request Channel The channel to the CPU is called an Interrupt Request IRQ because it interrupts what the processor is doing and requests some of the processor s time If two or more devices use the same IRQ the processor does not know which device is asking for attention This causes a hardware conflict Direct Memory Access Similarly the data required by the device is stored in a specific plac...

Страница 209: ...ion of a device CAUTION Changing the default settings using Device Manager can cause other conflicts that make one or more devices unusable Device Manager is a configuration tool for advanced users who understand configuration parameters and the ramifications of changing them Disabling a device 1 Click Start Control Panel Administrative Tools NOTE The Control Panel window must be set to Classic Vi...

Страница 210: ...rol Panel window must be set to Classic View to access the Administrative Tools icon 2 Click the Computer Management icon 3 Click the Device Manager button 4 To view the device s installed double click the device type 5 To view the properties double click the device The operating system displays the Device Properties dialog box which provides an array of tabs They include TheGeneraltab whichprovid...

Страница 211: ...nstall the memory module following the instructions in Adding memory on page 64 and making sure it is seated properly 5 Check for the error again 6 If the error recurs remove the memory module entirely and check for the error again If removing the memory module eliminates the error the memory module may be faulty If the error recurs without the memory module installed the error is not caused by th...

Страница 212: ...mputer The main battery may not be inserted correctly in the computer Turn off the computer remove the battery clean the contacts with a soft dry cloth if necessary and replace the battery The battery may be too hot or too cold to charge properly If you think this is the probable cause let the battery reach room temperature and try again If the battery has completely discharged it will not begin c...

Страница 213: ...or nothing happens the problem may be related to the keyboard itself The keyboard produces unexpected characters A keypad overlay may be on If the numeric keypad or cursor control light is on press Fn and F10 simultaneously to turn off the cursor control light or press Fn and F11 simultaneously to turn off the numeric keypad light If the problem occurs when both the keypad overlays are off make su...

Страница 214: ... and press F5 twice again to advance through the display options If you are using an external monitor Check that the monitor is turned on Check that the monitor s power cable is firmly plugged into a working power outlet Check that the cable connecting the external monitor to the computer is firmly attached Try adjusting the contrast and brightness controls on the external monitor Press Fn and F5 ...

Страница 215: ...t work with your hardware Reduce the size of the color palette to one that is supported by the computer s internal display To change the display properties 1 Point at the desktop and click with the secondary button The Display Properties window appears 2 Click Properties then click the Settings tab 3 Adjust the screen resolution and or color quality 4 Click OK The display mode is set to Simultaneo...

Страница 216: ...on the disk and repairs any damage it finds To run Error checking 1 Click Start then click My Computer 2 Right click the drive you want to check and select Properties from the menu The drive s properties box appears 3 Click the Tools tab 4 Click the Check now button The Check Disk All Apps box appears 5 You can choose one or both options Automatically fix file system errors Scan for and attempt re...

Страница 217: ...skette drive You may already have a diskette in the drive Make sure the drive is empty You may be inserting the diskette incorrectly Hold the diskette with the hub side facing down and insert it so that the metal head window cover goes into the drive first The metal cover or a loose label may be obstructing the path into the drive Carefully inspect the diskette If the metal cover is loose replace ...

Страница 218: ...c down until it locks on the spindle Close the drive tray carefully making sure it has shut completely You press the disc eject button but the drive tray does not slide out Make sure the computer is connected to a power source and turned on The DVD ROM or DVD ROM CD RW drive eject mechanism requires power to operate To remove a disc without turning on the computer use a narrow object such as a str...

Страница 219: ...erformance is poor Make sure your system s A C adaptor is plugged in and the system s power setting is on full The Root or Title menu does not open Most DVD titles have one or both of the Root and Title menus If one menu button appears to do nothing try the other menu button WinDVD performance decreases after making a system change DVD playback performance is dependent upon several system resource...

Страница 220: ...ack 2 EnsuringDMAisturnedon See Playback performance is poor on page 219 3 If you have installed new hardware such as a new graphics card or audio card ensure the component s drivers support Microsoft DirectX 8 1 or higher and WinDVD Contactthe manufacturer of the component 4 Verifying that your display driver resolution color depth and refresh rate are optimal for DVD playback Some systems do not...

Страница 221: ... sampling rate support DirectX 8 1 or higher Source Microsoft DVD ROM drive with DMA enabled only available with Microsoft OSR 2 1 or above with PIXX 4 0 and USB support added WinDVD software WinDVD error messages This table offers descriptions and resolutions for error messages that may appear when using WinDVD Error message and additional information Resolution The disc in the DVD ROM drive is n...

Страница 222: ...rd or audio compo nent within the system The problem may be one of the following The audio card is faulty There is a problem with the audio driver Check installation of the sound card drivers WinDVD cannot display the selected resolution due to system limitations The screen size exceeds the allowable display limit There are not enough sys tem resources to play the DVD at the selected setting Alter...

Страница 223: ... Report the problem and any error code to your supplier s Technical Support This is usually a rare title specific problem There is a problem with the copy protection system within the DVD ROM drive Playback cannot con tinue The DVD ROM drive failed to authenticate authorize playback of the DVD disc There may be a problem with the DVD ROM drive Try to play another disc Contact your supplier s Techn...

Страница 224: ...se DVD content from the appropriate region If appli cable on your system refer to the Help file for how to change the Region Code Permission to play is denied Please check the Parental Control setting The Parental Control set ting of WinDVD is lower than the Parental Control level of the content being played Playback of the DVD disc is not authorized Change the Parental Con trol level in the DVD O...

Страница 225: ...volume is too loud Adjust the volume control Changing the settings for the Record Monitor feature in the Recording Control Utility default Off or the Mute feature in the This file appears to contain unsupported data Please refer to the Sup ported Formats section of the WinDVD Help file and ensure that this file contains valid data The drive or disc cannot be found This may be caused by one of the ...

Страница 226: ...o determine the type of card and the resources it requires by reading its Card Information Structure CIS Sometimes the CIS contains enough information for you to use the card immediately Other cards must be set up before you can use them Use the Windows XP PC Card PCMCIA Wizard to set up the card Refer to your Microsoft documentation for more information or refer to the documentation that came wit...

Страница 227: ...lfunctions again it may be defective Resolving PC Card problems Here are some common problems and their solutions The slots appear to be dead PC Cards that used to work no longer work Check the PC Card status 1 Click Start 2 Click My Computer icon with the secondary button then click Properties The System Properties dialog box appears 3 Click the Hardware tab 4 Click the Device Manager button 5 Do...

Страница 228: ...another without turning the computer off fails Follow this procedure before you remove a PC Card 1 Double click the PC Card icon on the taskbar 2 Click Safely remove xxxx where xxxx is the identifier for your PC Card The operating system displays a message that you may safely remove the card 3 Remove the card from the slot The system does not recognize your PC Card Refer to the PC Card documentati...

Страница 229: ...as shown in Setting up your printer on page 171 You may have connected the printer while the computer is on Disable Stand By mode turn off the computer and turn off the printer Turn the printer back on make sure it is on line then turn the computer back on Try printing another file For example you could create and attempt to print a short test file using Notepad If a Notepad file prints correctly ...

Страница 230: ...ngth and stop bits specified in the communications program It should be set up to transmit at 300 1200 2400 4800 9600 14400 28800 33600 bps bits per second or higher Refer to the program s documentation and the modem manual for information on how to change these settings TECHNICAL NOTE Disable Call Waiting before you connect through the modem Call Waiting interrupts data transmission The modem is ...

Страница 231: ...cking up all files to tape weekly and copying critical files to diskette on a daily basis If you have installed your own programs you should back up these programs as well as your data files If something goes wrong that requires you to reformat your hard disk and start again reloading all your programs and data files from a backup source will save time Read the user s guides It s very difficult to...

Страница 232: ...werful support tools that can Retrieve hardware and software details whenever you need system configuration information Check and inform you of any updates whenever you go online To load an update click yes Run a detailed system report that harvests and compiles your system s hardware and software information This report is also accessible to Toshiba s InTouch Center technicians to reference when ...

Страница 233: ...hnical support group for their assistance Consult the dealer from whom you purchased your computer and or program Your dealer is your best source for current information For the number of a Toshiba dealer near you in the United States call 800 457 7777 Contacting Toshiba If you still need help and suspect that the problem is hardware related Toshiba offers a variety of resources to help you 1 Star...

Страница 234: ...allation diskettes or CD ROM Information about what you were doing when the problem occurred Exact error messages and when they occurred For technical support call the Toshiba InTouch Center Within the United States at 800 457 7777 Outside the United States at 949 859 4273 Other Toshiba Internet Web sites toshiba com Worldwide Toshiba corporate site computers toshiba com Marketing and product info...

Страница 235: ...n 40 B 1930 Zaventem Belgium Brazil Semp Toshiba Informática Silveria Rodrigues 52 05047 000 Sao Paulo SP Brazil Canada Toshiba Canada Ltd 191 McNabb Street Markham Ontario L3R 8H2 Canada Central America Caribbean TechData Latin America 8501 NW 17th Street 101 Miami FL 33126 United States Chile CHS Promark Chile Ltda J Joaquin Aguirre Luco 1339 Huechuraba Santiago Chile Colombia CHS Promark Colomb...

Страница 236: ...g Germany Greece Ideal Electronics S A 109 Syngrou Avenue 176 71 Kalithea Athens Greece Hungary Technotrade Kft Szerencs utca 202 1147 Budapest Hungary Ireland Same as United Kingdom Italy Progetto Elettronica 92 s r l Viale Certosa 138 20156 Milano Italy Japan Toshiba Corporation PCO IO 1 1 Shibaura 1 Chome Minato Ku Tokyo 105 8001 Japan Luxembourg Same as The Netherlands Mexico Toshiba de México...

Страница 237: ... Bielsko Biala 01 059 Warszawa Poland Portugal Quinta Grande Assisténcia Técnica Informática Lda Av Moinhos no 15A Ur Quinta Grande 2720 Alfragide Portugal Singapore Toshiba Singapore Pte Ltd 438B Alexandra Rd 06 01 Alexandra Technopark Singapore 119968 Slovakia HTC a s Dobrovicova 8 81109 Bratislava Slovakia Slovenia Inea d o o Ljubljanska 80 61230 Domzale Slovenia Spain Toshiba Information Syste...

Страница 238: ... Weybridge Business Park Addlestone Road Weybridge KT15 2UL United Kingdom United States Toshiba America Information Systems Inc 9740 Irvine Boulevard Irvine California 92618 United States Venezuela InterPC de Venezuela Esquina Calle 4 y Calle 8 Edificio Tepal Piso 3 La Urbina Caracas 1073 Venezuela The Rest of Europe Toshiba Europe I E GmbH Hammfelddamm 8 D 4 1460 Neuss Germany ...

Страница 239: ... and off Hot keys have a legend on or above the key indicating the option or feature the key controls Volume Mute Instant password security Fn This hot key enables disables volume mute on your computer When volume mute is enabled no sound will come from the speakers or headphones Fn This hot key blanks the display ...

Страница 240: ...instant security Using the mouse or any key will make the screen saver password dialog box appear and you can then type in either a user or supervisor password For the Windows XP operating system you type the user or supervisor password into the Windows security screen dialog box To activate the password feature 1 Click Start then click Control Panel 2 Double click the Display icon NOTE The Contro...

Страница 241: ...in the operating system under battery power are Long Life Normal and High Power DVD Playback Presentation and Super Long Life Sample power usage modes The power usage mode in the Windows operating system under AC power is Full Power only The properties of each mode are set in the Toshiba Power Management utility For more information see Power Management on page 115 ...

Страница 242: ... into Stand By mode A message box is displayed by default to confirm that the computer is going into Stand By mode This message box can be set so it doesn t display Sample Stand By confirmation box For more information about Stand By mode please see Using Standby on page 110 ...

Страница 243: ...t a message box is displayed by default to confirm the computer is going into Hibernation mode The message box can be set so it doesn t display Sample Hibernation confirmation box If Hibernation mode is disabled this hot key will not respond For more information on Hibernation mode see Enabling Hibernation on page 195 ...

Страница 244: ...taneously External monitor only Built in display panel and external video device simultaneously External video device only Sample display options window In order to use a simultaneous mode you must set the resolution of the internal display panel to match the resolution of the external display device Fn This hot key decreases the screen brightness Fn This hot key increases the screen brightness ...

Страница 245: ...can toggle between are Wi Fi enabled This enables the Wi Fi module Bluetooth enabled This enables just the Bluetoothmodule See Using Bluetooth on page 135 for instructions on setting up Bluetooth Sample wireless modes window Fn This hot key turns the cursor control overlay on and off Fn This hot key turns the numeric overlay on and off Fn This hot key turns the scroll lock feature on and off ...

Страница 246: ...246 ...

Страница 247: ...rsal power supply you can use worldwide This appendix shows the shapes of the typical AC power cable connectors for various parts of the world USA and Canada UL approved CSA approved United Kingdom BS approved Australia AS approved Europe VDA approved NEMKO approved ...

Страница 248: ...248 Blank Page ...

Страница 249: ... the measure of the screen s dimensions in terms of horizontal and vertical pixels in graphics modes or rows and columns of characters in text modes LCD Colors is the maximum number of simultaneous colors or shades of gray that the mode can display on the built in screen CRT Colors is the maximum number of simultaneous colors or shades of gray that the mode can display on an external monitor Max V...

Страница 250: ...on interlaced 16M colors XGA 800 x 600 256 64K 16M 256 64K 16M 60 75 85Hz non interlaced 16M colors XGA 1024x 768 256 64K 16M 256 64K 16M 60 75 85Hz non interlaced 16M colors XGA 1280x 1024 256 64K 16M virtual display 256 64K 16M 60 75Hz non interlaced 16M colors XGA 1600x 1200 256 64K virtual display 256 64K 60Hz non interlaced 64K colors ...

Страница 251: ...pear in this user s guide AC alternating current BIOS basic input output system bps bits per second CD compact disc CD ROM compact disc read only memory CD RW compact disc rewrite memory CMOS complementary metal oxide semiconductor COM1 communications port 1 serial port COM2 communications port 2 serial port CPU central processing unit ...

Страница 252: ...able FCC Federal Communications Commission FIR fast infrared GB gigabyte HDD hard disk drive HTML Hypertext Markup Language IEEE Institute of Electrical and Electronics Engineers I O input output IRQ interrupt request ISP Internet service provider KB kilobyte LAN local area network LCD liquid crystal display LPT1 line printer port 1 parallel port LSI large scale integration MB megabyte MIDI Musica...

Страница 253: ...e is one thin film transistor TFT for each cell This type of display works well with notebook computers because of its shallow depth and high quality color Active matrix displays are viewable from wider angles than most passive matrix displays adapter A device that provides a compatible connection between two units For example the computer s internal display adapter receives information from the s...

Страница 254: ...ght bits is a byte See also byte bits per second bps A way of measuring the speed at which information is passed between two devices The basic measure used in modem communications bps is similar but not identical to the baud rate See also baud rate boot To start the computer The term boot originates from bootstrap program as in pulling itself up by its bootstraps a program that loads and initializ...

Страница 255: ...ny letter number or symbol you can use on the computer Some characters are non printing characters such as a paragraph break in a word processing program A character occupies one byte of computer storage chip A small piece of silicon containing computer logic and circuits for processing memory input output and or control functions Chips are mounted on printed circuit boards click To press and rele...

Страница 256: ...g device A component attached to the computer Devices may be external outside the computer s case or internal inside the computer s case Printers disk drives and modems are examples of devices device driver A program called a driver that permits a computer to communicate with a device dialog box An on screen window displayed by the operating system or a program giving a direction or requesting inp...

Страница 257: ...ouse button rapidly twice without moving the AccuPoint or mouse In the Windows operating system this refers to the primary AccuPoint control button or left mouse button unless otherwise stated double density diskette A 3 5 inch diskette that can hold up to 720 KB ofinformation half the capacity of a high density diskette See also diskette high density diskette download 1 In communications to recei...

Страница 258: ...disk that keeps track of the location of files stored on the disk file name A set of characters that uniquely identifies a file within a particular folder It consists of two parts the actual name and the file name extension See also file extension file extension The three characters following the period pronounced dot at the end of a file name The extension indicates the type of file Examples are ...

Страница 259: ...e By default the hard disk is referred to as drive C hardware The physical components of a computer system Compare software Hibernation A feature of many Toshiba notebook computers that saves to the hard disk the current state of your work including all open files and programs when you turn the computer off When you turn on the computer again your work is returned to the same state it was when the...

Страница 260: ...d faster than main memory See also cache CPU cache L1 cache LAN local area network A group of computers or other devices dispersed over a relatively limited area and connected by a communications link that enables any device to interact with any other on the network liquid crystal display LCD A type of display that uses a liquid substance between two transparent electrode panels When an electric c...

Страница 261: ... and back to digital enabling information to pass back and forth between digital computers and analog telephone lines motherboard The main circuit board in the computer It contains the processor memory and other primary components MS DOS prompt See system prompt multimedia A combination of two or more media such as sound animation and video in a computer program or presentation Musical Instrument ...

Страница 262: ... his or her identity to the computer or the network PC Card A credit card sized expansion card designed to increase the capabilities of notebook computers PC Cards provide functions such as modem fax modem hard disk drive network adapter sound card or SCSI adapter peripheral Any device such as a printer or joystick that is attached to the computer and controlled by the computer s CPU pixel Short f...

Страница 263: ...ble disk resolution A measure of the sharpness of the images that can be produced by a printer or displayed on a screen For a printer resolution is expressed in dots per inch dpi For a screen it is expressed as the number of pixels available horizontally and vertically restart Synonymous with reboot To reset the computer by reloading the operating system without turning the computer off See also b...

Страница 264: ...k A diskette that contains the operating system files needed to start the computer Any diskette can be formatted as a system disk A system disk is also called a bootable disk or a startup disk Compare non system disk system prompt The symbol in MS DOS generally a drive letter followed by a greater than sign indicating where users are to enter commands T TFT display See active matrix display U univ...

Страница 265: ...erm for the IEEE 2 11b communication protocol to permit an Ethernet connection using wireless communication components World Wide Web www The worldwide network of Web sites linked together over the Internet A user of the Web can jump from site to site regardless of the location of the computer hosting the site See also Internet ...

Страница 266: ...266 Blank Page ...

Страница 267: ... Wizard 171 adjusting recording quality 143 Alt keys 84 approved countries for use 10 arm wrist strain 43 assign keys Fn esse 184 audio wav files 142 audio features 140 audiovisual features 144 B backing up files 82 batteries changing 116 running on 191 battery caring for 123 changing 120 charge does not last 213 charging 47 52 charging before use 44 conserving power 124 disposal 124 not charging ...

Страница 268: ...ls DMA 208 IRQ 208 character keys 83 charging the battery 47 checking device properties 210 class 1 laser product label 11 communications network connection 134 setting up 103 system resources 208 compact disc positioning 95 compact discs handling 96 inserting 94 problem solving 218 removing 96 compact disk read write 2 computer customizing 188 non system disk or disk error message 204 not accessi...

Страница 269: ...s 214 external monitor not working 215 external adjusting 178 LCD 35 screen is blank 214 display device connecting 56 external 55 video 55 display features 34 display hot key 177 display latch 28 display modes kot key 244 display output settings 57 177 display panel closing 52 opening 28 34 display panel closed front 28 display panel open front 34 display external adjusting 58 disposal information...

Страница 270: ...rs 63 F fan CPU 29 FAT File Allocation Table 216 fax branding 5 FCC Notice Declaration of Conformity Information 3 FCC requirements 4 file extensions 92 file names 91 file backing up 82 files backing up 102 printing 92 restoring 103 saving 90 FN keys 84 Fn esse 50 starting 182 using to assign keys 184 Fn esse program 182 assigning a key 182 using drag and drop 183 function keys 84 H hard disk driv...

Страница 271: ...iance to RSS 210 8 Industry Canada requirement 4 infrared port 28 Installation 4 installation memory module 66 modem 4 installing memory modules 64 mouse 60 instant passwords using 197 instructions for IC CS 03 certified equipment 6 interference statement 9 Internal External mode 215 Internet bookmarked site not found 206 slow connection 206 URL address not found 206 internet connecting to 138 fea...

Страница 272: ...mlock 38 on off 36 SelectBay indicator 37 light wireless indicator 37 lighting 42 lights indicator panel 36 lock battery 33 PC Card 32 34 lock cable PORT Noteworthy computer 31 M main battery light 37 make sure you have everything 27 memory adding 64 expansion slots 66 problem solving 211 memory module 33 133 MHz FSB DDRAM 64 installation 66 removing 69 memory module sizes 65 microphone 142 extern...

Страница 273: ...l port 30 parallel printer connecting 166 password deleting a supervisor 199 disabling a user 198 supervisor set up 198 passwords instant using 197 setting user 196 PC Card checklist 227 CIS Card Information Structure 226 computer stops working 228 configuring 76 errors 228 hot swapping 98 hot swapping fails 228 inserting 73 modem default 132 not recognized 228 problem solving 226 227 removing 75 ...

Страница 274: ... solving 229 set up 171 using 169 printer serial 30 printing a file 92 problem solving AC power 212 accessing disk drives 203 battery charge does not last 213 battery not charging 212 can t insert diskette in drive 217 can t read a diskette 218 cannot access CD DVD 218 changing display properties 215 checking device properties 210 compact discs not running correctly 218 computer hangs when PC Card...

Страница 275: ...or disk error 204 217 PC Card 226 checklist 227 error occurs 228 hot swapping fails 228 not recognized 228 slots appear dead 227 power and batteries 211 printer 229 program not responding 201 program not working properly 217 screen does not look right flickers 214 system resources 208 trouble prevention 230 URL address not found 206 using Startup options 205 VirtualTech 232 warning resume failure ...

Страница 276: ...142 recording quality 143 recording sounds 142 recycle bin icon 129 region code 154 regulatory information 8 right side 31 RJ 11 jack 79 RJ45 jack 30 Run dialog box 89 S safety icons 24 safety instruction CD ROM 10 DVD ROM 10 safety instructions DVD ROM CD RW 10 safety precautions battery disposal 124 saving files 90 screen 35 blank 214 doesn t look normal flickers 214 scroll button 50 SD Media 76...

Страница 277: ... 134 setting up software 50 setting up your computer 44 shut down 52 shutting down more quickly 106 Slim SelectBay docking 192 removing module 71 Slim SelectBay indicator light 37 Slim SelectBay modules 69 Slim SelectBay release 33 Slim SelectBay slot 33 slot PC Card 32 SD Media card 32 Slim SelectBay 33 software setting up 50 sound problem solving 225 sound recording 143 sounds recording 142 SPAN...

Страница 278: ...arting up the computer from Shut down 108 from Standby 113 Startup menu problem solving 205 status bar WinDVD 147 status lights 28 36 stereo speaker 31 stored data protection 2 supervisor password deleting 199 supervisor password set up 198 switch power Bluetooth 32 Wi Fi 32 system indicator panel 28 36 system requirements WinDVD 221 System Setup 203 system tray 130 T taskbar 130 telephone company...

Страница 279: ...shiba Virtual Tech icon 129 trademarks 12 transferring files 131 transferring information between computers 131 turning off the computer 52 105 turning on the computer 47 turning on the power 48 type of service telephone 4 U underside 33 Universal Resource Locator URL 130 USA Federal Communications Commission FCC compliance with Part 15 8 USB Universal Serial Bus hot swapping 29 ports 29 USB mouse...

Страница 280: ...ctor adjusting display 58 video window 150 video out port 31 VirtualTech 201 using 232 volume mute hot key 239 W Warm Undock 192 warranty SelectServ 26 Web sites 233 234 Support Online 207 Wi Fi wireless networking 133 Wi Fi Mini PCI modules 178 Wi Fi power switch 32 Windows Explorer 88 Windows Media Player 141 Windows Millennium Edition Help 207 Windows Standby 52 Windows Start menu 87 Windows XP...

Страница 281: ...ror messages 221 exiting 164 launching an Internet browser from 163 not functioning properly 221 optional settings 151 performance is poor 219 region code 154 slow playback 220 starting 145 system requirements 221 video content poor 220 WinDVD control panel 147 WinDVD status bar 147 WinDVD toolbar 146 wireless indicator light 37 wireless interoperability 7 wireless LAN your health 7 wireless netwo...

Отзывы: