background image

Installing the product

12

2


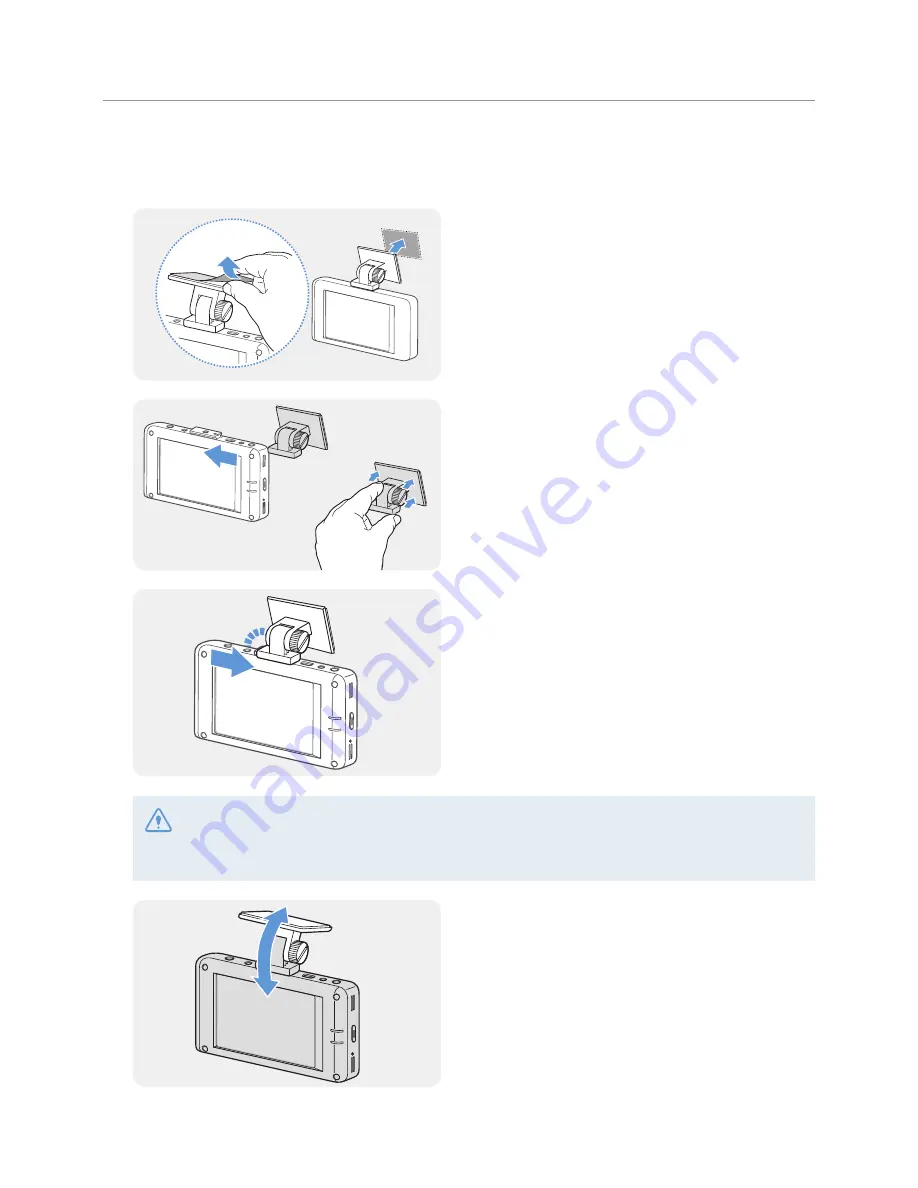
After determining the installation location, wipe the installation location on the windshield with dry 
cloth.

3


Remove the film from the adhesive tape on the 
bracket, and then press the tape to the installation 
location.

4


Remove the product from the bracket and push the 
bracket against the windshield to ensure that the 
bracket is firmly fixed.

5


Align the product to the bracket, and then slide it 
into the locking position until you hear a click. 

• 

The product may fall and be damaged during vehicle operation if it is not firmly fixed to the bracket.

• 

If you need to remove the bracket from the windshield to alter the installation location, be careful not 
to damage the windshield’s film coat.

6


Set the vertical angle of the camera appropriately 
and temporarily fix it by lightly turning the fixing 
screw.

The camera angle must be adjusted again after the 
installation is complete. Do not completely tighten 
the fixing screw yet.

Содержание QX800

Страница 1: ...ARD This product records videos while the vehicle is operating Read and follow the instructions in this guide to properly use and maintain the product User Guide QX800 2 Channel Dashboard Camera QHD 1...

Страница 2: ......

Страница 3: ...settings some product features may not be supported and different firmware versions may influence the product s performance or features About the user guide The information provided in the guide may c...

Страница 4: ...ome screen 28 3 10Playing the videos 29 3 10 1 Playing on the product 29 3 10 2 Checking the video file storage location31 4 Using the vehicle diagnosis and management feature DriveX 33 4 1 Setting th...

Страница 5: ...vehicle diagnosis and management feature DriveX 53 6 4 1 Setting the gas price 53 6 4 2 Setting the vehicle information 53 6 5 Configuring the system settings 54 6 5 1 Setting the display language 54...

Страница 6: ...or battery depletion Ensure that the product is out of the reach of children and pets If the product breaks it may result in fatal damage Do not expose product to direct sunlight or intense light The...

Страница 7: ...rd Quick start guide Rear camera cable The memory cards are installed in the product at the factory The standard items may change without prior notice 1 1 2 Accessories sold separately Cigar socket po...

Страница 8: ...GPS connector Used to connect the external GPS module optional for additional features Fixing bracket connector Used to connect the fixing bracket OBD2 connector Used to connect the OBD2 cable optiona...

Страница 9: ...n error occurs Power button Press to turn on or off the display Press and hold to turn the product on or off Gently touch the screen to make inputs on the touchscreen The screen may be damaged if you...

Страница 10: ...then push the memory card into the slot until you hear a click Before inserting the memory card ensure that the metal contacts on the memory card are facing toward the lens of the product Ensure that...

Страница 11: ...eld 20 cm If a GPS navigating device installed on the dashboard is present its GPS reception may be affected depending on the dashboard camera s installation location Adjust the installation location...

Страница 12: ...ign the product to the bracket and then slide it into the locking position until you hear a click The product may fall and be damaged during vehicle operation if it is not firmly fixed to the bracket...

Страница 13: ...t the continuous power cable to the vehicle contact a Thinkware premium store or fitting service center If the product is not installed properly the product may be damaged or electrical fire or electr...

Страница 14: ...ter 5 Place the fuses back into their locations on the fuse panel connecting each fuse leg with the wire to the output contact point and taking care not to change the fuse position When you install th...

Страница 15: ...s LED and the voice guide are turned on and the Caution screen will appear on the display for 5 seconds 8 When the Caution screen is closed check the camera angle through the LCD display 9 1 8 1 4 Adj...

Страница 16: ...cable yourself Doing so may damage the product or the vehicle For safe driving arrange the cables to prevent the driver s vision from being obstructed or interfering with driving 2 Turn on the ACC or...

Страница 17: ...e rear camera 2 2 1 Selecting an installation location Select the location on the rear windshield where there is no defrost grid wire and the camera can record the entire rear view For vehicles with a...

Страница 18: ...e rear camera to the rear windshield After securing the rear camera to the windshield it is hard to remove the camera or change the installation location due to the strong adhesive 2 2 1 Remove the fi...

Страница 19: ...s to prevent the driver s vision from being obstructed or interfering with driving 3 Turn on the ACC or starts the engine to check if the product is powered on After the product is powered on the Stat...

Страница 20: ...firmly to secure it Before installation make sure the external GPS module s cable length is sufficient and check the cable routing path 3 Connect the external GPS module to the product s GPS connector...

Страница 21: ...recording starts when you start driving While driving videos are recorded continuously and stored as 1 minute segments When you finish driving and turn off the engine the recording mode switches to p...

Страница 22: ...he operating status even when the LCD is turned off by checking the LED indicators on the rear of the product STATUS REC PWR Status LED STATUS Indicates the operating status of the product Recording L...

Страница 23: ...le is detected a video is recorded for 20 seconds from the moment 10 seconds before the detection to the moment 10 seconds after the detection and stored in the Incident continuous folder light on fli...

Страница 24: ...on the Live view screen File List Manual Recording and select a video to play 3 6 Using parking mode When the product is connected to the vehicle via the continuous power cable the operating mode is s...

Страница 25: ...ker Time Lapse No impact detected A videos is recorded at a rate of 2 fps for 10 minutes compressed into a 2 minute long file and stored in the Parking record folder Since the video file recorded with...

Страница 26: ...tton on the Live view screen Settings Record settings Setting button next to Ultra Night Vision and then select the checkbox for Continuous Mode or Parking Mode or both to select the recording mode Th...

Страница 27: ...camera is recording Displays the video that the front camera is recording Tap the screen to hide or display the Menu buttons Displays the current date and time Activate or deactivate the voice record...

Страница 28: ...isplays the GPS icon when the external GPS module optional is installed Displays the current date and time Displays the volume level View and play the recorded videos Refer to 3 10 Playing the videos...

Страница 29: ...e Live view screen 1 minute long continuous videos that are recorded during continuous recording Videos that are recorded when impacts are detected during continuous recording Videos that are recorded...

Страница 30: ...n screen Move to the File list screen Turn the video sound on or off Displays the playback status Play the previous file Move the current video to the Archive Play or pause a video Play the next file...

Страница 31: ...eo files incident recording and manual recording files will not be deleted When the storage is insufficient for event video files only Event video files will be deleted chronologically from oldest to...

Страница 32: ...ditions F Front camera R Rear camera GS Intelligent impact detection Ensure that the product is turned off before removing the memory card The recorded video files may be lost and the product may be d...

Страница 33: ...played at the bottom and the DriveX button is activated on the left side of the Live view screen If the DriveX icon is not displayed or the DriveX button is deactivated check the OBD2 cable connection...

Страница 34: ...he DriveX screen View the vehicle s detailed diagnostics data Displays the vehicle s current fuel injection rate coolant temperature transmission fluid temperature and battery voltage Displayed when t...

Страница 35: ...nosis results as a reference only If a breakdown is reported by the diagnosis visit a car repair shop and check the vehicle 4 4 Viewing the driving statistics To view your vehicle s driving statistics...

Страница 36: ...e on average Second class 15 9 13 8 km L on average Third class 13 7 11 6 km L on average Forth class 11 5 9 4 km L on average Fifth class 9 3 km L or lower on average To delete all driving statistics...

Страница 37: ...he alignment of the screen to use ADAS Identifying the vehicle type On the Live view screen tap the Home button Settings Road safety settings and then tap the button next to Vehicle type under Road Sa...

Страница 38: ...fety settings and then tap the Setting button next to Safety Camera Alert to switch to OFF This feature may not be available in some countries 5 2 The lane departure warning system LDWS When the vehic...

Страница 39: ...not turned on and the vehicle leaves its lane at a GPS speed over 50 km h External GPS module OBD2 cable An alarm will sound when the turn signals are not turned on and the vehicle leaves its lane at...

Страница 40: ...a preliminary collision hazard is detected Secondary forward collision warning Displayed when the distance to the vehicle ahead decreases after a preliminary collision warning Preliminary forward coll...

Страница 41: ...ed forward collision warning will be displayed on the LCD even when the LCD is turned off To deactivate the uFCWS or change the warning sensitivity tap the Home button on the Live view screen Settings...

Страница 42: ...the rear bumper of your vehicle There is a vehicle in the left side blind spot There is a vehicle in the right side blind spot The BSD warning left The BSD warning right For your safety the BSD warnin...

Страница 43: ...ar after 5 seconds or you can close the message screen by tapping OK 5 8 The Rear View In Gear R feature OBD2 installation required When the gear of the vehicle equipped automatic transmission is set...

Страница 44: ...he rear camera You can set the brightness of the rear view recording Refer to the following instructions to set the brightness 1 On the Live view screen tap the Home button Settings Camera Settings an...

Страница 45: ...change is made If the continuous impact detection sensitivity is too high the product will record a video even when a minor impact caused by the road condition and your driving is detected This may sh...

Страница 46: ...g impact sensitivity You can set the detection sensitivity for recording when impact is detected while parking Refer to the following instructions to set the parking impact sensitivity 1 On the Live v...

Страница 47: ...ton next to Off Timer 2 Switch the button to 6 Hour 12 Hour 24 Hour 48 Hour or OFF The new setting will take effect immediately The vehicle battery will not be charged while the vehicle is parked If y...

Страница 48: ...senger vehicles set the voltage to 23 2 V 24 6 V If the Off voltage value is too low the product may consume the battery completely depending on the conditions like the vehicle type or temperature 6 2...

Страница 49: ...rt System 2 You can switch the button to ON or OFF to activate or deactivate the feature The new setting is applied to the system as soon as a change is made 6 3 2 Identifying the vehicle type Refer t...

Страница 50: ...tializing the lane departure warning feature Refer to the following instructions to initialize the lane departure warning guide lines 1 On the Live view screen tap the Home button Settings Road safety...

Страница 51: ...ime video image and warn the driver Refer to the following instructions to set the detection sensitivity or activate or deactivate this feature 1 On the Live view screen tap the Home button Settings R...

Страница 52: ...the rear view image will be reversed when the blind spot information feature is activated 6 3 11 Setting the rear view in gear R This feature provides the rear view of the vehicle when the vehicles g...

Страница 53: ...ueling cost 2 Enter the fuel price per liter and tap OK The new setting is applied to the system as soon as a change is made 6 4 2 Setting the vehicle information Detailed vehicle information is essen...

Страница 54: ...ce Follow the instructions to adjust the volume 1 On the Live view screen tap the Home button Settings System Settings and then tap the Setting button next to Volume 2 Switch the button to 1 2 3 or OF...

Страница 55: ...ust the LCD Auto Off time 1 On the Live view screen tap the Home button Settings System Settings and then tap the Setting button next to LCD Auto Off 2 Switch the button to 10 min 30 sec or OFF The ne...

Страница 56: ...s you to return all the system settings to factory default settings Follow the instructions to initialize the system settings 1 On the Live view screen tap the Home button About Device Device Info and...

Страница 57: ...in the memory card 3 A confirmation window will appear when memory partitioning is complete Tap OK to close the window The window will disappear after 5 seconds without a user input 7 2 Formatting th...

Страница 58: ...GPS A GPS module is used to include the location data in the recorded videos On the Live view screen tap the Home menu button About Device GPS Info to view the GPS features The connection status time...

Страница 59: ...m other than those listed in the system requirement 9 2 Installing the PC viewer The PC viewer installation file setup exe is stored in the root folder of the memory card that is provided with the pro...

Страница 60: ...time of the current video Indicates the vehicle s driving speed at the time of recording Displays the progress of video playback Play or control a video Adjust the volume of the current video Display...

Страница 61: ...ylist in the bottom right corner of the PC viewer screen The playlist section layout is as follows Select a folder Continuous Incident continuous Parking record Parking incident Display a list of vide...

Страница 62: ...cted video file Stop Stop playing the current video The progress bar will move to the beginning of the video Skip forward by 10 sec Fast forward the video by 10 sec Play the next file Play the next fi...

Страница 63: ...iving speed Indicates the vehicle s driving speed at the time of recording Accelerator Brake Turn signal Indicates the brake pedal operation Indicates the accelerator pedal operation Indicates the lef...

Страница 64: ...he firmware upgrade Doing so may cause serious damage to the product or to the data stored in the memory card 1 Disconnect power to the product and remove the memory card 2 Insert the memory card to a...

Страница 65: ...product and then adjust the camera s viewing angle while monitoring the LCD display The memory card cannot be recognized Ensure that the memory card has been inserted in the correct direction Before i...

Страница 66: ...OS Image sensor Sony IMX178 Rear camera OmniVision 4689 Angle of view 140 based on the opposite angle 1440p Rear camera 180 based on the opposite angle 1440p Video QHD 2560 X 1440 H 264 file extension...

Страница 67: ...efore contacting a service center Please backup all important data stored in the memory card The data in the memory card may be deleted during repair Every product requested for repair is regarded as...

Страница 68: ...68...

Страница 69: ...http www thinkware com Ver 1 2 Dec 2016...

Отзывы: