9. ELECTRIC WIRING
- 154 -
■
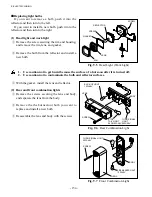
Replacing light bulbs
If you want to remove a bulb, push it into the
reflector and then turn to the left.
If you want to install a new bulb, push it into the
reflector and then turn to the right.
(1) Head light and work light
①
Remove the screw securing the rim and housing,
and remove the rim, lens, and gasket.
②
Remove the bulb from the reflector and install a
new bulb.
1. Use caution not to get burnt because the surface of a hot soon after it is turned off.
2. Use caution not to contaminate the bulb and reflector surfaces.
③
With the gasket, install the lens and reflector.
(2) Rear and front combination lights
①
Remove the screws securing the lens and body,
and separate the lens from the body.
②
Remove the the burned-out bulb you want to
replace and install a new bulb.
③
Reassemble the lens and body with the screws.
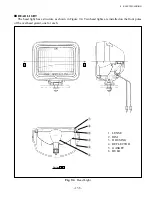
REFLECTOR
SCREW
40W‑48V
GASKET
LENS
RIM
Fig. 9.5
Head Light (Work Light)
BACK-UP LIGHT
10W-48V
LENS
SCREW
STOP/
TAIL LIGHT
25W/10W-48V
TURN SIGNAL
LIGHT
25W-48V
BODY
Fig. 9.6
Rear Combination Light
SCREW
TURN SIGNAL LIGHT
25W-48V
SIDE MARKER LIGHT
10W-48V
BODY
LENS
Fig. 9.7
Front Combination Light
Содержание FB10-7
Страница 2: ......
Страница 4: ...No SEB 81BBE...
Страница 8: ...No SEB 81BBE...
Страница 9: ...No SEB 81BBE Fig 1 Overall Dimensions Unit mm in...
Страница 10: ...No SEB 81BBE...
Страница 28: ...1 BATTERY AND CHARGER 16 NOTE...
Страница 30: ...2 MOTORS 18 DRIVE UNIT Fig 2 1 Drive Motor Installation DRIVE AXLE DRIVE MOTOR...
Страница 42: ...3 CONTROL SYSTEM 30 Fig 3 2 Inverter Assembly 1 0 to 2 5 ton Trucks...
Страница 43: ...31 3 CONTROL SYSTEM Fig 3 3 Inverter Assembly 3 0 to 3 5 ton Trucks...
Страница 44: ...3 CONTROL SYSTEM 32 Fig 3 4 Controller Wiring 1 0 to 2 5 ton Trucks...
Страница 45: ...33 3 CONTROL SYSTEM Fig 3 5 Controller Wiring 3 0 to 3 5 ton Trucks...
Страница 133: ...7 HYDRAULIC SYSTEM 121 Fig 7 27 Remove the oil seal from the front cover...
Страница 160: ...8 LOAD HANDLING SYSTEM 148 NOTE...


