Medium Optical Disk (RW551/RW552) Library
2–4
EK–MOL80–SV. B01
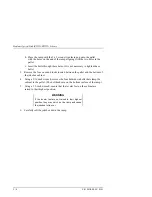
b. Place the ramp with the 2 x 2 wood strips facing up onto the pallet
with the holes on the end of the ramp aligning with the two holes in the
pallet.
c. Insert the bolts through these holes. (It is not necessary to tighten these
bolts.)
3. Remove the four wooden blocks located between the pallet and the bottom of
the jukebox cabinet.
4.
Using a 9/16-inch wrench, remove the four hold-down bolts that clamp the
cabinet to the pallet. (The bolt heads are on the bottom surface of the ramp.)
5.
Using a 1/2-inch wrench, ensure that the leveler feet on the cabinet are
raised to their highest position.
WARNING
If the leveler feet are not raised to their highest
position, they may catch on the ramp and cause
the jukebox to tip over.
6. Carefully roll the jukebox down the ramp.
Содержание RW551
Страница 27: ...Medium Optical Disk RW551 RW552 Library 3 2 EK MOL80 SV B01 Figure 3 2 Rear Panel SCSI Connect...
Страница 34: ...Chapter 3 Product Configuration and Operation EK MOL80 SV B01 3 9 Figure 3 4 Control Panel Menu Tree...
Страница 92: ...end...
Страница 139: ...Chapter 5 Removal and Replacement EK MOL80 SV B01 5 47 Figure 5 49 Jukebox Exploded View 1 of 2...
Страница 140: ...Medium Optical Disk RW551 RW552 Library 5 48 EK MOL80 SV B01 Figure 5 49 Jukebox Exploded View 2 of 2...
Страница 141: ...Chapter 5 Removal and Replacement EK MOL80 SV B01 5 49 Figure 5 50 Jukebox Power Harness...
Страница 142: ...Medium Optical Disk RW551 RW552 Library 5 50 EK MOL80 SV B01 Figure 5 51 Jukebox Pulley and Rope Diagram...
Страница 166: ...Chapter 6 Theory of Operation EK MOL80 SV B01 6 23 Figure 6 10 User Zone Layout for 1 3 Gbyte Media g 1...
Страница 167: ...Medium Optical Disk RW551 RW552 Library 6 24 EK MOL80 SV B01 Figure 6 11 User Zone Layout for 1 3 Gbyte g 16...
Страница 168: ...Chapter 6 Theory of Operation EK MOL80 SV B01 6 25 Figure 6 12 User Zone Layout for 2 6 Gbyte Media 1 024 bytes sector...


