50
Projector
Ch
apt
er 1 U
s
e
r G
u
id
e
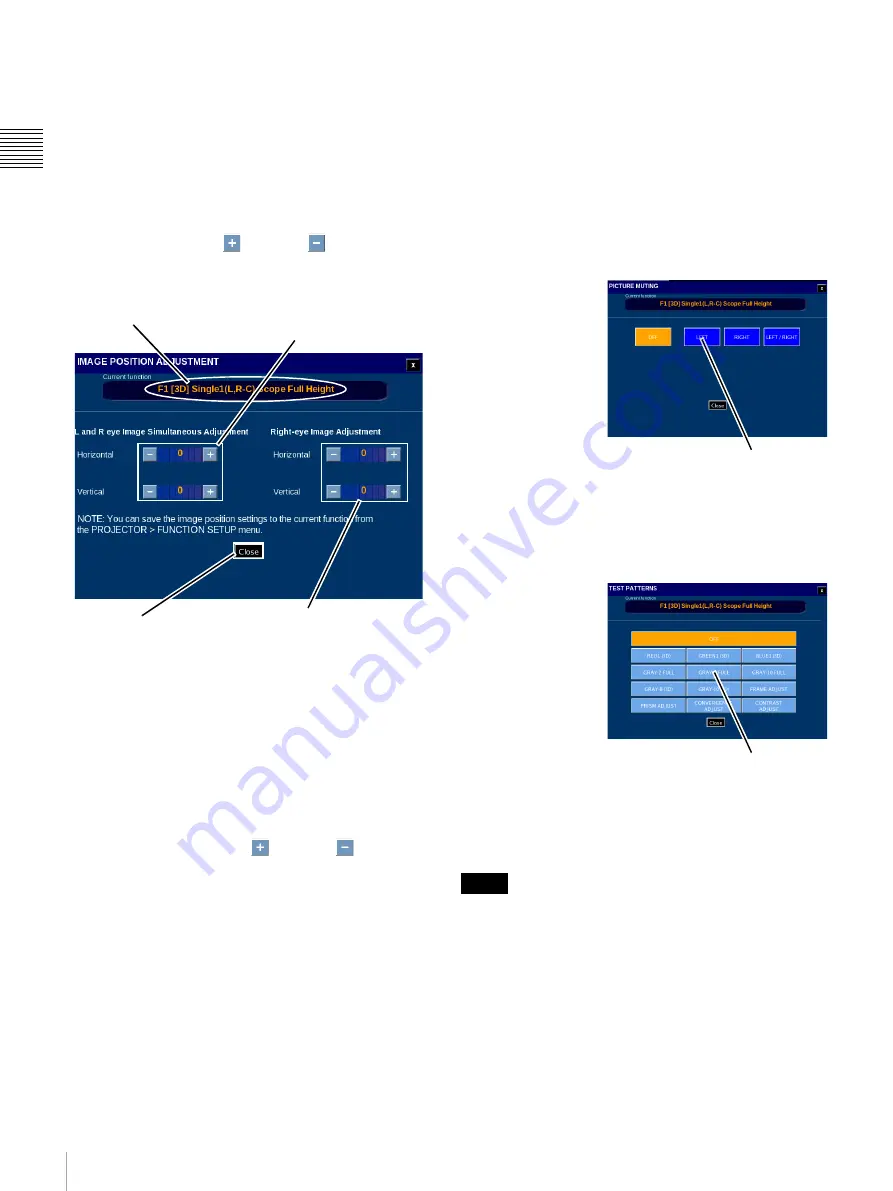
To perform Image Position adjustment, tap
Image
Position
on the ADJUSTMENT pane. The Image Position
Adjustment screen appears.
Adjustments made during the Image Position Adjust
process are applied immediately to the projector. You must
be able to view the auditorium screen in detail as picture
movement is in pixel increments.
1
To realize the Image Position adjustment process, use
the appropriate
Plus
or
Minus
button to
properly position the images as observed on the
auditorium screen.
The adjustment range is;
• L&R eye
Horizontal: -70 to +70
Vertical: -20 to +20 or -120 to +120
• R eye
Horizontal: -600 to +600
Vertical: -20 to +20
Then unit of adjustment is 1 pixel.
Tap the appropriate
Plus
or
Minus
button to
position the combined Right-eye and Left-eye images
and then adjust the position of the Right-eye image
only as observed on the auditorium screen.
2
Various Test Patterns are used during the Image
Position adjustment process.
Since the adjustments made are set immediately in the
projector you can exit the Image Position Adjustment
pane to change the Test Pattern as needed. To select a
different Test Pattern, tap
Close
.
Tap
Test Patterns
,
select the new
Test Pattern
and then tap
Close
. The
ADJUSTMENT pane reappears.
3
To assist in the process of positioning the right-
eye/left-eye images you can block the image by
muting the right, left or both images. To block an
Image, tap
Close
.
Tap
Picture Muting
, select the
Image
to be muted and then tap
Close
.
The ADJUSTMENT pane reappears.
4
Tap
Image Position
and continue with the adjustment
process.
Picture Muting
To select the
picture to be
muted from the
ADJUSTMENT
pane, tap
Picture Muting
.
The PICTURE
MUTING pane
appears. Tap the
button for the
eye to be muted.
The image for
the selected eye
is muted and you can proceed with adjustment of the
image position for the remaining eye image.
Test Pattern (Change)
To select a test
pattern image
from the
ALIGNMENT
pane, tap
Test
Pattern
. The
TEST
PATTERN
popup appears.
Once the Right-eye
and Left-eye images
are properly
positioned set both
Picture Muting and Test Pattern to
OFF
then tap
Close
on
the Image Position Adjustment pane.
The Image Position settings can be saved in the currently
selected projector FUNCTION.
Specifying the 3D Input Format
To specify the 3D format for input to the HDMI board, tap
HDMI 3D
Input
on the ADJUSTMENT pane. The
SELECT INPUT FORMAT pane appears.
Tap to Close
Current Function (3D)
Tap +/- to set Horizontal or
Vertical position of both
Right & Left Eye Images
Tap +/- to set Horizontal or
Vertical position of ONLY the
Right Eye Image
Note
Tap Desired Eye
to be muted
Tap Desired Pattern
to Select


