


1-21
87
D
ubb
in
g (TAPE
y
DV
D)
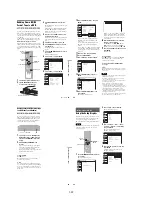
5
Select “Program Dubbing,” and press
ENTER.
6
Select “Create Dubbing List,” and press
ENTER.
If you have performed Program Dubbing
before, the display asks for confirmation. To
continue, select “Yes” and press ENTER.
The display for selecting titles appears.
7
Select the title you want to dub, and press
ENTER.
The sub-menu appears.
To dub the entire title, select “Title Dubbing”
and press ENTER. The Program Dubbing List
appears with the selected title. Go to step 13.
To select a scene to dub, go to step 8.
8
Select “Scene Dubbing,” and press
ENTER.
The display for setting a scene appears.
“Start” is selected.
9
Press ENTER at the start point.
You can use
H
PLAY, ,
.
/
>
,
x
STOP, and
X
PAUSE to find
the point.
“End” is selected.
10
Press ENTER at the end point.
“Make” is selected.
To reset the start or end point, select “Start” or
“End” and repeat from step 9 or 10.
11
Press ENTER.
To continue, repeat from step 9.
12
Select “Finish,” and press ENTER.
The Program Dubbing List appears with the
selected scene.
13
Select an option and press ENTER, if
necessary.
To add other titles or scenes, select “Addition”
and press ENTER, and repeat from step 7.
To cancel the selected title or scene, select
“Erase” and press ENTER. When asked for
confirmation, select “OK” and press ENTER.
To view the selected title or scene, select
“Check” and press ENTER.
To cancel dubbing, press
O
RETURN.
14
Select “Dubbing,” and press ENTER.
Dubbing starts.
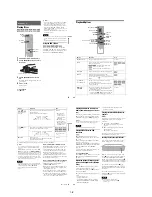
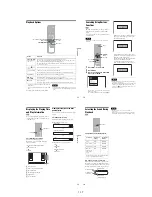
Program Dubbing
10:10 AM
Create Dubbing List
Program Dubbing List
Setup
Disc Setting
Edit
Title List
Timer
Dubbing
Create Dubbing List
10:10 AM
>
>
T
No. Title
Length
Edit
01 LINE 1
00:05:04
02 LINE 1
00:00:51
May/02/2007
03:25 PM
1/2
LINE
1
Scene Dubbing
10:10 AM
Scene No.01
T
---/--/---- --:--
Dubbing List No. 01
Make
Finish
Start
End
Start 00:00:00
End 00:00:00
00:00:07
10:10 AM
Scene No.01
T
00:00:10
---/--/---- --:--
Dubbing List No. 01
Make
Finish
Start
End
Scene Dubbing
Start 00:00:10
End 00:00:00
Program Dubbing List
10:10 AM
>
T
No. Title
Length
Edit
01 LINE 1
00:05:04
May/02/2007
03:25 PM
Addition
Check
Dubbing
Erase
LINE
1
,
continued
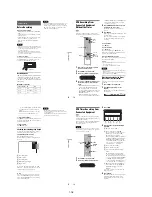
88
To stop dubbing
Press
x
STOP.
Note that it may take a few seconds for the
recorder to stop dubbing.
z
Hints
• The brightness of the playback picture may differ from
normal DVD playback picture.
• The DVD playback time may differ slightly from the
VHS tape counter value.
• The sound being played back (main, sub, etc.) is the
dubbed sound.
Notes
• Dubbing stops when:
– the DVD is played back to the end and stops.
– the DVD deck or the VHS video deck is stopped.
– the tape remaining time runs out.
• The System Menu, OPTIONS menu, and information
display are not displayed during dubbing.
• Copyrights
– Recordings made from discs and other copyrighted
material are solely for individual enjoyment, and
other unauthorized use is prohibited under copyright
law.
– Unauthorized editing of copyrighted material is
prohibited under copyright law.
• Once you eject the disc, the Program Dubbing List is
erased.
Finalizing a Disc (Preparing
a Disc for Playback on
Other Equipment)
Finalizing is necessary in order to play discs
recorded with this recorder on other DVD
equipment.
When you finalize a DVD+RW/DVD-RW (Video
mode)/DVD+R/DVD-R (Video mode), a DVD
menu will be automatically created, which can be
displayed on other DVD equipment.
Before finalizing, check the differences between
the disc types in the table below.
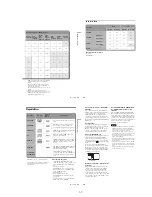
Differences between the disc types
Discs are automatically finalized when
removed from the recorder. If you want
to record on it again, reformat the disc
(page 67). Note however, that
reformatting a disc erases all its
contents.
Finalizing is unnecessary when playing a
disc on VR format compatible equipment.
Even if your other DVD equipment is
VR format compatible, you may need to
finalize the disc, especially if the
recording time is short. After finalizing,
you cannot edit or record on the disc. If
you want to edit or record on it again,
unfinalize or reformat the disc (page 67).
Note however, that reformatting a disc
erases all its contents.
Finalizing is necessary in order to play
on equipment other than this recorder.
After finalizing, you cannot edit or
record on the disc. If you want to edit or
record on it again, unfinalize or reformat
the disc (page 67). Note however, that
reformatting a disc erases all its
contents.
Finalizing is necessary in order to play
on equipment other than this recorder.
The finalized discs can be played on
other VR mode compatible players.
After finalizing, you cannot further edit
or record on the disc.
Finalizing is necessary in order to play
on equipment other than this recorder.
After finalizing, you cannot further edit
or record on the disc.
-RW
VR
-RW
Video
+
RW
+
R
-R
VR
-R
Video
+
RW
-RW
VR
-RW
Video
-R
VR
+
R
-R
Video
89
D
ubb
in
g (TAPE
y
DV
D)
1
Press DVD to operate the DVD recorder.
2
Insert a disc.
3
Press SYSTEM MENU while the recorder is
in stop mode.
The System Menu appears.
4
Select “Disc Setting,” and press ENTER.
The “Disc Setting” display appears.
5
Select “Disc Finalize,” and press ENTER.
The display asks for confirmation.
6
Select “Finalize,” and press ENTER.
The display asks for confirmation again.
7
Select “OK,” and press ENTER.
The recorder starts finalizing the disc.
To turn off the display
Press SYSTEM MENU.
To unfinalize a DVD-RW (VR mode)
If you cannot record or edit on a DVD-RW (VR
mode) that has been finalized, unfinalize the disc
by selecting “Unfinalize” in step 6 above.
z
Hints
• You can check whether the disc has been finalized or
not. If you cannot select “Finalize” in step 6 above, the
disc has already been finalized.
• To check the disc information, select “Disc
Information” in the “Disc Setting” display and press
ENTER. See page 67 for details.
Notes
• Depending on the condition of the disc, the recording,
or the DVD equipment, discs may not play even if the
discs are finalized.
• The recorder may not be able to finalize a disc if it was
recorded on another recorder.
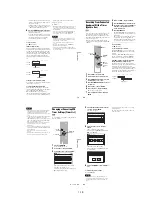
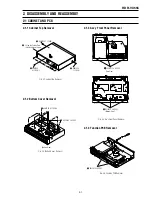
1
1
2
2
3
3
4
4
5
5
6
6
7
7
8
8
0
0
9
9
SYSTEM
MENU
DVD
M
/
m
/
<
/
,
,
ENTER
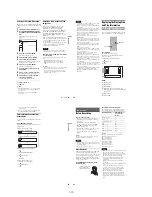
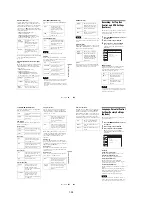
Disc Setting
10:10 AM
Disc Name
:
Disc Protect
: Not Protected
Disc Format
: VR Mode
Disc Finalize
: Unfinalized
Disc Information
Erase All Titles
Setup
Disc Setting
Edit
Title List
Timer
Dubbing
Do you want to finalize this disc ?
Unfinalize
Finalize
Disc will be finalized.
Do you want to continue ?
Cancel
OK
90
DV/D8 Dubbing (DV/D8
t
DVD)
Before DV/D8 Dubbing
This section explains dubbing with a digital video
camera via the DV IN jack on the front panel. If
you want to dub by way of the LINE IN jacks, see
“Recording From Another VCR or Similar
Device” on page 54.
To record from the DV IN jack
The DV IN jack on this recorder conforms to the
i.LINK standard. You can connect any other
equipment that has an i.LINK (DV) jack, and
record digital signals.
Follow the instructions in “Connecting a Digital
Video Camera to the DV IN Jack,” and then move
on to the section on dubbing. For more
information about i.LINK, see “About i.LINK” on
page 113.
z
Hint
If you plan to do additional editing on a disc after the
initial dub, use the DV IN jack and record on a DVD-RW
(VR mode) or DVD-R (VR mode). Note that erasing
unwanted scenes does not free up disc space for DVD-Rs
(VR mode).
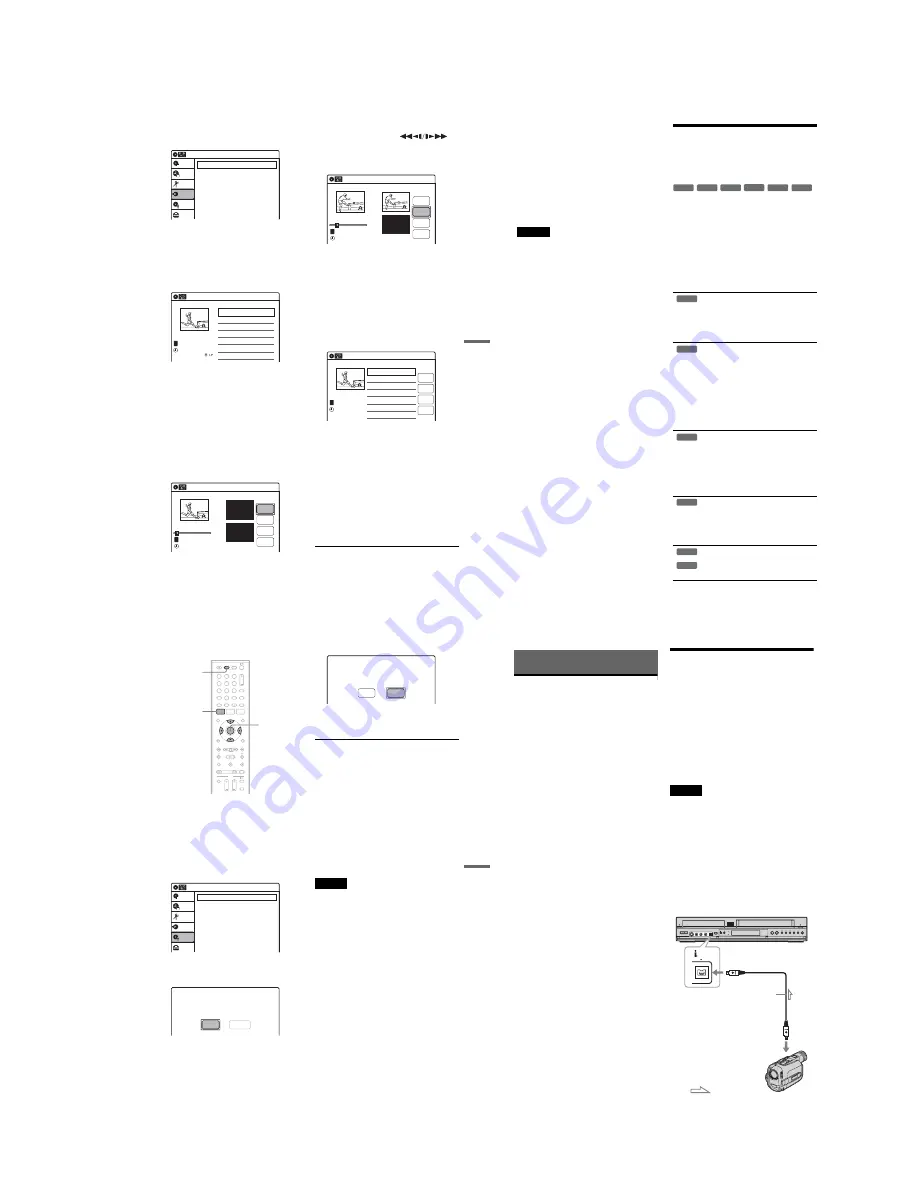
Connecting a Digital Video
Camera to the DV IN Jack
You can connect a digital video camera to the DV
IN jack on the recorder to record or edit from a
DV/D8 format tape. Operation is straightforward
because the DVD recorder will fast forward and
rewind the tape for you – you do not need to
operate your digital video camera. Do the
following to start using the “DV/D8 Edit”
functions of this recorder.
See the instruction manual supplied with the
digital video camera as well before connecting.
Notes
• The DV IN jack is for input only. It will not output
signals.
• You cannot use the DV IN jack when:
– your digital video camera does not work with this
recorder. Connect the camera to the LINE IN jack and
follow the instructions of “Recording From Another
VCR or Similar Device” on page 54.
– the input signal is not in DVC-SD format. Do not
connect a MICROMV format digital video camera
even if it has an i.LINK jack.
– the images on the tape contain copy protection
signals, which limit recording.
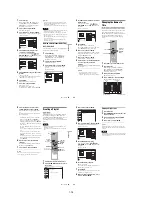
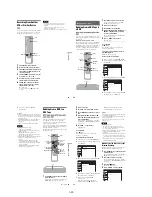
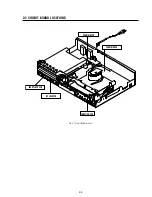
Hookups
DV IN
VCR-DVD recorder
to DV IN
: Signal flow
i.LINK cable
(not supplied)
to DV output
Digital video camera
Содержание RDR VX555 - DVDr/ VCR Combo
Страница 62: ...2 22 2 22E MEMO ...
Страница 64: ...3 4E MEMO ...
Страница 66: ...4 1 DVD Main PCB 4 4 4 3 COMPONENT SIDE ...
Страница 67: ...4 6 4 5 CONDUCTOR SIDE ...
Страница 68: ...4 8 4 7 4 2 VCR Main PCB COMPONENT SIDE ...
Страница 69: ...4 10 4 9 CONDUCTOR SIDE ...
Страница 70: ...4 12 4 11 4 3 Function PCB COMPONENT SIDE COMPONENT SIDE ...
Страница 71: ...4 14 4 13 4 4 Front Jack PCB COMPONENT SIDE CONDUCTOR SIDE ...
Страница 72: ...4 16E 4 15 4 5 DV Jack PCB COMPONENT SIDE COMPONENT SIDE ...
Страница 74: ...5 4 5 3 5 1 S M P S VCR Main PCB ...
Страница 75: ...5 6 5 5 5 2 Power VCR Main PCB ...
Страница 76: ...5 8 5 7 5 3 Logic VCR Main PCB ...
Страница 77: ...5 10 5 9 5 4 A V VCR Main PCB ...
Страница 78: ...5 12 5 11 5 5 Hi Fi VCR Main PCB ...
Страница 79: ...5 14 5 13 5 6 MPEG Decoder DVD Main PCB ...
Страница 80: ...5 16 5 15 5 7 A V Decoder DVD Main PCB ...
Страница 81: ...5 18 5 17 5 8 In Out DVD Main PCB ...
Страница 82: ...5 20 5 19 5 9 DV HDMI DVD Main PCB ...
Страница 83: ...5 22 5 21 5 10 Front Timer Front Jack PCB DV Jack DV Jack PCB ...
Страница 84: ...5 24E 5 23 5 11 Function Function PCB ...
Страница 127: ...MEMO ...


