

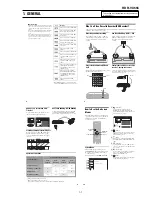
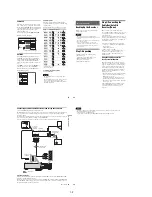
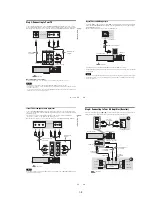


1-9
39
DV
D
Pl
ay
bac
k
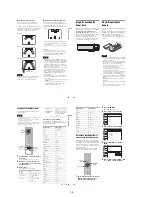
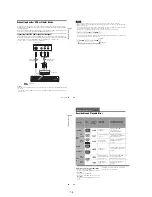
Playing a Title From the
Title List
The Title List menu displays the program titles on
the disc.
1
Press DVD to operate the DVD recorder.
2
Place a disc on the disc tray.
3
Press TITLE LIST.
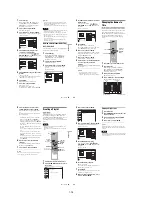
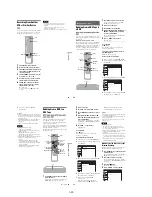
Example: DVD-RW (VR mode)
A
Disc type:
Displays a disc type.
Also displays the title type (original or
Playlist) for DVD-RWs (VR mode),
DVD-Rs (VR mode), and DVD-RAMs.
B
Movie thumbnail image
C
Title information:
Displays the title number, title name,
recording date, and recording mode.
“
” indicates a protected title, while
“
” indicates unprotected.
D
Clock
4
Select the title, and press ENTER.
The sub-menu appears.
5
Select “Play,” and press ENTER.
Playback starts from the selected title on the
disc.
About the Title List for DVD-RWs (VR mode)
and DVD-Rs (VR mode)
You can switch the Title List to show an original
or Playlist.
While the Title List menu is turned on, press
ORIGINAL/PLAYLIST repeatedly to select
either “Title List (Original)” or “Playlist.”
For details, see “Edit options for DVD-RWs (VR
mode)/DVD-Rs (VR mode)” on page 56.
To turn off the Title List
Press TITLE LIST.
z
Hint
You can also switch the Title List of DVD-RAMs to
show an original or Playlist.
Notes
• The Title List does not appear for DVD-RWs (Video
mode), DVD+Rs, or DVD-Rs (Video mode) that have
been finalized. To view a title, press TOP MENU or
MENU (page 35).
• The Title List may not appear for discs created on other
DVD recorders.
• Letters that cannot be displayed are replaced with “*.”
+
RW
+
R
-RW
VR
-RW
Video
RAM
-R
VR
-R
Video
1
1
2
2
3
3
4
4
5
5
6
6
7
7
8
8
0
0
9
9
TITLE LIST
MENU
TOP MENU
ORIGINAL/
PLAYLIST
DVD
M
/
m
/
<
/
,
,
ENTER
10:10 AM
01 LINE 1
>
01:29:03
02 LINE 1
>
00:31:23
03 LINE 1
>
01:59:00
04 LINE 1
>
00:58:56
LINE
1
08:00 PM
May/02/2007
T
No. Title
Length
Edit
Title List (Original)
1/4
1
2
3
4
3
40
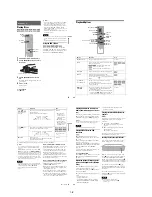
Searching for a Title/
Chapter/Track, etc.
You can search a DVD by title or chapter, and
VIDEO CD by track or scene. As titles and tracks
are assigned individual numbers on the disc, select
the title or track by entering its number. You can
also search for a scene using the time code.
1
Press OPTIONS during playback.
The OPTIONS menu appears.
2
Select a search method.
“Title” (for DVDs)
“Chapter” (for DVDs)
“Track” (for VIDEO CDs with PBC function
off)
“Time” (for DVDs/VIDEO CDs with PBC
function off): Searches for a starting point
using the time code.
3
Press
M
/
m
/
<
/
,
to select the number of
the title, chapter, track, etc., you want, or
press the number buttons to enter the time
code.
For example: “Time”
To find a scene at 2 hours, 5 minutes, and 20
seconds, enter “20520.”
If you make a mistake, wait a moment until
the display returns to the elapsed playing time
display, then select another number.
4
Press ENTER.
The recorder starts playback from the selected
point.
To turn off the display, press OPTIONS.
Note
Depending on the disc, you may not be able to use the
OPTIONS menu to search for a title/chapter/track, or
enter the time code for a playback point.
+
RW
+
R
VCD
-RW
VR
-RW
Video
RAM
DVD
-R
VR
-R
Video
1
1
2
2
3
3
4
4
5
5
6
6
7
7
8
8
0
0
9
9
OPTIONS
M
/
m
/
<
/
,
,
ENTER
Number
buttons
41
DV
D
Pl
ay
bac
k
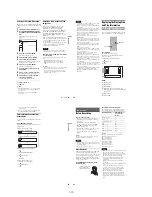
Playing MP3 Audio Tracks
and JPEG Image Files
You can play DATA CDs (CD-ROMs/CD-Rs/
CD-RWs)/DATA DVDs (DVD-ROMs/
DVD+RWs/DVD-RWs/DVD+Rs/DVD-Rs) that
contain MP3 audio tracks or JPEG image files.
Playing MP3 audio tracks
You can play MP3 audio tracks on DATA CDs or
DATA DVDs.
1
Press DVD to operate the DVD recorder.
2
Place a DATA CD/DATA DVD on the disc
tray.
When you insert a DATA CD/DATA DVD
containing MP3 audio tracks and JPEG image
files, the display for selecting a media type
appears. When you select “Mix,” you can
enjoy a slide show with sound (page 43).
If you insert a DATA CD/DATA DVD
containing only MP3 audio tracks, the
“Music” display appears. Go to step 4.
3
Select “Music,” and press ENTER.
The “Music” display appears.
4
Select an album, and press ENTER.
5
Select a track, and press ENTER.
Playback starts from the selected track.
When a track or album is being played, the
title is shown in a box.
To stop playback
Press
x
STOP.
To pause playback
Press
X
PAUSE.
To restart playback, press
H
PLAY or
X
PAUSE.
To return to the previous display
Press
O
RETURN.
To switch between MP3 audio tracks and JPEG
image files
Press
x
STOP, and press TOP MENU.
z
Hint
When playback of all the MP3 audio tracks within the
album finishes, the recorder stops.
DATA CD DATA DVD
1
1
2
2
3
3
4
4
5
5
6
6
7
7
8
8
0
0
9
9
H
PLAY
O
RETURN
M
/
m
/
<
/
,
,
ENTER
.
/
>
DVD
TOP MENU
x
STOP
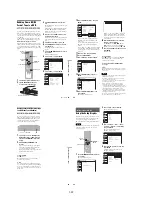
OPTIONS
X
PAUSE
10:10 AM
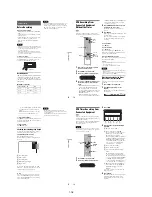
Photo
Music
Mix
Press ENTER :
Music menu for this disc.
Stop 00:00:00
Prev Directory
01-Track1.mp3
02-Track2.mp3
03-Track3.mp3
04-Track4.mp3
05-Track5.mp3
MP3_001
0/9
10:10 AM
Music
Surround:Off
,
continued
42
Playing JPEG image files
You can play JPEG image files on DATA CDs or
DATA DVDs.
1
Press DVD to operate the DVD recorder.
2
Place a DATA CD/DATA DVD on the disc
tray.
When you insert a DATA CD/DATA DVD
containing MP3 audio tracks and JPEG image
files, the display for selecting a media type
appears.
When you select “Mix,” you can
enjoy a slide show with sound (page 43).
If you insert a DATA CD/DATA DVD
containing only JPEG image files, the
“Photo” display appears. Go to step 4.
3
Select “Photo,” and press ENTER.
The “Photo” display appears.
4
Select a folder, and press ENTER.
To display the previous or next page, press
.
/
>
.
5
Select an image file, and press ENTER.
The selected image is displayed over the
entire screen.
To display the previous or next image, press
.
/
>
.
The following menu icons appear in the upper
part of the screen.
: Returns to the “Photo” display.
: Starts the slide show (page 42).
: Rotates the image (page 42).
: Zooms the image (page 42).
Press OPTIONS to turn on/off the menu
icons.
To play the slide show
1
Press
<
/
,
to select “
,” and press
ENTER.
The “Slideshow Speed” menu appears.
“
”: Slow
“
”: Normal
“
”: Fast
2
Press
<
/
,
to select the desired play speed,
and press ENTER.
The slide show starts from the selected image.
To stop playing, press
x
STOP.
To rotate the selected image
Press
<
/
,
to select “
,” and press ENTER.
Each time you press ENTER, the image turns
clockwise by 90°.
To zoom in an image
Press
<
/
,
to select “
,” and press ENTER.
Each time you press ENTER, the magnification
changes as follows:
2
u
t
4
u
t
2
u
t
normal
To return to the previous display
Press
O
RETURN.
To switch between MP3 audio tracks and JPEG
image files
Press
x
STOP, and press TOP MENU.
z
Hint
You can also start the slide show by pressing
H
PLAY
in step 5 above.
Notes
• You cannot use
M
/
m
/
<
/
,
to move the image within
the screen while zooming.
• Slide show can play in only one direction.
• You cannot rotate or zoom during slide show.
•
If you select
“
”
in the rotated image display,
the images in the “Photo” display will not be
rotated.
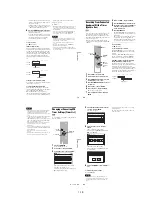
10:10 AM
Photo
Music
Press ENTER :
Mix
Music menu for this disc.
Slideshow
\\abc\defg
Page 1 / 2
10:10 AM
Photo
Directory information
Содержание RDR VX555 - DVDr/ VCR Combo
Страница 62: ...2 22 2 22E MEMO ...
Страница 64: ...3 4E MEMO ...
Страница 66: ...4 1 DVD Main PCB 4 4 4 3 COMPONENT SIDE ...
Страница 67: ...4 6 4 5 CONDUCTOR SIDE ...
Страница 68: ...4 8 4 7 4 2 VCR Main PCB COMPONENT SIDE ...
Страница 69: ...4 10 4 9 CONDUCTOR SIDE ...
Страница 70: ...4 12 4 11 4 3 Function PCB COMPONENT SIDE COMPONENT SIDE ...
Страница 71: ...4 14 4 13 4 4 Front Jack PCB COMPONENT SIDE CONDUCTOR SIDE ...
Страница 72: ...4 16E 4 15 4 5 DV Jack PCB COMPONENT SIDE COMPONENT SIDE ...
Страница 74: ...5 4 5 3 5 1 S M P S VCR Main PCB ...
Страница 75: ...5 6 5 5 5 2 Power VCR Main PCB ...
Страница 76: ...5 8 5 7 5 3 Logic VCR Main PCB ...
Страница 77: ...5 10 5 9 5 4 A V VCR Main PCB ...
Страница 78: ...5 12 5 11 5 5 Hi Fi VCR Main PCB ...
Страница 79: ...5 14 5 13 5 6 MPEG Decoder DVD Main PCB ...
Страница 80: ...5 16 5 15 5 7 A V Decoder DVD Main PCB ...
Страница 81: ...5 18 5 17 5 8 In Out DVD Main PCB ...
Страница 82: ...5 20 5 19 5 9 DV HDMI DVD Main PCB ...
Страница 83: ...5 22 5 21 5 10 Front Timer Front Jack PCB DV Jack DV Jack PCB ...
Страница 84: ...5 24E 5 23 5 11 Function Function PCB ...
Страница 127: ...MEMO ...


