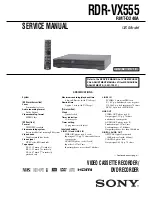


1-5
23
Ho
ok
up
s a
nd Set
tings
7
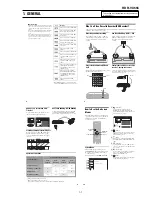
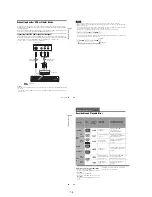
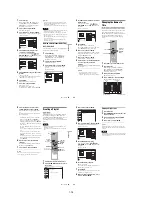
Set the command mode for the remote so it
matches the command mode for the
recorder you set above.
Follow the steps below to set the command
mode on the remote.
A
Hold down ENTER.
B
While holding down ENTER, enter the
command mode code number using the
number buttons.
C
Hold down both the number buttons and
ENTER at the same time for more than
three seconds.
To return to the previous display
Press
O
RETURN.
To check the command mode for the recorder
Press
x
(stop) on the recorder when the recorder
is turned off. The command mode for the recorder
appears in the front panel display.
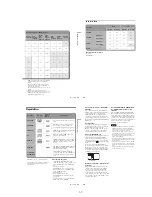
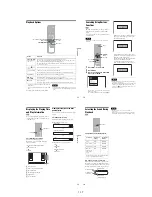
Step 7: Easy Setup
Follow the steps below to make the minimum
number of basic adjustments for using the
recorder. If you do not complete Easy Setup, it
will appear each time you turn on your recorder.
Settings are made in the following order.
m
m
m
m
m
1
Turn on the TV.
2
Press
"/1
.
The recorder turns on.
Command Mode
Code number
DVD1
number button 1
DVD2
number button 2
DVD3
number button 3
If the command mode for the recorder has not
been changed, set the command mode for the
remote to the default setting of DVD3. If the
command mode for the remote is changed to
DVD1 or DVD2, you will be unable to operate
this recorder.
OSD Language Setup
Cable Box/Sat. Control Setup
Clock Setup
TV Type Setup
Audio Connection Setup
Finished!
1
1
2
2
3
3
4
4
5
5
6
6
7
7
8
8
0
0
9
9
M
/
m
/
<
/
,
,
ENTER
O
RETURN
"/1
Number
buttons
,
continued
24
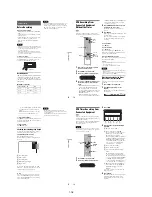
3
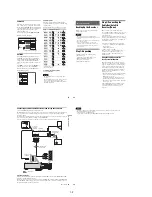
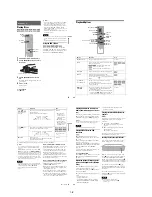
Switch the input selector on your TV so that
the signal from the recorder appears on
your TV screen.
“Initial setting necessary to operate the DVD
recorder will be made. You can change them
later using setup.” appears.
• If this message does not appear, select “Easy
Setup” in the “Setup” display to run Easy
Setup (page 104).
4
Press ENTER.
The setup display for selecting the language
used in the on-screen display appears.
5
Select a language, and press ENTER.
The setup display for cable box/satellite
receiver control appears.
6
Select whether or not you use the cable
box/satellite receiver control, and press
ENTER.
If you want to use the cable box/satellite
receiver control (page 12), select “Yes.”
If not, select “No,” then go to step 10.
7
Press the number buttons to enter the
brand code of your cable box/satellite
receiver.
See “Cable Box/Satellite Receiver Brand
Code” (page 121).
• To re-enter the code number, select
“Cancel” and return to step 6.
8
Select “OK,” and press ENTER.
9
Select the recorder’s audio/video input
(“Line1” or “Line2”) that is connected to
the cable box/satellite receiver, and press
ENTER.
The setup display for clock setting appears.
10
Press
M
/
m
to set the month and press
,
.
Set the day, year, hour, minutes, and AM/PM
in the same way, then press ENTER. The day
of the week is set automatically.
The setup display for selecting the picture size
of the connected TV appears.
English
Français
Español
Easy Setup
Select the screen language.
No Disc
Do you want to control
your set top box with this recorder?
(Changes to the current setting will
erase all timer settings.)
Yes
No
Easy Setup
No Disc
Easy Setup
No Disc
OK
Cancel
Enter the brand code of
your set top box.
Select the input line that you
connected the set top box to.
Line1
Line2
Easy Setup
No Disc
Hour
Min
AM/PM
Month
Set the time and date manually.
Day
Year
00
AM
12
:
01
01
2007
Mon
No Disc
Easy Setup
12:00 AM
01
25
Ho
o
kup
s
an
d
S
e
tt
in
g
s
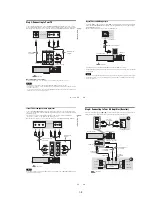
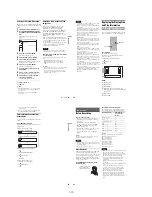
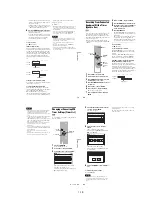
11
Select the setting that matches your TV
type.
“16:9”: For wide-screen TVs or standard TVs
with a wide screen mode.
“4:3 Letter Box”: For standard TVs.
Displays “wide screen” pictures with bands
on the upper and lower sections of the screen.
“4:3 Pan Scan”: For standard TVs.
Automatically displays “wide screen”
pictures on the entire screen and cuts off the
sections that do not fit.
For details, see “Video Settings (Video)” on
page 96.
12
Press ENTER.
The setup display for selecting the type of
Dolby Digital signal appears.
13
Select the type of Dolby Digital signal you
want to send to your amplifier (receiver).
If your AV amplifier (receiver) has a Dolby
Digital decoder, select “Dolby Digital.”
Otherwise, select “D-PCM.”
14
Press ENTER.
The setup display for selecting the type of
DTS signal appears.
15
Select whether or not you want to send a
DTS signal to your amplifier (receiver),
and press ENTER.
If your AV amplifier (receiver) has a DTS
decoder, select “On.” Otherwise, select “Off.”
16
Press ENTER when “Finish” appears.
Easy Setup is finished. All connections and
setup operations are complete.
If you use the cable box/satellite receiver
control, check that the control works correctly
(page 26).
To return to the previous display
Press
O
RETURN.
z
Hint
If you want to run Easy Setup again, select “Easy Setup”
in the “Setup” display (page 104).
Note
To record TV programs using the timer, you must set the
clock accurately.
16 : 9
4 : 3 Letter Box
4 : 3 Pan Scan
Easy Setup
Select your TV screen type.
10:10 AM
No Disc
D-PCM
Dolby Digital
Easy Setup
Dolby Digital
10:10 AM
No Disc
On
Off
Easy Setup
DTS
10:10 AM
No Disc
Finish
Easy Setup
Easy Setup is finished.
10:10 AM
No Disc
,
continued
26
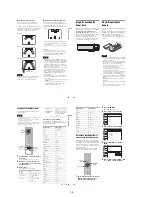
Checking the cable box/satellite
receiver control setting
1
Turn on the recorder and the cable box/
satellite receiver.
2
Point the recorder’s remote at the recorder
(not at the cable box/satellite receiver).
3
Press CH +/– and check that the channel
changes on the cable box/satellite receiver
window.
4
Press the number buttons and check that
the channel changes on the cable box/
satellite receiver window.
If you cannot get the recorder to control your
cable box/satellite receiver
Check the settings at “Set Top Box Control” in
“Features” setup (page 101).
Check the connection and place the set top box
controller near the cable box/satellite receiver
(page 12).
If your cable box or satellite receiver still does not
operate with this recorder, contact your cable or
satellite company to see if they can provide you
with a compatible cable box or satellite receiver.
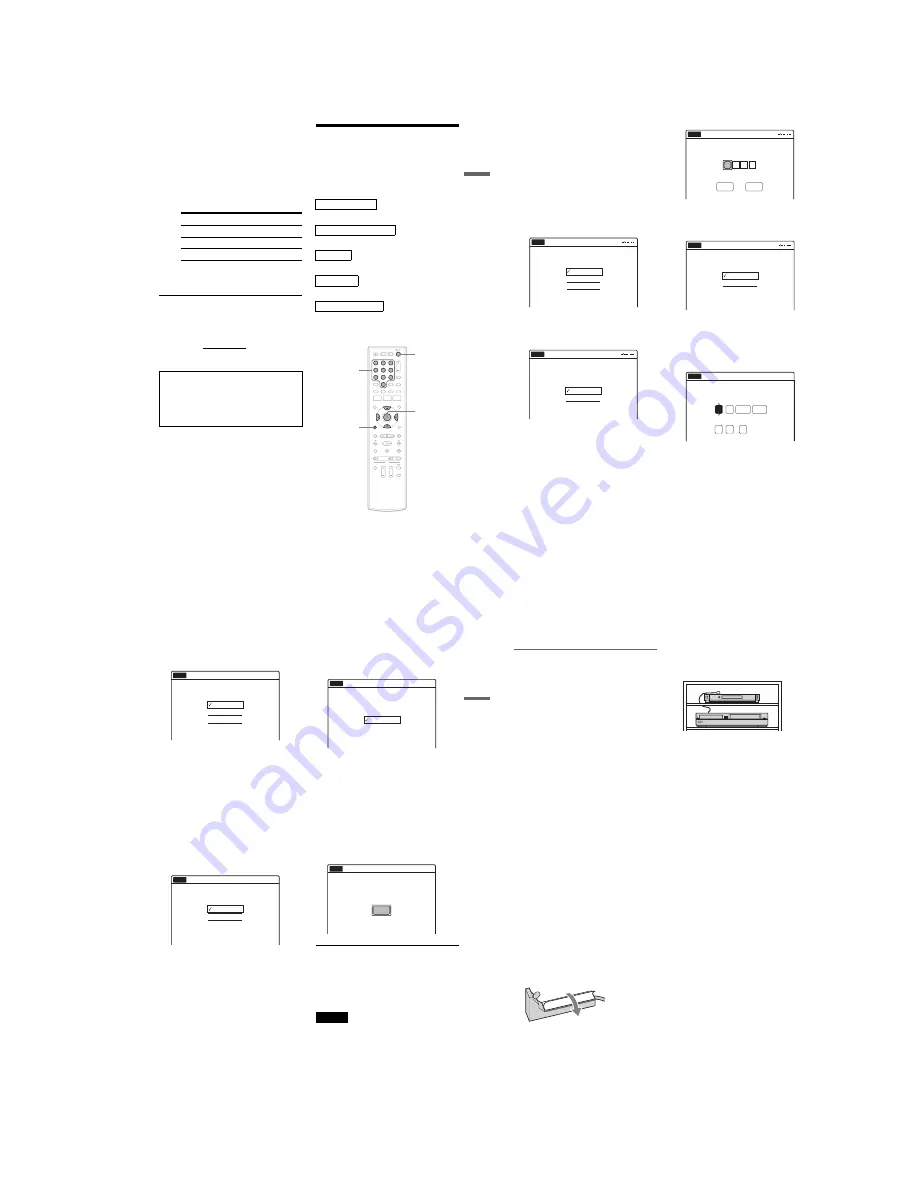
To fix the set top box controller to your cable
box/satellite receiver
Once you have confirmed that the set top box
controller controls your cable box or satellite
receiver, affix it in place.
1
Attach the supplied double-sided tape to the
set top box controller.
Remove the backings on the double-sided
tape.
2
Affix it so that the set top box controller is
near the remote control sensor on your cable
box/satellite receiver.
Содержание RDR VX555 - DVDr/ VCR Combo
Страница 62: ...2 22 2 22E MEMO ...
Страница 64: ...3 4E MEMO ...
Страница 66: ...4 1 DVD Main PCB 4 4 4 3 COMPONENT SIDE ...
Страница 67: ...4 6 4 5 CONDUCTOR SIDE ...
Страница 68: ...4 8 4 7 4 2 VCR Main PCB COMPONENT SIDE ...
Страница 69: ...4 10 4 9 CONDUCTOR SIDE ...
Страница 70: ...4 12 4 11 4 3 Function PCB COMPONENT SIDE COMPONENT SIDE ...
Страница 71: ...4 14 4 13 4 4 Front Jack PCB COMPONENT SIDE CONDUCTOR SIDE ...
Страница 72: ...4 16E 4 15 4 5 DV Jack PCB COMPONENT SIDE COMPONENT SIDE ...
Страница 74: ...5 4 5 3 5 1 S M P S VCR Main PCB ...
Страница 75: ...5 6 5 5 5 2 Power VCR Main PCB ...
Страница 76: ...5 8 5 7 5 3 Logic VCR Main PCB ...
Страница 77: ...5 10 5 9 5 4 A V VCR Main PCB ...
Страница 78: ...5 12 5 11 5 5 Hi Fi VCR Main PCB ...
Страница 79: ...5 14 5 13 5 6 MPEG Decoder DVD Main PCB ...
Страница 80: ...5 16 5 15 5 7 A V Decoder DVD Main PCB ...
Страница 81: ...5 18 5 17 5 8 In Out DVD Main PCB ...
Страница 82: ...5 20 5 19 5 9 DV HDMI DVD Main PCB ...
Страница 83: ...5 22 5 21 5 10 Front Timer Front Jack PCB DV Jack DV Jack PCB ...
Страница 84: ...5 24E 5 23 5 11 Function Function PCB ...
Страница 127: ...MEMO ...


