


1-15
63
DV
D Ed
it
in
g
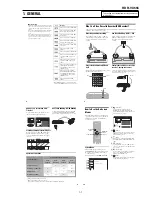
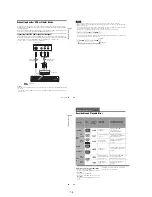
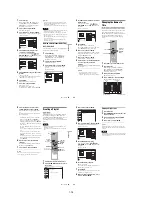
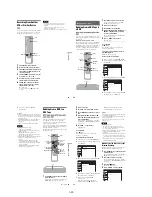
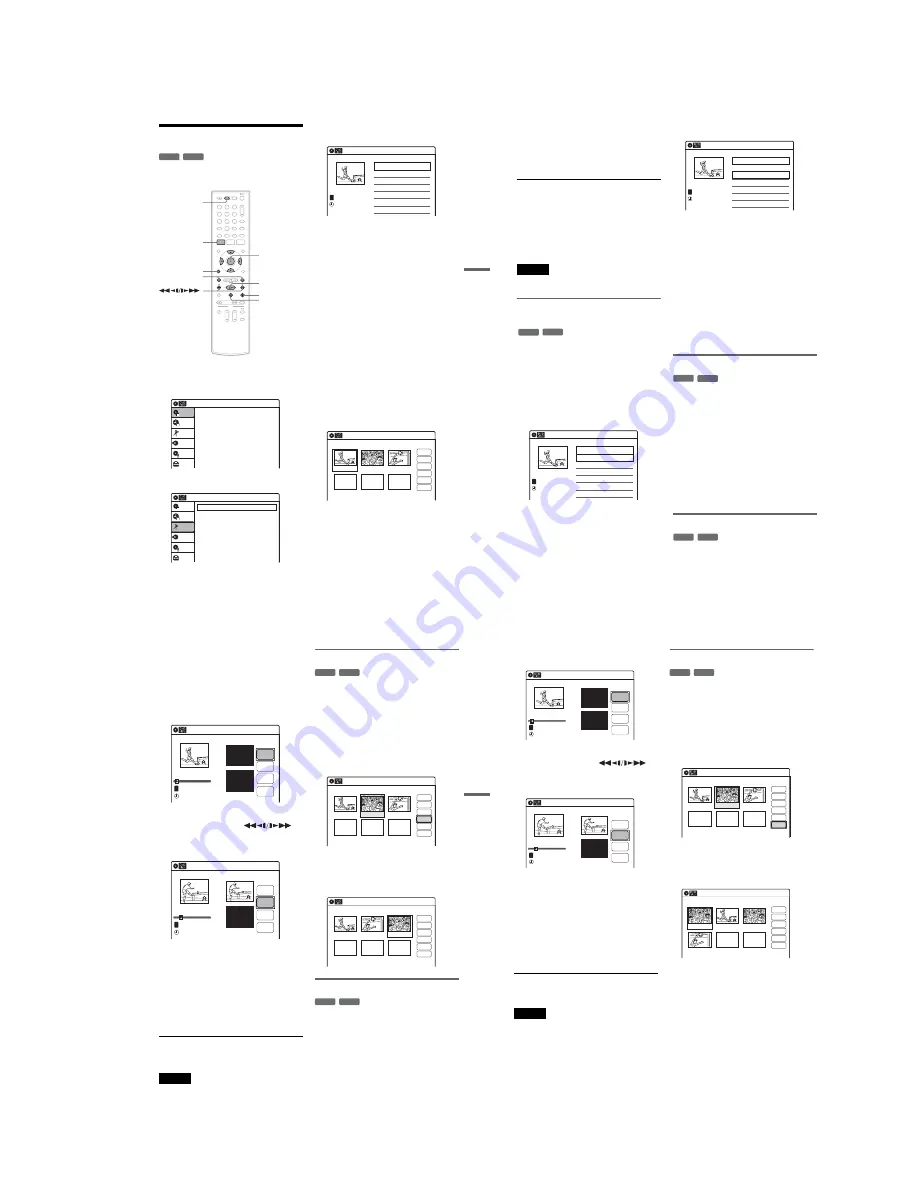
Editing a Playlist
You can edit Playlist titles or scenes within them,
without changing the actual recordings.
1
Press DVD to operate the DVD recorder.
2
Press SYSTEM MENU while the recorder is
in stop mode.
3
Select “Edit,” and press ENTER.
4
Select “Edit Playlist,” and press ENTER.
The “Playlist” Title List appears.
5
Select a Playlist title, and press ENTER.
The sub-menu appears.
6
Select an option, and press ENTER.
Select from the following options. For details,
see the pages in parentheses.
“Title Erase”: Erases the title. Select “OK”
when asked for confirmation.
“Chapter Erase”: Allows you to select
chapters in the Playlist title to erase (page 58).
“Title Name”: Allows you to rename the title
(page 60).
“A-B Erase”: Allows you to select sections in
the title to erase (page 58).
“Edit Scene”: Allows you to re-edit scenes in
the Playlist title. Go to step 7.
“Divide Title”: Divides the title in two at a
desired point (page 59).
“Combine Titles”: Allows you to combine
two titles into one (page 64).
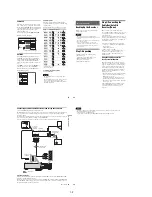
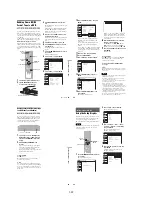
7
Select “Edit Scene,” and press ENTER.
The display for editing scenes appears.
“Check”: Allows you to preview a scene.
Starts playback of the selected scene when
you press ENTER. The display returns to the
“Edit Scene” display when the playback
finishes or when you press
O
RETURN.
“Erase”: Erases a scene (page 64).
“Modify”: Allows you to change the start and
end point of a scene (page 64).
-RW
VR
-R
VR
1
1
2
2
3
3
4
4
5
5
6
6
7
7
8
8
0
0
9
9
SYSTEM
MENU
DVD
M
/
m
/
<
/
,
,
ENTER
H
PLAY
x
STOP
X
PAUSE
O
RETURN
.
/
>
Press ENTER :
Title Menu for DVD Title List.
10:10 AM
Title List (Original)
Setup
Disc Setting
Edit
Title List
Timer
Dubbing
10:10 AM
Create Playlist
Edit Playlist
Edit
Setup
Disc Setting
Edit
Title List
Timer
Dubbing
Playlist
10:10 AM
01 LINE 1
>
00:05:04
02 LINE 1
>
00:00:51
03:25 PM
May/02/2007
T
No. Title
Length
Edit
1/2
LINE
1
Edit Scene
10:10 AM
Scene No.1 / 3
Playlist No.01
03 00:04:20
02 00:00:10
01
00:00:34
Check
Erase
Modify
Move
Add
Copy
,
continued
64
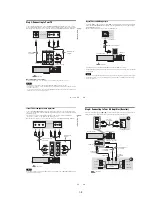
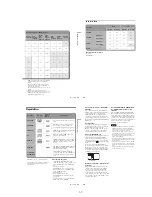
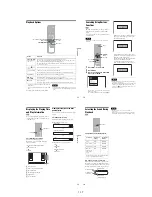
“Move”: Allows you to change scene order
(page 65).
“Add”: Allows you to add other scenes before
a selected scene (page 65).
“Copy”: Allows you to copy a scene
(page 66).
To return to the previous display
Press
O
RETURN.
To turn off the display
Press SYSTEM MENU.
z
Hint
The Resume Play function will work for scene playback.
Note
You cannot create or edit Playlist titles on a finalized
disc.
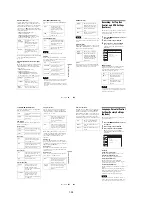
Combining two titles into one
(Combine Titles)
You can select a Playlist title and combine it with
another Playlist title.
1
Follow steps 1 to 5 of “Editing a Playlist”
(page 63) to select a Playlist title.
The sub-menu appears.
2
Select “Combine Titles,” and press
ENTER.
The next title below is also selected.
3
Select a Playlist title to be combined.
4
Press ENTER.
The display asks for confirmation.
5
Select “Yes,” and press ENTER.
The display asks whether to rename the title.
To use the same name as before, select “No”
and press ENTER to finish.
6
Select “Yes,” and press ENTER.
The “Title Name” display appears.
7
Follow steps 5 to 7 of “Changing the Name
of a Title” (page 60) to complete
renaming.
The two Playlist titles become one Playlist
title with the new name.
Erasing a scene (Erase)
You can erase a selected scene.
1
Follow steps 1 to 7 of “Editing a Playlist”
(page 63).
The “Edit Scene” display appears.
2
Select the scene you want to erase, and
press ENTER.
3
Select “Erase,” and press ENTER.
The display asks for confirmation.
4
Select “OK,” and press ENTER.
The selected scene is erased.
To erase other scenes, repeat from step 2.
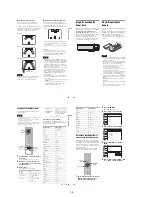
Modifying a scene (Modify)
You can change the start and end point of the
selected scene.
-RW
VR
-R
VR
Playlist
10:10 AM
>
>
LINE
1
03:25 PM
May/02/2007
T
No. Title
Length
Edit
01 LINE 1
00:05:04
02 LINE 1
00:00:51
03 LINE 1
>
01:59:00
04 LINE 1
>
00:58:56
1/4
Playlist
10:10 AM
>
>
11:30 PM
May/15/2007
T
No. Title
Length
Edit
01 LINE 1
00:05:04
02 LINE 1
00:00:51
03 LINE 1
>
01:59:00
04 LINE 1
>
00:58:56
3/4
LINE
1
-RW
VR
-R
VR
-RW
VR
-R
VR
65
DV
D Ed
it
in
g
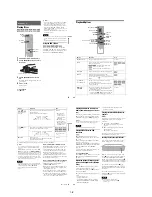
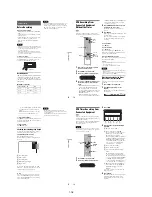
1
Follow steps 1 to 7 of “Editing a Playlist”
(page 63).
The “Edit Scene” display appears.
2
Select the scene you want to modify, and
press ENTER.
3
Select “Modify,” and press ENTER.
“Start” is selected.
4
Press ENTER at the start point.
You can use
H
PLAY, ,
.
/
>
,
x
STOP, and
X
PAUSE to find
the point.
“End” is selected.
5
Press ENTER at the end point.
“Change” is selected.
To reset the start or end point, select “Start” or
“End” and repeat step 4 or 5.
6
Press ENTER.
The display returns to the “Edit Scene”
display.
The re-selected section is captured as a scene.
To modify other scenes, repeat from step 2.
To cancel modifying
Select “Cancel,” and press ENTER.
Note
The start and end point of a scene may be different from
what you have set.
Moving a scene (Move)
You can change the scene order within the Playlist
title.
1
Follow steps 1 to 7 of “Editing a Playlist”
(page 63).
The “Edit Scene” display appears.
2
Select the scene you want to move, and
press ENTER.
3
Select “Move,” and press ENTER.
4
Select a new location using
<
/
,
, and
press ENTER.
The selected scene moves to the new location.
To move other scenes, repeat from step 2.
Adding a scene (Add)
You can add a scene before the selected scene.
1
Follow steps 1 to 7 of “Editing a Playlist”
(page 63).
The “Edit Scene” display appears.
2
Select the location where you want to add,
and press ENTER.
A new scene will be added before the selected
scene.
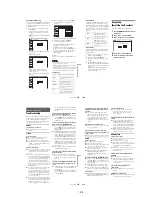
Modify
10:10 AM
T
Change
Cancel
00:00:07
Playlist No. 01
Scene No.01
End 00:00:00
Start 00:00:00
Start
End
May/02/2007 03:25 PM
Modify
10:10 AM
Scene No.01
T
00:00:10
May/02/2007 03:25 PM
Playlist No. 01
Change
Cancel
End 00:00:00
Start 00:00:10
Start
End
-RW
VR
-R
VR
Edit Scene
10:10 AM
Scene No. 2 / 3
03 00:04:20
02 00:00:10
01
00:00:34
Playlist No.01
Check
Erase
Modify
Move
Add
Copy
Edit Scene
10:10 AM
Scene No. 3 / 3
02 00:04:20
03 00:00:10
01
00:00:34
Playlist No.01
Check
Erase
Modify
Move
Add
Copy
-RW
VR
-R
VR
,
continued
66
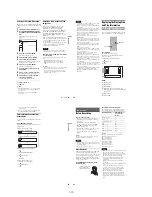
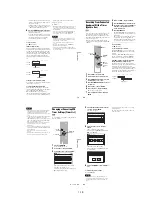
3
Select “Add,” and press ENTER.
“Start” is selected.
4
Press ENTER at the start point.
You can use
H
PLAY, ,
.
/
>
,
x
STOP, and
X
PAUSE to find
the point.
“End” is selected.
5
Press ENTER at the end point.
“Add” is selected.
To reset the start or end point, select “Start” or
“End” and repeat step 4 or 5.
6
Press ENTER.
The display returns to the “Edit Scene”
display.
The selected section is added before the scene
selected in step 2.
To add other scenes, repeat from step 2.
To cancel adding
Select “Cancel,” and press ENTER.
Note
The start and end point of a scene may be different from
what you have set.
Copying a scene (Copy)
You can copy and add a selected scene.
1
Follow steps 1 to 7 of “Editing a Playlist”
(page 63).
The “Edit Scene” display appears.
2
Select the scene you want to copy, and
press ENTER.
3
Select “Copy,” and press ENTER.
4
Select a location to copy to using
<
/
,
and press ENTER.
The scene is copied to the selected location.
To copy other scenes, repeat from step 2.
Add
10:10 AM
T
00:00:07
Playlist No. 01
Scene No.01
Add
Cancel
End 00:00:00
Start 00:00:00
Start
End
May/02/2007 03:25 PM
Add
10:10 AM
Scene No.01
T
00:00:10
Playlist No. 01
Add
Cancel
End 00:00:00
Start 00:00:10
Start
End
May/02/2007 03:25 PM
-RW
VR
-R
VR
Edit Scene
10:10 AM
Scene No. 2 / 3
03 00:04:20
02 00:00:10
01
00:00:34
Check
Erase
Modify
Move
Add
Copy
Playlist No.01
Edit Scene
10:10 AM
Scene No. 1 / 4
04 00:04:20
03 00:00:10
02
00:00:34
01 00:00:10
Playlist No.01
Check
Erase
Modify
Move
Add
Copy
Содержание RDR VX555 - DVDr/ VCR Combo
Страница 62: ...2 22 2 22E MEMO ...
Страница 64: ...3 4E MEMO ...
Страница 66: ...4 1 DVD Main PCB 4 4 4 3 COMPONENT SIDE ...
Страница 67: ...4 6 4 5 CONDUCTOR SIDE ...
Страница 68: ...4 8 4 7 4 2 VCR Main PCB COMPONENT SIDE ...
Страница 69: ...4 10 4 9 CONDUCTOR SIDE ...
Страница 70: ...4 12 4 11 4 3 Function PCB COMPONENT SIDE COMPONENT SIDE ...
Страница 71: ...4 14 4 13 4 4 Front Jack PCB COMPONENT SIDE CONDUCTOR SIDE ...
Страница 72: ...4 16E 4 15 4 5 DV Jack PCB COMPONENT SIDE COMPONENT SIDE ...
Страница 74: ...5 4 5 3 5 1 S M P S VCR Main PCB ...
Страница 75: ...5 6 5 5 5 2 Power VCR Main PCB ...
Страница 76: ...5 8 5 7 5 3 Logic VCR Main PCB ...
Страница 77: ...5 10 5 9 5 4 A V VCR Main PCB ...
Страница 78: ...5 12 5 11 5 5 Hi Fi VCR Main PCB ...
Страница 79: ...5 14 5 13 5 6 MPEG Decoder DVD Main PCB ...
Страница 80: ...5 16 5 15 5 7 A V Decoder DVD Main PCB ...
Страница 81: ...5 18 5 17 5 8 In Out DVD Main PCB ...
Страница 82: ...5 20 5 19 5 9 DV HDMI DVD Main PCB ...
Страница 83: ...5 22 5 21 5 10 Front Timer Front Jack PCB DV Jack DV Jack PCB ...
Страница 84: ...5 24E 5 23 5 11 Function Function PCB ...
Страница 127: ...MEMO ...


