


1-12 (E)
.
IM/HDCU1000 Series
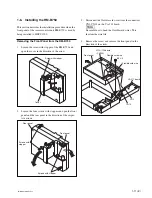
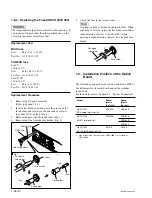
11. Connect the flexible card wires to the connectors CN3,
CN4 on the AU-303 board.
m
.
Do not insert the flexible card wire sideways. Insert
it securely to the deep end as shown in the Fig 1. If
the connection is not performed correctly, it may
cause an failure.
.
Be careful not to bend the flexible card wires. This
shortens the wire life.
12. Close the front panel of the RM-B750 in the direction
of the arrow and secure it with the two screws with
stopper.
n
When closing the front panel, be careful not to give
excessive force on the flexible card wires or the
connectors.
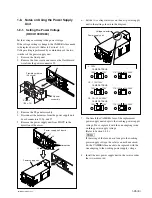
13. Upon completion of front panel installation, check that
the switch S206 (CCU-PW) on the MPU-124 board of
the RM-B750 is ON.
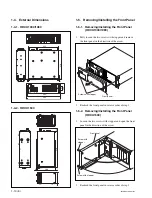
Installing the Front Panel to the Unit
5.
Turn off the power and disconnect the plug from the
outlet.
6.
Open the front panel of the unit. (Refer to Section 1-5-
2.)
7.
Remove the screw.
8.
Slide the front panel in the direction of the arrow to
extract the pin from the potbellied hole and remove the
front panel.
9.
Insert the pin into the potbellied hole of the front panel
of the RM-B750 removed in step 4 and slide the pin in
the direction of the arrow.
n
Confirm that the pin is hooked to the potbellied hole so
that front panel does not drop.
10. Secure the front panel of the RM-B750 with the screw
removed in step 7.
Front panel
Potbellied hole
Pin
Screw with
stopper
Screw with stopper
B3
x
6
Potbellied hole
Pin
B3
x
6
Front panel of
the RM-B750
AU-303 board
Flexible card wires
Screw with stopper
Screw with stopper
S206
CN4
CN3
Insulated surface
(Blue)
Insulated surface
(Blue)
7.5 mm or less
7.5 mm or more
Fig. 1
OK
NG


