background image

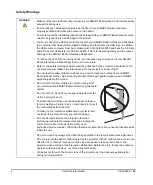
CAUTION

• Never operate this unit immediately after moving it from a cold location to a warm location. 

When the unit is exposed to such a change in temperature, moisture may condense on the 
lens and crucial internal parts. Allow the system to stabilize to room temperature before 
operation to prevent the unit from possible damage.

• In a high altitude location where air is thin, cooling efficiency is reduced so use the projector 

with fan mode


set to High.

• Do not place in hot locations, such as near heating equipment. Doing so could cause a 

malfunction and shorten the life of the projector.

• Before you clean the Unifi 45 projector, turn off the power button switch on the projector, not 

the ECP, and allow bulb to cool. Depressing the ECP button at this time would cause the 
projector to start back up. 

• Do not allow liquids or commercial solvents of any kind to flow into the projector base or 

head. Do not use spray cleaners or solvents near any part of the projector, as it may damage 
or stain the unit.

• Cycling power to the projector repeatedly can lock or damage the interactive whiteboard 

system. Allow at least 15 minutes for cooling before sending the ON command after turning 
off the system.

• After you turn the system off, wait until the system cools completely before turning the 

system on again. Avoid cycling the system off and on.

• Do not connect your serial cable directly to the projector’s RS-232 serial interface. The 

extended control panel’s (ECP’s) RS-232 serial interface is the only recommended 
connection point.

IMPORTANT

• Using the Unifi 45 projector system near a TV or radio may cause interference to the images 

or audio sound. If this happens, move the TV or radio away from the projector.

• Securing the pen tray can provide theft deterrence for the interactive whiteboard as well. 


The screws that secure the interactive whiteboard to the wall are located directly behind the 
pen tray. The pen tray must be removed before you can remove the interactive whiteboard. 
When you secure the pen tray, you also secure the interactive whiteboard.

• Install your host computer’s video output directly to your Unifi 45 projector and not to 


the ECP. The VGA connector on the ECP is then available for a guest computer connection, 
such as a laptop. If you will not have guest computers, you can use the VGA connector on 
the ECP instead.

• Only use the input marked “Computer 2” on your projector to connect the ECP 


harness cable.

• The 600i2 interactive whiteboard system does not have speakers. Consult your 

authorized 

SMART reseller

  to determine your audio output options.

• If you have peripheral devices that do not use a 4-pin mini-DIN connectors or an RCA 

composite video jack, or if your device has an audio connection that does not use RCA 
jacks, you might need to purchase third-party adapters.

• After you resolve your projector’s issue, you must turn your projector’s main power switch off 

and on again to clear the indicator light sequence and reset your projector’s status.

iv

Important Information

99-00850-21 B0

Содержание SmartBoard 600i2

Страница 1: ...Configuration and User s Guide SMART Board 600i2 Interactive Whiteboard System...

Страница 2: ...is a trademark owned by Bluetooth SIG Inc and is used by SMART Technologies ULC under license All other third party product and company names may be the trademarks of their respective owners Copyrigh...

Страница 3: ...ead and understand the safety warnings and precautions in this SMART Board 600i2 Interactive Whiteboard System s Installation Guide document 118923 and the Important Information Warnings Document docu...

Страница 4: ...d on a chair to touch the surface of your SMART Board product Rather wall mount the product at the appropriate height or use a SMART height adjustable floor stand Do not climb or allow children to cli...

Страница 5: ...is broken Turn the projector off and wait 15 minutes for the lamp to cool completely before removing the old lamp assembly Wear protective eyewear while changing the lamp Failure to do so can cause i...

Страница 6: ...serial interface The extended control panel s ECP s RS 232 serial interface is the only recommended connection point IMPORTANT Using the Unifi 45 projector system near a TV or radio may cause interfe...

Страница 7: ...iod do not heat disassemble short or recharge the batteries or expose them to fire or high temperature avoid eye and skin contact if batteries have leaked dispose of exhausted batteries and product co...

Страница 8: ...vi Important Information 99 00850 21 B0...

Страница 9: ...Whiteboard System 21 Installing SMART Notebook Software 21 Connecting Your Computer to the Interactive Whiteboard System 22 Using Your 600i2 Interactive Whiteboard System 25 After Completing the Insta...

Страница 10: ...and Electronic Equipment Regulations 55 Restriction of Certain Hazardous Substances RoHS Directives 56 Customer Support 57 Online Information and Support 57 Training 57 Technical Support 57 Shipping...

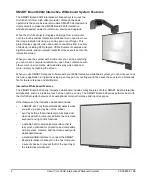
Страница 11: ...u can use with your SMART Board 600i2 interactive whiteboard system SMART Board 600i2 Interactive Whiteboard System Features Interactive Whiteboard Features Unifi 45 Projector System Features Standard...

Страница 12: ...ching the screen When you use SMART Notebook software with your 600i2 interactive whiteboard system you can write over any Ink Aware application in digital ink using a pen tray pen or your finger and...

Страница 13: ...cludes the following receptacles VGA input S video receptacle composite video jack stereo 3 5 mm audio input and stereo RCA jacks protected cable routing through the projector housing and a cable cove...

Страница 14: ...ar shape does not scratch or mark the surface of the interactive whiteboard and reflects infrared light Optional Accessories For more information on optional accessories contact your authorized SMART...

Страница 15: ...mum of 64 20 m Wireless Bluetooth Connection WC6 This accessory eliminates the need for a USB cable between the computer and your interactive whiteboard The included 7V DC switching power supply provi...

Страница 16: ...6 About Your 600i2 Interactive Whiteboard System 99 00850 21 B0...

Страница 17: ...o 2987 m The product can withstand storage temperatures from 40 F to 122 F 40 C to 50 C Humidity SMART Board 600i2 interactive whiteboard systems can operate between 30 and 70 humidity non condensing...

Страница 18: ...g shadows on the interactive whiteboard and can reduce the contrast of the projected image Locate a wall with a flat regular surface and minimum clearance to accommodate your interactive whiteboard sy...

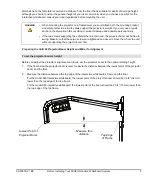
Страница 19: ...e free to swing Make sure that these two screws are tightened and never remove them from the unit without supporting the projector boom first Preparing the Unifi 45 Projector Boom Height and Mirror fo...

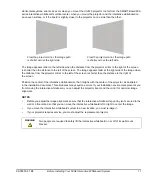
Страница 20: ...ge appears wider at the bottom when the image path s distance from the projector mirror to the top of the screen is shorter than the distance to the bottom of the screen The image appears wider at the...

Страница 21: ...e when the distance from the projector mirror to the left of the screen is shorter than the distance to the right of the screen Position the center of the interactive whiteboard so that it aligns with...

Страница 22: ...s procedure sets the mirror to a neutral position However further adjustments will be required 1 Remove the boom s front cover You can now access the adjustment screws To adjust the mirror s depth and...

Страница 23: ...cluded hex key adjust hex screw 3 to adjust the mirror s depth for your model of interactive whiteboard 3 Adjust thumbscrew 1 to center the mirror s vertical angle Make sure that the mirror isn t angl...

Страница 24: ...50 21 B0 1 Adjust thumbscrew 2 to center the mirror s horizontal angle NOTE These images show the mirror from below Make sure that the mirror isn t angled too far left or too far right To adjust the h...

Страница 25: ...ies logo perform the following steps to display the logo 1 Point the remote control at the infrared IR sensor on the front of the projector and then press the MENU button 2 Press the left and right bu...

Страница 26: ...ou don t have a computer use the projector s MENU see instructions on page 15 to change the background to blue so that you can see the full projector image clearly Complete the procedures on the prece...

Страница 27: ...t and right sides of the image are parallel NOTE The image moves up and down when you adjust the thumbscrew Use thumbscrew 1 in combination with the hex screw adjustment at the base of the boom see st...

Страница 28: ...he focus if necessary Securing the Pen Tray and Interactive Whiteboard Because the pen tray that comes with your SMART Board interactive whiteboard is detachable you may want to safeguard it and the i...

Страница 29: ...through the loop end of the cable Verify that the cable is tight enough to prevent you from removing the pen tray while the lock is in place Install the pen tray Insert the prong end of the security...

Страница 30: ...20 Before Installing Your 600i2 Interactive Whiteboard System 99 00850 21 B0...

Страница 31: ...t website for additional instructions When connecting both a guest computer and a host computer to your interactive whiteboard system make sure that the computer in use for the presentation is connect...

Страница 32: ...dio input and then connect your ECP harness cable s 3 5 mm audio plug to one of the two inputs on the SMART audio mixer device You don t need to use the other input on the SMART audio mixer device for...

Страница 33: ...the VGA input 4 Connect the other end of your VGA cable to your computer s video output 5 Connect the other end of the audio cable to your computer s audio output IMPORTANT It is recommended that you...

Страница 34: ...audio visual inputs for peripheral devices IMPORTANT If you have peripheral devices that do not use a 4 pin mini DIN connector or an RCA composite video jack or if your device has an audio connection...

Страница 35: ...en instructed to do so by an accredited SMART Technical Support Specialist To regularly turn your interactive whiteboard system on and off use the ECP s Power button instead of the projector s master...

Страница 36: ...t to the interactive whiteboard to turn on the SMART Board 600i2 interactive whiteboard system You can view the LAMP ON STANDBY and TEMP status indicators on the projector s underside to determine the...

Страница 37: ...option adjusts the projector output to Bright Standard and True Color mode MENU HEADING IMAGE ADJUSTMENT POSITION ADJUSTMENT SETTING DISPLAY Menu Options Contrast Phase Screen Size Brightness Frequen...

Страница 38: ...on This option adjusts the vertical position of the projected image from 32 to 0 Do not adjust this option unless advised to do so by a certified SMART Technical Support Specialist Clamp Pulse 1 and C...

Страница 39: ...s option unless advised to do so by a certified SMART Technical Support Specialist No Signal Power Off The projector detects when there is no input connected Select Off if you want the projector to wa...

Страница 40: ...options exist in this menu but you can use it to troubleshoot problems with your system Input This field shows your current active input setting Computer 1 Computer 2 S video or composite Mode Name Th...

Страница 41: ...e interactive whiteboard s dry erase capability Avoid setting up and using your interactive whiteboard in an area with excessive levels of dust humidity or smoke Cleaning Your Interactive Whiteboard F...

Страница 42: ...nk is still wet If any trace of the ink remains spray a lint free cloth with a glass or whiteboard cleaner and wipe the area clean TIP Cleaning the Pen Tray If the infrared sensors in the bottom of th...

Страница 43: ...t this time would cause the projector to start back up CAUTION Do not allow liquids or commercial solvents of any kind to flow into the projector base or head Do not use spray cleaners or solvents nea...

Страница 44: ...e screws connecting the projector plate to the projector Put the screws in a safe place 8 Turn the projector over and lay it on your work area so that the warning lights and setting buttons face upwar...

Страница 45: ...uter lamp cover using a flat screwdriver or your finger Keep the outer lamp cover in a safe place 2 Allow sufficient time for the lamp and inner lamp cover to cool They should feel cool enough to touc...

Страница 46: ...he three lamp locking screws These screws cannot be removed Rotate the handle on the old lamp so that it faces upwards 5 Press on the tab and pull up with the handle on the old lamp Release the tab Re...

Страница 47: ...t all the way down Release the tab 7 Tighten the lamp locking screws until the new lamp is secure 8 Put the inner lamp cover back into its original position Retrieve the inner lamp cover screw from st...

Страница 48: ...plate from the projector boom Raise the projector plate assembly while keeping it attached to the flange hook Pass the threaded rod through the attachment hole on the projector boom and then secure t...

Страница 49: ...e ECP or the remote control to start up the system The power button light on the ECP turns solid green when the system starts 4 To confirm that the lamp timer has been reset press the MENU button on t...

Страница 50: ...40 Maintaining Your 600i2 Interactive Whiteboard System 99 00850 21 B0...

Страница 51: ...button This button also functions as your status warning light Ready light Status Off The projector system is not receiving power Check your power cord RS 232 connector at the projector located below...

Страница 52: ...nternal command LAMP ON STANDBY TEMP Your projector is turning on Wait for your projector to finish turning on LAMP ON STANDBY TEMP Your projector is on The lamp is on Your projector is waiting for in...

Страница 53: ...switch is off Your projector isn t connected to the power source Your projector has an internal problem To resolve the issue follow these steps 1 Check the power source and then make sure that all th...

Страница 54: ...he lamp 4 If your projector still doesn t turn on turn off the master power switch unplug the power cord and then contact your authorized SMART reseller LAMP ON STANDBY TEMP Off Flashing Red Solid Red...

Страница 55: ...or light sequence the icon appears and your projector turns off during use your projector has an internal problem To resolve the issue follow these steps 1 Turn off the master power switch 2 Unplug th...

Страница 56: ...e lower right part of the interactive whiteboard s frame The ready light indicates the operational state of the controller module If the interactive whiteboard starts responding unusually or if the LE...

Страница 57: ...Interface Settings Timing and Command Processing Command Inventory To allow the ECP to sequence the commands To control the sequence programmatically Query Commands Projector Power Control Commands Se...

Страница 58: ...nds and responses with a carriage return To configure your serial interface 1 Connect your computer to the ECP serial connector using a straight through DB9M to DB9F cable 2 On your computer start you...

Страница 59: ...program doesn t process commands during this delay In the On state if the current input source doesn t send a signal a black screen with the SMART Technologies logo a Command Failed message appears w...

Страница 60: ...he powering cycle to finish and select an input source Allow the ECP to sequence the commands Control the sequence programmatically CAUTION Cycling power to the projector repeatedly can lock or damage...

Страница 61: ...to sequence the commands 1 Type on and then press ENTER 2 Type set input vga1 and then press ENTER To control the sequence programmatically Send Command on Wait for Response Send Command get powersta...

Страница 62: ...get powerstate Displays the projector s power state Idle Powering On or Cooling Power state get brightness Displays the projector s brightness setting Brightness get contrast Displays the projector s...

Страница 63: ...value equal to Brightness set brightness is a value between 16 and 16 The sign represents the value s positive or negative sign and represents the numeric value Sets the brightness to an exact value b...

Страница 64: ...54 Remote Management of Your 600i2 Interactive Whiteboard System 99 00850 21 B0...

Страница 65: ...he materials from your product Please think about how you intend to dispose of any product that has a WEEE symbol or accompanying WEEE guidelines If you need more information on the collection reuse a...

Страница 66: ...ments for China s EIP Restriction of Certain Hazardous Substances RoHS Directives SMART Technologies supports global efforts to ensure that electronic equipment is manufactured sold and disposed of in...

Страница 67: ...t www2 smarttech com st en US Where to Buy All SMART products include online telephone fax and e mail support Online www smarttech com contactsupport Telephone 1 403 228 5940 or Toll Free 1 866 518 67...

Страница 68: ...58 Customer Support 99 00850 21 B0 Warranty Product warranty is governed by the terms and conditions of SMART s Limited Equipment Warranty that shipped with the SMART product at the time of purchase...

Страница 69: ...ental requirements 7 Location 8 Before using your system Final steps 25 C Cables Harness cable ECP 3 Optional accessories 5 Cautions Dust 8 Electrostatic discharge 8 Environment 7 Humidity 7 Water and...

Страница 70: ...ing the projector lamp 33 Replacing the projector plate assembly 38 Resetting all settings 30 Resetting the lamp timer 39 S Security Cable 18 Securing the pen tray to its brackets 19 Securing the pen...

Страница 71: ...Resetting all settings 30 Resetting the lamp timer 39 Status display 30 System features 3 Using 26 Won t turn on 41 Using Adjusting your Unifi 45 projector settings 27 After completing installation 2...

Страница 72: ...62 Index 99 00850 21 B0...

Страница 73: ......

Страница 74: ...ART Technologies 3636 Research Road NW Calgary AB T2L 1Y1 CANADA www smarttech com support www smarttech com contactsupport Support 1 403 228 5940 Toll Free 1 866 518 6791 U S Canada 99 00850 21 REV B...

Отзывы: