86
87
Maintenance
Maintenance
F Wiper blade cleanliness check and replacement
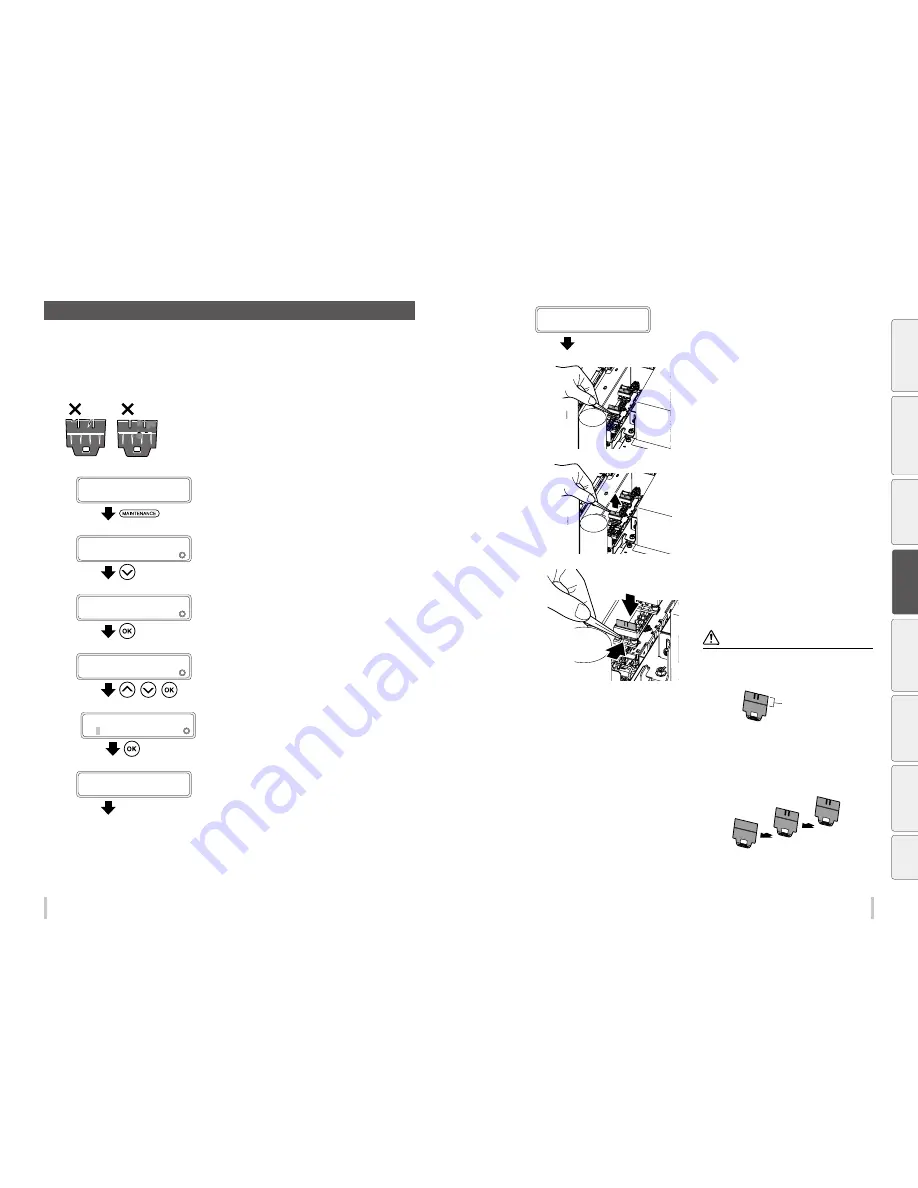
Replace the wiper blade in the following cases.
- When a printer message prompts you to do so.
- When you notice that the blade is not clean or damaged during a daily inspection.
Follow the procedure below to replace the wiper blade.
Always replace the 3 blades at the same time.
1
PRINTER READY
01: PAPER / 1626mm
Press the
MAINTENANCE
key.
2
MAINTENANCE
2
START MAINTENANCE
Press the
Down
key to select
WIPER
MAINTENANCE
.
3
MAINTENANCE
2
WIPER MAINTENANCE
Press the
OK
key.
4
WIPER MAINTENANCE
2
REPLACE BLADE
,
,
Press the
Up
and
Down
keys to select
REPLACE BLADE
, and then press the
OK
key.
5
>REPLACE BLADE
OK?
Press the
OK
key to start the operation.
To cancel the operation, press the
CANCEL
key.
6
WIPER IS MOVING...
PLEASE WAIT
The wiper stops moving.
7
OPEN COVERS AND
REPLACE WIPER BLADE
Open the front cover, and then the capping
cover.
8
Pinch the lower edge of the wiper blade with
a pair of tweezers and pull out the plastic
protrusion.
9
Lift upward to remove the wiper blade.
10
(1)
(2)
Pinch the rubber portion of a new wiper
blade with the pair of tweezers and insert the
wiper blade straight from the top. Install it so
that the plastic protrusion fits into the hole of
the rubber portion.
CAUTION
The front and back of the wiper blade are the same.
As the upper portion of the wiper blade touches directly
the print head, do not touch it with your hands or pinch
it with the tweezers when handling.
Upper portion of
the wiper blade
Replace the two rubber blades and the sponge blade.
Install the blades in the following order starting from
the rear.
Rubber
g
Rubber
g
Sponge
If you make a mistake in the order, cleaning will not
be performed effectively and the print heads will
malfunction.
(3) Sponge
(2) Rubber
(1) Rubber
Be
fo
re
p
rin
tin
g
Lo
adi
ng
the
m
edi
a
A
dj
us
tm
ent
M
ai
nt
enan
ce
A
dv
an
ce
d
op
er
ati
on
s
Trou
ble
sh
oo
tin
g
M
enu
tr
ee
Ap
pe
nd
ix
Содержание IP-6620
Страница 112: ...222 ...


