background image

32

33

Before printing

Before printing

Online and offline

The printer operates in both online and offline states. 

When the printer is in online:  
   - The printer prints the data sent from the computer’s Raster Image Process (RIP) software. 
When the printer is in offline: 
   - The menu is operated with the operation panel keys. 

 
The Online key switches between online and offline states. 
When the MENUADJUSTMAINTENANCENOZZLE PRINT, or PH.RECOVERY key is pressed in online state, the 
printer switched to offline to make menu operations possible. 
 

Online 

When the online LED is on, the printer is online.

Media of 1626 mm (64 inches) in width 

Media name: PAPER 

The number of the selected media: 01


PRINTER READY 
01: PAPER / 1626mm

Online state (idle mode) display

When the online LED blinks, the printer is printing. 

Print direction 

BI: Bidirectional 
UNI: Unidirectional

Density 

ND: Normal density 
HD: High density

Print mode 

DRAFT 

FAST PRODUCTION 

PRODUCTION 

STANDARD 

QUALITY 

HIGH QUALITY 

MAX QUALITY


PRINTING 
NORMAL  ND  BI

Online state (print mode) display


Offline 

When the online LED is off, the printer is offline.

 
The message displayed on the panel when the printer switches to offline differs depending on the key that has been pressed. 
 

When the ONLINE key is pressed:


OFFLINE

When the ADJUST key is pressed:


ADJUST  


2

MEDIA ADVANCE 

When the PH.RECOVERY key is pressed:


PH RECOVERY 

2

NORMAL 


When an operator call error is displayed... 


š

When an operator call error ( 


page 173

) is displayed, the printer may not operate even if the CANCEL key is pressed.

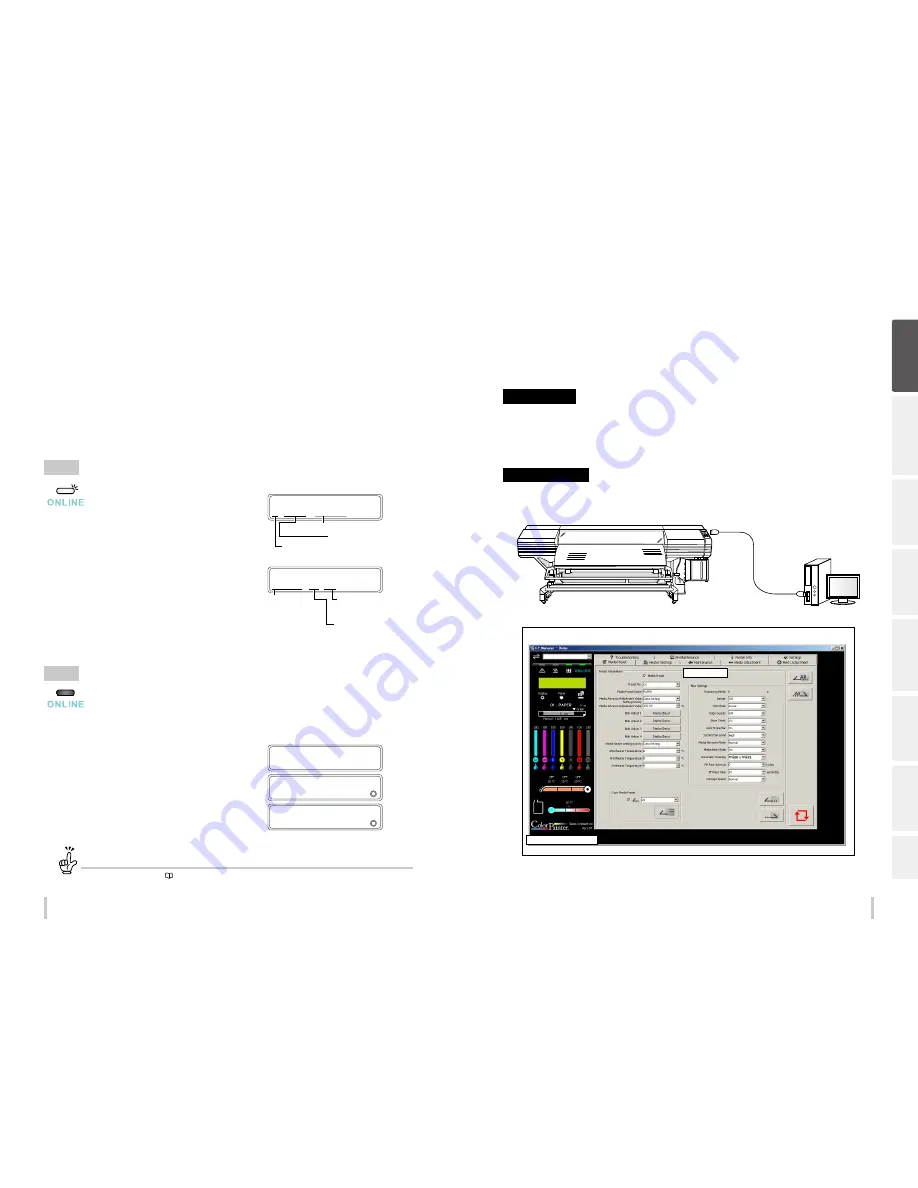
CP_Manager

The Printer supports the CP_Manager software which provides a general view of the printer status. The following 
operations can be performed with CP_Manager™. 
 

Panel operations 

- Display the printer status 
- Create media preset, input adjustment values 
- Execute nozzle print, adjustment patterns print 
- Maintenance time notice, maintenance operation 
 

Additional functions 

- Display operation guidance 
- Display the instruction manual (PDF) 
 

Printer

Computer

USB interface


Printer status display

Media preset

CP_Manager display example


Install CP_Manager™ using the CD-ROM supplied with the printer.

Be

fo

re

 p

rin

tin

g

Lo

adi
ng

 the

 m

edi

a

A

dj

us

tm

ent

M

ai

nt

enan
ce

A

dv

an

ce

op

er

ati

on

s

Trou
ble

sh

oo

tin

g

M

enu

 tr

ee

Ap
pe

nd

ix

Содержание IP-6620

Страница 1: ...printer Keep this manual for future reference User s Guide U00130312100 Solvent Ink Color Inkjet Printer IP 6620 Seiko I Infotech Inc Before printing Loading the media Adjustment Maintenance Advanced operations Troubleshooting Menu tree Appendix ...

Страница 2: ... at his own expense The CE mark that shows that the products sold in the EU are conformed to the requirements of EC directive is statutorily required to be affixed to the products In each directive the scope of directive to be applied to equipment is explicitly defined Our company s product IP 6620 conforms the EMC directive 2004 108 EC low voltage directive 2006 95 EC and RoHS Directive 2011 65 E...

Страница 3: ...ity Media jam caused by skewed media Raise the media with the media lifter Incorrect winding Move the take up reel unit toward you Colors on the right and left differ due to skewed media The printout is not clean due to media contacting the print heads Examples Be sure to pay attention to the following three points to maintain an excellent print quality and use the printer over a long time 1 Load ...

Страница 4: ...y become visible and the image may appear blurred if the bidirectional print position is not adjusted The printer has been designed to facilitate adjustment The capping unit is dirty The print heads are dirty Maintenance status and periods can be grasped at a glance Use CP_Manager to make maintenance operations easier Clean the capping unit 3 Perform the necessary maintenance operations Check the ...

Страница 5: ...he power Load the roll media Replace the media Starting out PH RECOVERY NORMAL Check the Waste ink bottle Check stains on the wiper blade Perform a print head cleaning NORMAL Check the wiper cleaning liquid Clean the capping unit Perform a nozzle print Regular Inspection Maintenance page 31 page 163 page 42 page 30 page 29 page 36 page 43 page 82 page 86 page 79 page 84 page 76 page 80 ...

Страница 6: ...of time When you want to PERFORM DAILY MAINTENANCE NOW Wiper cleaning liquid Wiper sponge Wiper blade Waste ink bottle Replace consumables A warning message is displayed The media is not straight The panel operation is not possible The heater does not warm up Smears or stripes appear on the print page 132 page 153 page 148 page 92 page 143 page 157 page 104 Replacement and trouble page 84 page 178...

Страница 7: ...rmation 114 Check the remaining ink level 114 Export printer information 115 Check remaining media length 116 Check the USB connection status 118 Check the firmware version on the printer 119 Check the total print length 120 Handle the media 122 Create a new media preset 122 Minimize the right and left margins 125 Prevent the media from sticking and wrinkling 128 Prevent the media from lifting up ...

Страница 8: ...tion Operate the printer carefully near the printer s movable parts so that your hands or your clothes are not caught in the printer Install and operate the printer in a well ventilated area Otherwise the operator may feel sickish In such a case take a rest in a well ventilated place Media rolls are heavy Handle them with care using a dolly or other tools to prevent them from falling Dropping a me...

Страница 9: ...sassemble the ink cartridges They are intended for single use only 6 Do not drop the ink cartridges Avoid shock to them The drop or shock may cause an ink leakage Media Supported media The Printer supports solvent inkjet media of the types below Note that print conditions may change depending on environmental conditions and the media production batch So you are recommended to test the print with t...

Страница 10: ...stripe YES Color stripe YES 32 6 mm 27 6 mm 10 0 mm 10 0 mm 10 0 mm 5 0 mm 5 0 mm 5 0 mm Without mesh printing kit nor wide type media edge guards for platen sheet Printable area Manual legend Notational rules The notational rules used for explanation in this guide are as follows Marks WARNING Boxes marked with a WARNING describe points of caution to avoid serious personal injury CAUTION Boxes mar...

Страница 11: ...duct The following components are delivered with the printer and must installed to the printer during installation Check that all the components below are delivered If any item is missing or damaged contact the dealer from whom you purchased the printer or the nearest service representative Printer 1 unit with USB interface with the feed unit and take up reel unit Items packed with printer Waste i...

Страница 12: ...e and humidity ranges the print process may stop or the print quality may be degraded Places where the printer should not be installed Do not install the printer in the following places z z Places near a fire z z Places exposed to direct sunlight z z Places subject to vibration z z Places with excessive dust z z Places subject to extreme changes in temperature or humidity z z Places near an air co...

Страница 13: ...leaning the capping unit or the carriage Operation panel Equipped with LEDs and LCD to display the printer status and keys to set functions Inner take up Winding off Outer take up Pressure roller lever A lever used to fixe or release the media Moves together with the pressure roller lever at the printer front side Exhaust attachment option Installation locations Power inlet Connect the power cable...

Страница 14: ...ay information about the printer and change printer settings ADJUST Used to enter the adjustment menu MAINTENANCE Used to enter the maintenance menu NOZZLE PRINT Used to perform a nozzle print PH RECOVERY Used to enter the cleaning menu Before printing Loading the media Adjustment Maintenance Advanced operations Troubleshooting Menu tree Appendix Carriage Houses the print heads inside and prints i...

Страница 15: ...ff O Plug one end of the supplied power cable into the printer power inlet and the opposite end into a power outlet 2 Switch on Turn on I the printer power switch at the back of the printer Printer heater unit The printer is equipped with three heaters for ink fusing and image quality stabilization Print heater front Penetrates ink into media to fuse the ink Preheater rear Preheats media Afterheat...

Страница 16: ...the print head in good condition during shutdown the fill cap operation state where the cap is filled with ink is performed To quickly turn off the power press the power switch while holding the CANCEL key to skip the fill cap operation and turn off the power However executing the fill cap operation is generally recommended Notes After turning the power off wait at least 5 seconds before turning i...

Страница 17: ...print mode display Offline When the online LED is off the printer is offline The message displayed on the panel when the printer switches to offline differs depending on the key that has been pressed When the ONLINE key is pressed OFFLINE When the ADJUST key is pressed ADJUST 2MEDIA ADVANCE When the PH RECOVERY key is pressed PH RECOVERY 2NORMAL When an operator call error is displayed When an ope...

Страница 18: ...nner with no gloss and semi glossy banner with medium gloss Mesh banner with liner Mesh banner is perforated banner media reinforced with mesh grid As its open structure allows wind to permeate the mesh banner is wind and tear resistant and withstands heavy wind Depending on whether liner ink absorbing back sheet is present the mesh banner is classified into two categories backed and unbacked Back...

Страница 19: ... this adhesive may adhere to the paper guide or the platen In this case be sure to remove all adhesive before loading the new media 2 Move the left media holder fully to the left 3 Move the right media holder fully to the right 4 Install the media jack and media stand The media will be loaded from the left side so install the media lifter to the left side and the media stand to the right side Inst...

Страница 20: ...k s handle counter clockwise to remove the jack Then install it to the right side of the roll 9 Adjust the roll level using the media jack and insert the right media holder into the roll the same way as you did for the left side 10 Turn the media jack s handle counter clockwise to lower and remove the jack Then put the media jack and the media stand away Note If you leave the media jack or the med...

Страница 21: ...he media Adjust the media position so that the edge is place above the gradations Note Always move the media holders to adjust the position Moving only the media may cause it to skew 14 Turn the knob screws on both media holders to secure them 15 While keeping your hand on the media to straighten it turn the flange to wind the media until only 20 cm comes out from the front cover Note Do not try t...

Страница 22: ... rotate and unwind When back feeding more than 30 cm or media do not do it in a single operation but back feed the media slowly while removing the slack by rotating the media roll manually When the surface to be printed on is at the outer side of the roll When the surface to be printed on is at the inner side of the roll Rear paper guide Feed unit tubes Roll media Rear paper guide Feed unit tubes ...

Страница 23: ...ke up direction Tension and loose mode setting procedure Set the mode using TUR MODE in the EDIT MEDIA PRESETS menu 1 PRINTER READY 01 PAPER 1626mm Press the MENU key 2 MENU 2INFORMATION Press the Down key to select EDIT MEDIA PRESETS 3 MENU 2EDIT MEDIA PRESETS Press the OK key 4 EDIT MEDIA PRESETS 2SELECT MEDIA Press the Down key to select MISC SETTINGS 5 EDIT MEDIA PRESETS 2MISC SETTINGS Press t...

Страница 24: ...e guide bar falling In tension mode Tension mode is recommended for tarpaulin media Leave the guide bar in the standby position Note Taking up the media in tension mode with the guide bar in the usage position may cause the media to shift Procedure to set the media on the TUR unit 1 Put the take up direction switch installed on the right media holder in the off position Inner take up Winding off O...

Страница 25: ...on to keep the media straight as it may skew otherwise 9 Rotate the tube one turn to prevent the media from detaching from the tube To take up the media either rotate the flange manually or use the take up reel switch while feeding the media Switch between the on and off positions of the take up reel switch to wind the adequate length of media 10 Feed the media a little more to create a slack 11 W...

Страница 26: ... media output side 1 Feed the media until all the printed part that will be used has passed the output paper guide 2 Cut the media at the edge of the output paper guide If you use the optional cutter unit refer to Cutting the media on page 55 3 Place the guide bar in the standby position and pull the TUR unit toward you Hold the front pipe of the TUR unit and pull it toward you 4 Install the media...

Страница 27: ...ia jack 9 Turn the media jack s handle counter clockwise to lower the media and then remove the media Notes The media is heavy Always use two or more people when handling roll media to prevent injury such as when the media fall over someone s feet Also if you feel that the media is too heavy take measures to handle it properly such as increasing the number of people carrying out the operation Inco...

Страница 28: ...shaft Make sure the shaft is inserted completely in the flange Pay attention not to lose the R pin or the pin 3 Install the R pin Cutting the media The following explains the procedure to cut the media using the optional cutter unit 1 Place the guide bar in the usage position 2 Fix both media edges using media clips 3 Move the media cutter blade to cut the media Arrow mark Note An arrow mark g is ...

Страница 29: ...de Do not forcibly cut the media otherwise the blade may be damaged and lose its cutting performance Pay attention not to drop the media cutter blade If it falls the blade may be damaged and lose its cutting performance Handle the cutter blade with care It may be impossible for the cutter blade to cut thick media or cloth In such cases use a pair of scissors or other adequate means Forcibly cuttin...

Страница 30: ...as been changed The media advance mode has been changed The suction fan setting low medium high has been changed When the media advance adjustment value is incorrect When the media advance adjustment value is incorrect banding horizontal bands appears periodically on the printout Two modes are available to adjust media advance automatic print adjustment and manual print adjustment With automatic p...

Страница 31: ...dvance adjustment value The procedure is complete During this procedure the printer prints and checks patterns similar to those shown below 11 If the print quality has not been improved perform manual print adjustment Note The printer cannot set a correct adjustment value through automatic print adjustment in the following cases In such cases improve the conditions or perform manual print adjustme...

Страница 32: ... Press the OK key 5 MEDIA ADVANCE 2MEDIA ADVANCE AUTO Press the Up and Down keys to select MEDIA ADV MANUAL 6 MEDIA ADVANCE 2MEDIA ADV MANUAL Press the OK key 7 MEDIA ADV MANUAL 2MEDIA ADV VALUE Press the Up and Down keys to select MEDIA ADV VALUE 8 MEDIA ADV MANUAL 2MEDIA ADV VALUE Press the OK key 9 Registrationmark Aregistrationmark isdisplayedifthe mediapresetisregistered XXX XX Mediaadvancead...

Страница 33: ...n from step 9 through 17 Check the media advance adjustment pattern When the media advance adjustment value is too low When the media advance adjustment value is correct When the media advance adjustment value is too high Notes If the correct media advance adjustment value differs between the media right and left sides set the average value If the correct media advance adjustment value differs bet...

Страница 34: ...not have much experience with the printer Users who find manual print adjustment difficult Users who want finish adjustment quickly Automatic print adjustment may not be available depending on the media type If automatic print adjustment does not improve the print quality use manual adjustment Manual print adjustment is recommended for the following users Users who needs the best print quality Aut...

Страница 35: ...h surface Media with an extremely high or low degree of reflection Media on which the pattern cannot be printed properly such as when the ink tends to bleed The media surface is soiled with dust ink finger marks etc A gap tends to form between the platen and the media Lots of nozzles are clogged The media heater temperatures are not suitable The environmental luminosity is too strong Manual print ...

Страница 36: ...et the left adjustment value for the M print head enter 2 as in the pattern to the right the lines are separated for 11 but they form only one line for 2 M 11 M 2 13 1 DRA FAST PR PRO 2EXECUTE Press the Up and Down keys to select right or left adjustment and the color of the print head This example explains how to set a bidirectional adjustment value of 2 for the left adjustment of the M print hea...

Страница 37: ...UAL1 2M_L XX Set the bidirectional adjustment values of the other side and the other print heads following the same procedure When bidirectional adjustment values have been set for both sides of all print heads the adjustment procedure is complete Before printing Loading the media Adjustment Maintenance Advanced operations Troubleshooting Menu tree Appendix Maintenance ...

Страница 38: ...eaning IP6 252 Cap cleaning liquid set A 1 IP5 120 Cleaning stick 1 IP7 163 Cleaning roller set 1 Normal cleaning C Nozzle print D Waste ink bottle check and replacement IP6 109 Waste ink bottle E Wiper cleaning liquid check and supply IP6 251 Wiper cleaning liquid set A 1 F Wiper blade cleanliness check and replacement IP6 259 Wiper blade 1 G Wiper sponge replacement IP6 258 Wiper sponge H Printe...

Страница 39: ...roller to the cleaning stick 6 1ST WIPING OPERATION PLEASE WAIT 1 00 Carriage stops moving After the wiping of the print heads finishes the carriage moves to the maintenance area The printer issues a warning beep When the carriage moves the printer issues a warning beep To disable the warning beep see the page 149 7 OPEN COVERS AND CLEAN CAPS After the carriage has moved to the maintenance area op...

Страница 40: ... You can perform PH recovery in the following situations When the printer is idle online When the printer is offline During printing When the printer is in pause 2 PH RECOVERY 2NORMAL Press the OK key 3 NORMAL 2PRINT HEAD 1234567 Press the Right and Left keys to select the digit and press the Up and Down keys to select the print head number The numbers correspond to the print head to be cleaned Th...

Страница 41: ... this mark Example when lines for nozzles 24 and 133 are missing in the printout Check that there are no missing or bent lines If missing or bent lines are found with the nozzle print perform the normal cleaning If missing or bent lines remain after several normal cleanings set NOZZLE MAP with the procedure below Nozzle map setting 1 PRINTER READY 01 PAPER 1626mm Press the ADJUST key You can set u...

Страница 42: ...nit 4 Slide the lever up and install a empty waste ink bottle 5 Lower the lever and make sure that the splash guard was lowered Then the operation panel will request you to reset the waste ink counter 6 RESET WST INK COUNT 2NO RESET WST INK COUNT 2YES Press the Up and Down keys to select YES and then press the OK key If you do not reset the waste ink counter The printer will not issue the message ...

Страница 43: ...To cancel the operation press the CANCEL key 6 OPEN COVERS REPLACE WIPER CLEANG LIQUID Open the front cover and then the capping cover 7 Raise the old wiper cleaning liquid bottle a little and pull out the bottle after making sure that all the liquid has flowed into the printer Note Visually check that the waste ink bottle is not full before removing it 8 Printer set cap Replace the cap of the new...

Страница 44: ...LADE Open the front cover and then the capping cover 8 Pinch the lower edge of the wiper blade with a pair of tweezers and pull out the plastic protrusion 9 Lift upward to remove the wiper blade 10 1 2 Pinch the rubber portion of a new wiper blade with the pair of tweezers and insert the wiper blade straight from the top Install it so that the plastic protrusion fits into the hole of the rubber po...

Страница 45: ...ont cover 12 REPLACED WIPER BLADE 2NO Press the Down key to select YES 13 REPLACED WIPER BLADE 2YES Press the OK key 14 WIPER MAINTENANCE 2REPLACE BLADE G Wiper sponge replacement Replace the wiper sponge with the procedure below when a printer message prompts you to do so Generally the wiper sponge should be replaced approximately once every six month 1 PRINTER READY 01 PAPER 1626mm Press the MAI...

Страница 46: ...r as it goes until it clicks 10 Install a new wiper cleaning liquid bottle page 84 Wiper cleaning liquid check and supply 11 AFTER REPLACING WIPER SPONGE CLOSE COVERS Close the cap cover and the front over 12 REPLACED SPONGE 2NO Press the Down key to select YES 13 REPLACED SPONGE 2YES Press the OK key 14 WIPER MAINTENANCE 2REPLACE SPONGE You may also be prompted by a printer message to replace one...

Страница 47: ...es a warning beep When the carriage moves the printer issues a warning beep To disable the warning beep see the page 149 6 OPEN COVERS AND CHECK PRINT HEADS Open the front cover and then the maintenance cover 7 Carriage Head guard Clean the head guard at the right and left sides of the carriage using a cleaning swab or a soft cloth Nozzle surfaces Do not clean directly the nozzle surfaces Execute ...

Страница 48: ...ater or water diluted neutral detergent wring it and clean the exterior Notes Always turn the printer off before cleaning or doing other maintenance operation on the printer Never use volatile solvent such as thinner and benzene The coating may come off or discolor In case of dust or paper dust clean the printer with a vacuum cleaner If lots of ink or other substance adhere to the printer clean it...

Страница 49: ...tral detergent and wipe out once more Use a cotton swab with a tip of 3 mm diameter I Sheet mount cleaning If the capping unit or the nozzle surfaces on the print heads are very dirty clean these parts with a head cleaning sheet Nozzle surface Cap Capping unit Print head Note Do not rub the print heads with a cleaning swab This may cause the printer to malfunction Preparing the sheet mount cleanin...

Страница 50: ...dations and apply 2 cc to the gray sheet cap cleaning sheet for each color Apply the liquid in the vertical direction starting from each color tube indicated by the arrows twice in parallel For the 6 color specifications printer apply the liquid on the sheet only for the six first caps starting from the left For the 7 color specifications printer apply the liquid for the seven caps Press the OK ke...

Страница 51: ... COVERS Open the front cover and then the capping cover 13 REMOVE PINK SHEET Remove the pink sheet head cleaning sheet and press the OK key 14 REMOVE GRAY SHEET Remove the gray sheet cap cleaning sheet and press the OK key 15 CLOSE COVERS Close the capping cover and the front cover CARRIAGE IS MOVING PLEASE WAIT Carriage stops moving The carriage moves to the home position START CLEANING BOTTLE IS...

Страница 52: ...IN ONLINE ADJUST MAINTENANCE NOZZLE PRINT PH RECOVERY ON 2 Keep the front cover closed 3 Take up the media on the TUR unit or remove the media from the printer If you keep the media loaded on the printer for a long time the media may wrinkle on the platen or a gripping trace may be left on the media To keep the media in good condition the operation below is recommended Especially after printing on...

Страница 53: ...ed Prepare the storage liquid set IP7 137 Clean the print head and the ink flow path with the cleaning liquid Prepare the cleaning liquid set IP7 136 After the head wash Insert ink trays and charge the ink system Perform the daily maintenance When leaving the Printer for more than one month contact your service representative beforehand The service call error is displayed regardless of whether ser...

Страница 54: ...se the ink box cover 13 START SL CHARGING BOTTLE IS EMPTY Confirm that the waste ink bottle is empty and press the OK key Y YY Required time min sec decrease every 10 seconds CHARGING SL PLEASE WAIT Y YY 14 OPEN INK BOX COVER Open the ink box cover 15 Repeat steps 7 to 14 PH MAINTENANCE 2CLEAN FOR STORAGE Head wash Set the cleaning liquid cartridges to the optional ink trays in advance to facilita...

Страница 55: ...r 10 START DRAINING BOTTLE IS EMPTY Confirm that the waste ink bottle is empty and press the OK key Draining starts Y YY Required time min sec decrease every 10 seconds DRAINING PLEASE WAIT Y YY 11 OPEN INK BOX COVER Open the ink box cover 12 LOAD K CL cartridge Install the ink trays containing the cleaning liquid cartridges 13 CLOSE INK BOX COVER Close the ink box cover 14 START CL CHARGING BOTTL...

Страница 56: ...very 10 seconds DRAINING PLEASE WAIT Y YY 19 Repeat steps11 to15 20 OPEN INK BOX COVER Open the ink box cover 21 REMOVE K CL cartridge Remove the ink trays containing the cleaning liquid cartridges 22 CLOSE INK BOX COVER Close the ink box cover 23 START DRAINING BOTTLE IS EMPTY Confirm that the waste ink bottle is empty and press the OK key Draining starts Y YY Required time min sec decrease every...

Страница 57: ...PEN INK BOX COVER Open the ink box cover 8 INSTALL K INK CARTRIDGE Insert the ink trays 9 CLOSE INK BOX COVER Close the ink box cover 10 START INK CHARGING BOTTLE IS EMPTY Confirm that the waste ink bottle is empty and press the OK key Y YY Required time min sec decrease every 10 seconds CHARGING INK PLEASE WAIT Y YY 11 START CLEANING BOTTLE IS EMPTY Press the OK key Normal cleaning starts The pan...

Страница 58: ...TION Press the Down key to select INK INFORMATION 3 INK INFORMATION 2REMAINING INK Press the OK key 4 CC ink color XXX Remaining ink REMAINING INK 2CC XXX When the remaining ink total ink used ink falls under 2 LOW is displayed Press the Up and Down keys to select the color whose ink you want to check Export printer information Menu information can be exported in the PDF format to the USB drive 1 ...

Страница 59: ...y 2 MENU 2INK INFORMATION Press the Down key to select REMAINING MEDIA 3 MENU 2REMAINING MEDIA Press the OK key 4 Displayed in the unit set in the length unit menu XX Preset number NNNNNN Media name YYY Remaining length REMAINING MEDIA 2XX NNNNNN YYYm Not during printing 1 PRINTER READY 01 PAPER 1626mm Press the MENU key 2 MENU 2INFORMATION Press the Down key to select INFORMATION and then press t...

Страница 60: ...t SPEED The printer checks the connection speed 7 USB INFO 2SPEED XXXXX The panel displays the USB connection speed The panel should display HIGH SPEED If the panel displays FULL SPEED the print process will be slower Check the firmware version on the printer During printing The firmware version cannot be checked during printing Check the version when the printer is not printing Not during printin...

Страница 61: ...u TOTAL PRINT LENGTH YYYYYm Not during printing 1 PRINTER READY 01 PAPER 1626mm Press the MENU key 2 MENU 2INFORMATION Press the Down key to select INFORMATION and then press the OK key 3 INFORMATION 2INK INFORMATION Press the Down key to select TOTAL PRINT LENGTH 4 INFORMATION 2TOTAL PRINT LENGTH Press the OK key 5 Displayed in the unit set in the length unit menu TOTAL PRINT LENGTH YYYYYm Before...

Страница 62: ...ED This example explains how to enter a media advance adjustment value for the media preset number 02 1 PRINTER READY 01 PAPER 1626mm Press the MENU key 2 MENU 2INFORMATION Press the Down key to select EDIT MEDIA PRESETS 3 MENU 2EDIT MEDIA PRESETS Press the OK key 4 EDIT MEDIA PRESETS 2SELECT PRESET NO Press the OK key 5 SELECT PRESET NO 201g 01PAPER Press the Down key 6 SELECT PRESET NO 201g 02Gl...

Страница 63: ...DS ON ON ON ON ON SKEW CHECK ON ON ON ON ON COLOR STRIPE OFF OFF OFF OFF OFF SUCTION FAN POWER MEDIUM MEDIUM MEDIUM LOW LOW MEDIA ADVANCE MODE FORWARD ONLY FORWARD ONLY FORWARD ONLY FORWARD ONLY FORWARD ONLY MEDIA BACK MODE ON ON ON ON ON AUTO PH CLEANING BEFORE AFTERPRINT BEFORE AFTERPRINT BEFORE AFTERPRINT BEFORE AFTERPRINT BEFORE AFTERPRINT PH REST INTERVAL 0 CYCLES 0 CYCLES 0 CYCLES 0 CYCLES 0...

Страница 64: ... 4 EDIT MEDIA PRESETS 2SELECT PRESET NO Press the Down key to select MISC SETTINGS 5 EDIT MEDIA PRESETS 2MISC SETTINGS Press the OK key 6 MISC SETTINGS 2REMAINING MEDIA Press the Down key to select COLOR STRIPE 7 MISC SETTINGS 2COLOR STRIPE Press the OK key 8 COLOR STRIPE 2OFF Press the Down key once 9 COLOR STRIPE 2ON Press the OK key 10 COLOR STRIPE 2ON Press the CANCEL key 11 MISC SETTINGS 2COL...

Страница 65: ...DIT MEDIA PRESETS 2MISC SETTINGS Press the OK key 6 MISC SETTINGS 2REMAINING MEDIA Press the Down key to select SUCTION FAN POWER 7 MISC SETTINGS 2SUCTION FAN POWER Press the OK key 8 SUCTION FAN POWER 2MEDIUM Press the Down key once 9 SUCTION FAN POWER 2LOW Press the OK key 10 SUCTION FAN POWER 2LOW Press the CANCEL key 11 MISC SETTINGS 2SUCTION FAN POWER Press the MENU key PRINTER READY 01 PAPER...

Страница 66: ...RINKLES Advance feeding sequence to prevent wrinkles on solvent printing coated paper If five minutes have elapsed after the end of the last printing the printer feeds 55 cm of media before starting to print Prevent the media from lifting up The vacuum pressure applied to the media in the printing zone helps to hold the media down on the platen to keep the distance from media to print heads consta...

Страница 67: ... the preset menu 1 PRINTER READY 01 PAPER 1626mm Press the MAINTENANCE key 2 MAINTENANCE 2START MAINTENANCE Press the Down key to select PH MAINTENANCE 3 MAINTENANCE 2PH MAINTENANCE Press the OK key 4 PH MAINTENANCE 2CLEAN FOR STORAGE Press the Down key to select ADJUST PH HEIGHT 5 PH MAINTENANCE 2ADJUST PH HEIGHT Press the OK key 6 ADJUST PH HEIGHT 2OK Press the OK key CARRIAGE IS MOVING PLEASE W...

Страница 68: ...he printer and the carriage is narrow if it is hard to reach the head up down mechanism and the head securing screws move the carriage to the right or the left manually Confirm that the right and left head securing screws are tightened If the carriage moves with the head securing screws loosened they may strike the media or edge guards causing poor image quality and damage to the printer Always op...

Страница 69: ...e printer resumes printing if it was interrupted OFF Automatic cleaning is not performed We recommend using this mode when printing continuously several data files on media with which differences between printouts will be noticeable if automatic cleaning is performed between two files However since cleaning is not performed automatically determine suitable timing to execute cleaning manually Nozzl...

Страница 70: ...red in media preset No 2 to media preset No 10 1 PRINTER READY 01 PAPER 1626mm Press the MENU key 2 MENU 2INFORMATION Press the Down key to select EDIT MEDIA PRESETS 3 MENU 2EDIT MEDIA PRESETS Press the OK key 4 EDIT MEDIA PRESETS 2SELECT PRESET NO Press the Down key to select PRESET COPY SOURCE 5 EDIT MEDIA PRESETS 2PRESET COPY SOURCE Press the OK key 6 PRESET COPY SOURCE 2 01 PAPER Press the Up ...

Страница 71: ...et media without reloading the media The following procedure explains how to change from Paper media type in preset No 1 to Glossy media type in preset No 2 The media type parameter 02 Glossy here is called automatically when starting printing together with the 24 parameters set for each media preset 1 PRINTER READY 01 PAPER 1626mm Press the MENU key 2 MENU 2INFORMATION Press the Down key to selec...

Страница 72: ...tion as quickly as possible Otherwise the print heads may dry which may cause ink ejection failure In such a case perform a cleaning 1 BACKFEEDING MEDIA Rewind the media See Feed or rewind media on page 142 CAUTION Rewind the media after the printout has completely dried If the media is rewound while the printout is not sufficiently dry the printout may be damaged 2 PRINTER READY 01 PAPER 1626mm P...

Страница 73: ...ust the head margin before printing Advance or rewind the media during the preheating time before printing to adjust the margin to the previous printout Once printing scan has started this function cannot be used for the current job 1 PREHEATING STANDARD ND UNI Press the ONLINE key during the preheating time before printing 2 PRINTER IN PAUSE 01 PAPER 1626mm The printer enters pause mode Keep the ...

Страница 74: ...ight Edge guard moving direction Pivot Directions of strength bend the guard in the clockwise direction In pause mode during print the front cover can be opened and closed without canceling the print job If the edge guards are not correctly placed on the media edges or if the foreign matter is present on the media feeding path put the printer in pause open the front cover and reset the edge guards...

Страница 75: ...ER 1626mm Press the ONLINE key to resume printing 5 PRINTING STANDARD ND UNI Tochangetheprinter sbasicsettings Turn the warning beep off Normally the printer emits a warning beep when an error occurs However the warning beep can be turned off for the three following cases When the print heads are not covered by the caps during daily maintenance operations print head height adjustment or when a med...

Страница 76: ...the PH RECOVERY key 2 2STRONG PH RECOVERY 2NORMAL Press the Up and Down keys to select the cleaning option 3 PH RECOVERY 2NORMAL Press the OK key 4 NORMAL 2PRINT HEAD 1234567 Select the print heads to clean The correspondence between the ink colors and the print head numbers is shown in the table below Head group 1 Head group 2 Head group 3 Lc Lm C Y K M Gy 1 2 3 4 5 6 7 1 Press the Left and Right...

Страница 77: ... advance adjustment value during printing 1 PRINTING STANDARD ND BI Press the Up or Down key while PRINTING is displayed 2 FINE ADJ VAL 099 80 2099 80 Adjustment value when printing starts ncrease or decrease the value by 0 01 with the Up and Down keys Setting range 97 00 to 106 00 Press the Up and Down keys to modify the adjustment value The changed value is applied immediately after change The a...

Страница 78: ...do not use the TUR unit with this mode QUALITY 540 dpi x 540 dpi x DDP 9 1 1 Mode that slightly prioritizes quality compared to standard mode QUALITY HIGH DENSITY 540 dpi x 540 dpi x DDP 9 1 9 Productivity is slightly more prioritized in this mode than in high density high quality mode The ink may takes time to dry as a large quantity of ink is used Consequently do not use the TUR unit with this m...

Страница 79: ...ure registered with the media used AFTERHEATER T 50 50ºC PRINTHEATER T 40 40ºC PREHEATER T 45 45ºC When a media type is selected after installing the media initial temperature values of each heater for the selected media type are displayed on the menu 2 Heating starts after receiving the data from the RIP software RIP data When the heaters temperatures are set with the print and job data from the ...

Страница 80: ...Y ENDED appears automatically for two seconds and then the heater control menu display ends While this message is displayed no key input is effective Heater preset temperature for each media The heater preset temperatures for each media type are listed below Preset the heater temperature according to the media you use Media Media type Recommended heater temperature setting Print mode Afterheater P...

Страница 81: ...dby time Select the time to maintain the standby set temperature of the heater including the time for transition to the standby set temperature after printing 1 PRINTER READY 02 Glossy 1626mm Press the MENU key 2 MENU 2INFORMATION Press the Down key to select SETTING 3 MENU 2SETTING Press the OK key 4 SETTING 2MEDIA HEATER SET Press the Down key to select MEDIA HEATER SET and then press the OK key...

Страница 82: ...ay into its correct slot position in the ink box Note that an ink tray position is decided depending on its ink color REMOVE Y INK CARTRIDGE LCD message Ink color CAUTION Do not remove ink trays in the following cases Otherwise ink may spill in the printer depending on its state which may damage the printer The printer is not turned on because the power was interrupted or because the circuit break...

Страница 83: ...ions Then insert the ink cartridge plate into the ink tray until you hear a click 2 New ink cartridge Plate Ink tray Hook 1 2 5 Insert the ink tray into the slot in the printer Insert the ink tray as far as it goes 6 Close the ink box cover 7 Confirm that the ink cartridge has been successfully replaced When the replacement is successfully completed the printer returns to the online or offline sta...

Страница 84: ...inter Do not forget to set these leveling feet again after moving the printer to secure it Move the printer carefully so that the leveling feet do not hit any obstructions Make sure that the TUR unit casters do not reach the floor when moving the printer Adjustable leveling feet TUR unit s caster Printer s caster If the casters touches the floor remove the screws shown circled in the figure below ...

Страница 85: ...t mode printing does not start with PREHEATING displayed on the operation panel Items to be checked Corrective measures Room temperature Raise the room temperature Recommended temperature 20 to 25ºC Effect of air flow If the air from an air conditioner or a fan is blowing against the paper guide change the air flow direction the orientation of the printer or the location of the printer The transmi...

Страница 86: ...sections coming out from the edge guards it may contact the heads nozzle surfaces and cause nozzles to clog Cut any damaged sections with a pair of scissors or a cutter before installing the media Adhesive coming off the vinyl causing the media to rise Feed the media to beyond the risen area Mediawrinklingandrising Set the suction fan level to HIGH Decrease the printheater temperature Media adheri...

Страница 87: ... panel s POWER switch and the main printer power switch on the rear of the printer and the heater power switch 2 Remove the power cable front he power outlet and then remove it from the power inlet at the rear of the printer 3 Hold the Printer for one minute or more 4 Connect each power cord above to its inlet then connect the two cords to the socket 5 Turn on all three switches above System error...

Страница 88: ...nd open the front cover Check also that the settings are correct See How to clear media jams on page 171 Media errors LIFT THE LEVER AND LOAD THE MEDIA Meaning No media is installed on the printer Action When there is no media install new media If the flange is not attached correctly attach it correctly See Load media on the Printer on page 36 LOAD THE MEDIA Meaning The media cannot be detected Ac...

Страница 89: ...ter checks for skewed media after printing a certain length of media If the media has skewed more than a defined distance the print pauses and a screen where you can select to continue or stop the print is displayed PRINTING STANDARD ND BI The printer checks for skewed media MEDIA SKEW CONTINUE PRINT OK CANCEL Skewed media was detected The ONLINE LED flashes slowly POWER HEATER MENU CANCEL SET ORI...

Страница 90: ...o be replaced Action You are recommended to ask your service representative to replace it REPLACE THE WIPER BLADE Meaning The wiper blades need to be replaced Action Replace the wiper blades REPLACE THE WIPER CLEANING LIQUID Meaning The wiper cleaning liquid is running out Action Supply wiper cleaning liquid REPLACE THE WIPER SPONGE Meaning The wiper sponge needs to be replaced Action Replace the ...

Страница 91: ...me is counted down every 10 seconds 7 PRINTER READY 01 PAPER 1626mm The cleaning is complete The printers return to its state before cleaning Online idle and online Switches to online state Printing Resume printing In pause Stays in pause Fill the cap with ink 1 PRINTER READY 01 PAPER 1626mm Press the MAINTENANCE key You can perform PH recovery in the following situations When the printer is idle ...

Страница 92: ...g temperature humidity range 1 Use the printer within the operating temperature humidity range Note that some media may wrinkles even within the operating temperature and humidity range 2 Use proven media The media storage conditions are not the same as the printer operating conditions The difference between the media storage conditions and the printer operating conditions may cause the media to c...

Страница 93: ...ctly stretched between the paper roll and the pressure roller If the media is loose when performing the media advance adjustment the value will be incorrect Symptom B Print head nozzles are clogged 1 Perform a nozzle print and set nozzle map for the clogged nozzles page 80 2 Check for obstructions such as media lint or ink clot in the nozzle scanning path including the platen surface and remove th...

Страница 94: ...ng on the winding mode tension or loose Be sure to adjust the media advance adjustment value again after changing the suction fan setting Be sure to adjust the media advance adjustment value again after changing the pressure roller lever position If the ionizer is set to ON set it OFF If automatic adjustment has been performed perform manual adjustment Symptom C The media advance accuracy is poor ...

Страница 95: ... head cleaning Be sure to clean the caps 5 Perform SET CAP FOR CLNG 6 Clean the print heads surfaces with print sheet mount cleaning page 97 7 With media that easily creates static electricity the static electricity may cause the ink to dribble With such media set the ionizer to ON 1 8 With some banner media light media edges may touches the print heads which may cause the ink to dribble Symptom C...

Страница 96: ... adjust the media advance adjustment value again after changing the suction fan power Be sure to adjust the media advance adjustment value again after changing the pressure roller lever position If the ionizer is set to ON set it OFF If automatic adjustment has been performed perform manual adjustment Symptom C The media advance accuracy is poor or is not stable 1 Check that the media was installe...

Страница 97: ...r on the printout right and left sides Basic image Cause The media is skewed Cause Solution A skewed media is fed Example of skew Example of dent Media Media Example of skew Example of dent Media Media Printer Printer Bad example Good example 1 Check that the media condition is good If the media roll is damaged or wound in the shape of a cone replace the roll with a good one 2 Check that the media...

Страница 98: ...195 194 Troubleshooting Before printing Loading the media Adjustment Maintenance Advanced operations Troubleshooting Menu tree Appendix Menu tree ...

Страница 99: ...RESS XXX XXX Print progress percentage CURRENT PRINT JOB 2REQUIRED TIME HH MM HH MM Estimated completion time 24 hour display CURRENT PRINT JOB 2PRODUCTIVITY XX X XX X Productivity of the current printing operation by unit of length MENU 2REMAINING MEDIA REMAINING MEDIA XX NNNNNNN YYYm XX Preset number NNNNNN Media name YYY Remaining length in millimeters REMAINING MEDIA XX NNNNNNN YYYYft XX Prese...

Страница 100: ...X Preset number NNNNNN Media name YYY Remaining length in millimeters REMAINING MEDIA XX NNNNNNN YYYYft XX Preset number NNNNNN Media name YYY Remaining length in inches INFORMATION 2TOTAL PRINT LENGTH TOTAL PRINT LENGTH YYYYYm YYYYY Scanning distance in millimeters TOTAL PRINT LENGTH YYYYYYft YYYYY Scanning distance in inches Warning examples INFORMATION 2WARNING INFO CHECK MEDIA FOR WRINKLES PER...

Страница 101: ...ed if the media preset is registered YY Selected preset number NNNNNN Media name EDIT MEDIA PRESETS 2EDIT PRESET NAME EDIT PRESET NAME 2ZXX NNNNNN Z Registration mark A registration mark is displayed if the media preset is registered XX Preset number NNNNNN Media name EDIT MEDIA PRESETS 2MEDIA ADV PRIORITY MEDIA ADV PRIORITY 2ZYYYY Z Registration mark A registration mark is displayed if the media ...

Страница 102: ... XX Currently set temperature YY Set temperature after change Fahrenheit PREHEATER T 2ZXXXgYYY F EDIT MEDIA PRESETS 2DELETE PRESET DELETE PRESET 2ZXX YYYYYY Z Registration mark A registration mark is displayed if the media preset is registered XX Preset number YYYYYY Media name EDIT MEDIA PRESETS 2PRESET COPY SOURCE PRESET COPY SOURCE 2ZXX YYYYYY Z Registration mark A registration mark is displaye...

Страница 103: ...registration mark is displayed if the media preset is registered YYY Setting after change MISC SETTINGS 2AUTO PH CLEANING AUTO PH CLEANING 2ZYYY Z Registration mark A registration mark is displayed if the media preset is registered YYY Setting after change MISC SETTINGS 2PH REST INTERVAL PH REST INTERVAL 2ZXXXXgYYYY CYCLES Z Registration mark A registration mark is displayed if the media preset is...

Страница 104: ...PH UNCAPPED PH UNCAPPED 2YYY YYY Setting after change WARNING SOUND 2TUR OPEN TIMEOUT TUR OPEN TIMEOUT 2YYY YYY Setting after change WARNING SOUND 2INK ERRORS INK ERRORS 2YYY YYY Setting after change SYSTEM 2PART REPLACEMENT PART REPLACEMENT 2YYY YYY Setting after change SYSTEM 2DETECT MEDIA WIDTH DETECT MEDIA WIDTH 2YYY YYY Setting after change SYSTEM 2DETECT MEDIA DETECT MEDIA 2YYY YYY Setting a...

Страница 105: ... QUALITY MAX QUALITY YYYYYYYYY 23 PATTERNS YYYYYYYYY 2FEED MEDIA YYYYYYYYY 2BACK FEED MEDIA MEDIA ADV VALUE 2 ZXXX XgYYY Y Z Registration mark A registration mark is displayed if the media preset is registered XXX X Current adjustment value YYY Y Adjustment value after change ADJUST 2BIDIR POSITION BIDIR POSITION 2MEDIA ADVANCE AUTO MEDIA ADVANCE AUTO 2YYYYYYYYY YYYYYYYYY Bidirectional adjustment ...

Страница 106: ...ame as 1 DRA FAST PR PRO MEDIA ADV MANUAL 23 HIGH QUALITY 3 HIGH QUALITY 2EXECUTE Same as 1 DRA FAST PR PRO MEDIA ADV MANUAL 24 MAX QUALITY 4 MAX QUALITY 2EXECUTE Same as 1 DRA FAST PR PRO ADJUST 2SMART NOZZLE MAP SMART NOZZLE MAP 2CC SMART NOZZLE MAP CC 2 NN XXX CC NN 2XXXgYYY CC Print head color NN Nozzle map number XXX Current setting value XXX Current setting value YYY Setting value after chan...

Страница 107: ...NTENANCE 2REPLACE BLADE WIPER MAINTENANCE 2REPLACE LIQUID WIPER MAINTENANCE 2REPLACE SPONGE MAINTENANCE 2PH MAINTENANCE PH MAINTENANCE 2XXXX XXXX Maintenance type Service cleaning Head wash System priming Fill the cap with ink Head height adjustment Print heads check Sheet mount cleaning MAINTENANCE 2EXPORT DATA TO USB PRINTER READY 01 PAPER 1626mm NOZZLE PRINT PRINT OK PRINTER READY 01 PAPER 1626...

Страница 108: ...215 214 Menu tree Before printing Loading the media Adjustment Maintenance Advanced operations Troubleshooting Menu tree Appendix Appendix ...

Страница 109: ...olor Quantity IP6 221 Y yellow 1500 ml IP6 222 M magenta 1500 ml IP6 223 C cyan 1500 ml IP6 224 K black 1500 ml IP6 225 Lc light cyan 1500 ml IP6 226 Lm light magenta 1500 ml IP6 227 Gy gray 1500 ml The type number may vary depending on the region Contact your dealer for more information WARNING The ink is combustible Keep the ink away from open flames sparks or other sources of ignition Do not sw...

Страница 110: ...ct with the eyes to prevent breathing trouble or visual impairment If cleaning liquid gets into your eye wash it off with clean water and consult a doctor If it is swallowed do not try to induce vomiting but consult a doctor Cleaning liquid kit A Type Content Quantity IP6 254 Cleaning liquid cartridge A 6 pieces Cleaning liquid kit A Type Content Quantity IP6 255 Cleaning liquid cartridge A 7 piec...

Страница 111: ...ors Contact the nearest service representative or your dealer for information about maintenance and repair services and consumables http www seiko i com distributors index html For inquiries about the printer Contact Seiko I Infotech Inc for inquiries about the printer Seiko I Infotech Inc Headquarters 8 Nakase 1 chome Mihama ku Chiba shi Chiba 261 8507 Japan Tel 81 43 211 1370 Sales Office Fax 81...

Страница 112: ...222 ...

Отзывы: