


.
8.
Carefully remove all the ribs (W-1 through W-5) from the lasercut sheets #1 through #5. Take time to familiarize yourself
with the ribs and how they differ. You will notice that ribs W-1, W-2, W-3, and the front of rib W-4 are smaller than the W-5
ribs to all allow for the 3/32" thick balsa wing sheet pieces.
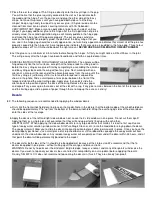
9.
Assemble (but don’t glue) Wing Ribs
W-2 thru W-5, plus the Main Spar
Web and the Rear Spar Web, onto
the Bottom Main Spar and Bottom
Rear Spar. Do not glue any of these
parts at this time!
Next add the Diagonal Wing Braces between the ribs as shown. Do not glue these
either!.
NOTICE: The Diagonal Wing Braces ARE NOT SYMMETRICAL! Make sure you
properly identify the top of each Brace
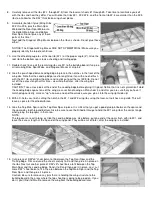
10.
Use the dihedral gauge to set the root rib (W-1) at the proper angle (3°). Glue the
root rib to the bottom spars, balsa sheeting and trailing edge.
11.
Double check to see all the remaining ribs are 90° to the building board, if so glue
all remaining Ribs, Spar Webs, and Diagonal Braces at all joints.
12.
Glue the pre-shaped balsa Leading Edge in place in the notches in the front of the
wing ribs. Note that the Leading Edge is extra long! Glue it on with one end flush
with the W-1 rib, and allow the other end to stick out past the last W-5 rib. Do not
cut off the excess length at this time - we will do that later, after the wing tip is
installed.
CAUTION: Take a close look at the end of the Leading Edge before gluing it in place! Notice that it is not symmetrical! Hold
the Leading Edge against one of the wing cross-section drawing on Plan sheet 2, and after you are sure that you have it
matched up correctly, mark an "up" arrow on one end. Now make sure you glue it into the wing right side up!
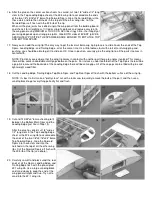
13.
With a X-Acto saw, finish cutting the notch in the W-1 and W-2 wing ribs using the laser-cut notches as a guide. This will
leave a space for the dihedral brace.
14.
Glue the Top Main Spar and the Top Rear Spar in place. It is critical that you get a good glue joint between the spars and
the spar webs, both top and bottom. Also, be sure to use the Dihedral Gauge to hold the W-1 wing rib at the correct angle
when gluing the top spars in that area.
NOTE:
The top spars are extra long, just like the Leading Edge was. Like before, put one end of the spars flush with rib W-1, and
leave the excess length at the tip end of the wing panel. They will be cut off later, after the wing tip is installed.
15.
Cut a piece of 3/32"x3" sheet balsa to fit between the Top Rear Spar and the
Trailing Edge. Trim and sand the sheet carefully to fit and then glue it in place on
the ribs. Next cut another piece of 3/32"x3" sheet balsa to fit between the Top
Main Spar and the Leading Edge. Sand it to fit and then glue it in place. Last, cut
more 3/32" sheet balsa to fit in the area between the Top Main Spar and the Top
Rear Spar, and then glue it in place.
Caution: Be sure to remove any pins that are holding the wing structure to the
building board in the areas where the top sheeting is going to be glued on. If you
don’t, you’ll find it difficult to remove the wing from the building board later.