


.
WING CONSTRUCTION
The KADET LT-25’s wing is designed to be built in two halves - called the LEFT WING PANEL and the RIGHT WING
PANEL as shown on fullsize plan sheet 2. Each wing panel will be built directly on top of its own plan, using the plan as a
pattern to position the parts.
It’s best to work on just one wing panel at a time. Occasionally you will find as you are working on one wing panel that the
parts you have already installed will be covering up some of the plan lines and text that you are looking for in a subsequent
step. In that case, simply refer to the other wing panel plan to see what is covered up.
Let’s start building the LEFT WING PANEL first.
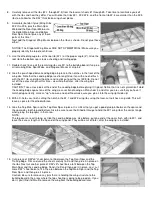
1.
Cut the drawing of the LEFT WING PANEL loose from the rest of Plan Sheet 2. Tape or pin it on top of your building board.
Cover the plan with a sheet of waxed. paper, also taped down. This will keep excess glue from sticking to the plan when
you are gluing the parts in place.
2.
Locate one 3/16"x3/8"x36" balsa stick for the Bottom Main Wing Spar. Pin the
Bottom Main Wing Spar in position on the plan.
IMPORTANT: Position the Bottom Main Spar on the plan precisely by lining up the
outboard end of the spar flush with the location of the last W-5 wing rib. (at the
wing tip).
3.
Use a razor saw to cut off the excess at the root rib (W-1.)
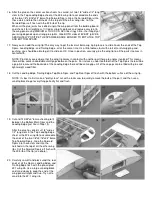
4.
Cut a piece of wing center sheet from the 3/32"x4"x24" balsa Sheet, to fit between
the main and rear spars. Place on the plan, gluing and pining its front edge to the
back of the Bottom Main Spar at the same time.
5.
Locate the 3/16"x1/4"x36" balsa stick for use as the Bottom Rear Spar and pin it in
place on the plan, gluing it to the rear edge of the balsa sheet at the same time.
Cut off the excess at the root rib (W-1).
6.
Cut a piece of wing trailing edge sheet from the 3/32"x3"x24" balsa sheet, to fit
between the rear bottom spar and the trailing edge. Place on the plan gluing and
pining its front edge to the back of the Bottom Rear Spar at the same time.
7.
Pin the pre-shaped balsa Trailing Edge in place on the plan, gluing it to the back
edge of the trailing edge sheet at the same time. Be sure to align all of the
notches in the Trailing Edge with the rib locations on the plan.
NOTE: It is possible for plan paper to shrink or expand slightly with humidity
changes. If it has, this is where you will notice it! You may find that the rib notches
in the Trailing Edge do not exactly match the rib locations on the plan.
Nonetheless, they should be very close, not off by more than the thickness of a
rib. A slight difference is nothing to worry about! The machine-cut notches in the
Trailing Edge are correct, and you should build your wing according to them. To
install a wing rib in the steps coming up, simply put the rear end of the rib in the
notch, and then align the rest of the rib parallel with the rib lines on the plan. Do not alter the notches in the Trailing Edges!