


.
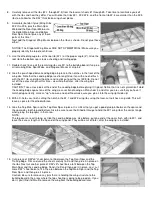
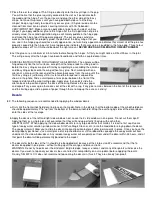
At the tip end of the wing panel, seal the bottom covering to the last W-5 wing
rib. Then continue on, working the covering bown smoothly onto the bottom of
the wing tip. Wrap and seal the covering completely around the edges of the
Wingtip. Trim off flush with the top surface of the Wingtip.
Now cover the top of the wing panel in the same manner you just did the bottom.
Remember to overlap all seams at least 1/4" onto the other pieces of covering
material.
Then cover the other wing panel in the same manner.
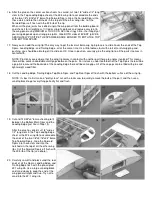
CAUTION ON SHRINKING WING COVERING!
Wait until all pieces of the wing covering have been completely sealed down around their edges before shrinking the
middle areas of the covering. When shrinking the middle, do not completely tighten one side of the wing first. It’s best to
alternate between the top and bottom wing surface, shrinking each side a little at a time, to avoid uneven shrinking which
could case a warp.
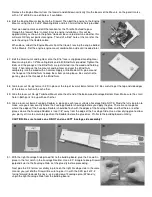
Installing Easy Hinges
WARNING: SIG EASY HINGES are designed to be used in conjunction with THIN CA glue. Thin CA (any brand) is the
ONLY type of glue that can be used on EASY HINGES - do not use any other type of glue on EASY HINGES!
1.
Mark the locations for the Easy Hinges on the model parts, using the full-size plans as a guide.
2.
Begin by carefully cutting a very shallow slit at the hinge location using a sharp #11 blade in your modeling knife. This first
slit should be very shallow so you can better control the direction of the knife. It’s main purpose is to establish your hinge
slot in the right place, so concentrate on staying on the hinge line and don’t try to cut too deep. NOTE: Make the slit
slightly wider than the actual hinge.
3.
Now make 3 or 4 more cuts in the exact same line, going slightly deeper each
time. As you make these additional cuts, concentrate on staying in the slit and
keeping the headed straight into the center of the wood so that it won’t come out
the side of the part. You will find that as the blade gets deeper into the wood, it
will become harder to move it along the slot. Try "wiggling" the knife handle in
the slot to make it cut, instead of trying to "slice" the blade along in one
continuous motion. Continue making additional cuts until the slot is
approximately 1/2" deep.
CAUTION: You must use extreme care to avoid cutting yourself while cutting the
hinge slots. If the balsa breaks while you are pushing on the knife, the blade
could go into your hand before you can stop it. A good precaution is to wear a
leather glove on the hand that is holding the model part while you are cutting the slots.
4.
After all the slots have been cut, insert a single Easy Hinge halfway into each hinge slot in the fin (or rudder, stab,
elevator, aileron, wing, as the case may be). If the hinge is difficult to push in, re-insert the knife and move it back and forth
in the slot a few more times and then try again.
DO NOT GLUE THE HINGES IN AT THIS TIME!
5.
6.
Now carefully slide the mating part onto the exposed half of the Easy Hinges.
You will find it easiest to slide the part onto the hinges at an angle, one hinge at
a time, instead of trying to push it straight onto the hinge at once. Don’t be
overly concerned if the hinges don’t end up perfectly straight or centered in the
slots - they do not have a center line.
ONCE AGAIN, DO NOT GLUE THE HINGES IN AT THIS TIME!
To set the proper amount of gap between the model parts, simply deflect the
control surface to the maximum amount of travel needed. This will automatically
set the proper hinge gap! Keep in mind that for best control response the gap
should be kept as small as possible, but big enough to allow full movement of the control surface. If everything appears to
function properly, move on to the next step.