


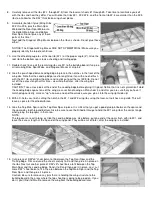
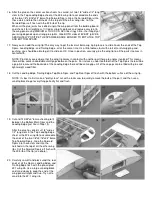


.
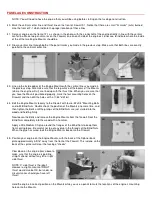
COVERING
In this step you need to cover all the parts of your model with the covering material of your choice, before proceeding on to
Final Assembly of the model.
General Notes
There are many different covering materials available for finishing model airplanes. They range from raw coverings that
must be bonded to the structure with adhesive and then painted; to iron-on plastic materials that have the color and finish
built right in.
The choice of which type of covering material to use on your KADET LT-25 is a matter of personal choice. However, if this
is your first model airplane, we recommend that you chose one of the popular pre-finished iron-on plastic film coverings.
This type of covering material provides a high gloss, durable finish that is easy to apply and repair. It goes on relatively
quick and is not near as messy or smelly as using a covering material that must be painted. All of the KADET LT-25
prototypes built here at the SIG factory were finished with SIG SUPERCOAT IRON-ON PLASTIC COVERING.
Since all iron-on plastic covering materials come with detailed step-by-step instructions on how they should be applied, we
will not go into a repetitive step-by-step sequence here. We will instead outline some ideas that are specific to the KADET
LT-25. Be sure to read all the instructions that come with your covering material and follow them carefully. NOTE: There
are also complete books and video tapes available on applying iron-on covering materials. These sources can be very
helpful, providing a lot more tips than we can cover in these instructions. Often times, the video tapes can be rented or
borrowed from your local hobby shop or model airplane club.
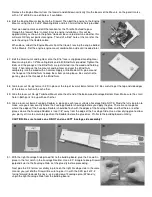
Choice Of Color Scheme
One of modeling’s pleasures is the chance to decorate your model to suit your own taste. There are a huge variety of
after-market items available in the hobby shops to dress up your airplane. Striping tapes and trim sheets in every color of
the rainbow, stick-on decals and markings, are all available and easy to apply.
You can go for a military look, a Cessna-like civil aviation look, or something totally wild in vivid neon colors. Your
imagination is the only limit!
If this is your first model, our advice is to keep the color scheme simple and visible. The most economical way to go is to
choose one primary color for the entire model. Choose a light color! Covering the entire model in black, dark blue, gray,
etc., is not a good choice. In the air a dark colored model will quickly turn into a black silhouette, and it will be difficult to
distinguish which way the airplane is going. A light color is more visible at greater distances! White, yellow, orange, cream,
and neon colors are excellent choices for a trainer model.
KIT COLOR SCHEME
The LT-25 kit includes one sheet of stick-on decals to duplicate the windows on the fuselage
and fin. On our kit box model, we covered the back part of the wing with white covering
material, and then covered the front part of the wing with blue covering. The blue covering
overlaps approximetely 3/8" onto the white covering material, at the main spar. The fuselage is
done the same way. If you want to make your LT-25 the same as ours, it will take 2 rolls of
White and 1 roll of Medium Blue. This 2-color scheme will take a little more time than if you
make the wing and fuselage all one color. The choice is yours!
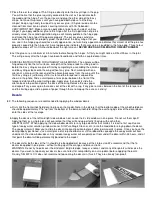
Surface Preparation
A good covering job starts with good surface preparation! Regardless of what
type of covering material you use it won’t hide poor workmanship. Finish sand the
entire model with 220 grit sandpaper. Fill any holes, gaps, nicks or dents on the
surface of your model with lite-weight filler. After the filler dries, sand off any
excess flush with the surface.