


.
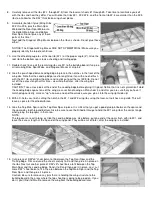
35. Cut and block sand the end of the aileron to match the shape of the wing tip. Remove the ailerons from the wing and set
them aside until time for covering.
Completing The Wing
36.
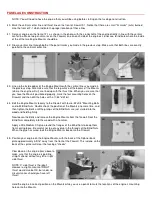
Use a sanding block with 80 grit sandpaper to give the entire wing a final sanding. Sand just enough to take off any
prominent high spots and to smooth out any mismatched joints between parts. Sand all wing sheeting down flush with the
spars, leading edges, and trailing edges. Avoid sanding into the spars, leading edges, and trailing edges themselves as
much as possible, just sand the wing sheeting pieces down to them! if you’ve got sheet that is lower than the spars, etc.
then fill in the low spot with light-weight wood filler and sand smooth. You shouldn’t have to sand the edges of the wing ribs
at all - they should already be level with the surface of the spars, etc. However, you may need to use a small sanding block
to touch up any excess glue on the rib to spar joints. Excessive sanding of the ribs themselves will distort the airfoil shape.
37.
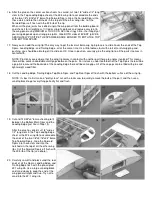
On the bottom of the wing, draw a short line parallel to and 1/2" aft of the main spar. Draw a second line, 2-1/8" aft of the
main spar. Cut a opening 1" wide x 1-5/8" long in the bottom of the wing sheeting for the aileron servo.
38.
Remove the aileron servo mount from the Laser-Cut sheet #19. Use Slow CA to glue it in place on the bottom of the wing.
Make sure the plywood mount is centered over the cutout that in the wing sheeting. Use enough glue to fill in the gap under
each side of the aileron servo mount, caused by the dihedral angle.
Reinforce Wing Center Joint
39.
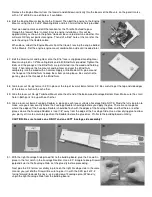
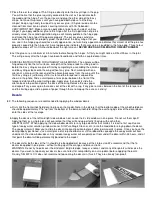
A 1" wide x 24" long piece of fiberglass cloth tape is supplied to reinforce the joint
between the Right & Left Wing Panels. Cut the 24" long tape into one 18" long
piece and one 6" long piece. Lay the 18" long piece of fiberglass tape over the
center joint on top of the wing. Using a small amount of Thin CA, tack glue the
end of the tape to the Trailing Edge. Make sure the width of the tape is
overlapping 1/2" onto the Right Wing Panel and 1/2" onto the Left Wing Panel.
After the Thin CA dries, pull the other end of the tape completely around the
Leading Edge and down onto the bottom surface of the wing. The tape should lay
nice and flat, tight against the top surface of the wing. Again make sure the tape
is centered over the joint - half on the Right Wing Panel and half on the Left Wing
Panel. Then tack glue the tape to the Leading Edge.
Now carefully flow Thin CA glue into the tape on top of the wing. Use just enough glue to saturate the tape - too much glue
will run outside the tape and get all over the place. If you do get too much glue on the tape, take a clean rag and quickly
wipe off the excess before it dries (don’t rub too hard and disturb the tape position). By working slowly and gluing small (3"
long) sections of tape at a time, you should be able to glue the entire length of tape in place without wrinkles or bumps.
CAUTION: Do the gluing in a well ventilated area to avoid breathing the fumes from the Thin CA glue!
After you’ve finished gluing the fiberglass tape on the top of the wing, turn the wing over and glue the remainder of the
original 18" long piece to the bottom front of the wing. Cut it off right in front of the plywood ASM part.
Using the same techniques, glue the 6" long piece of fiberglass tape to the bottom of the wing. It goes from the back of
plywood part ASM, all the way off the end of the wing. When dry, cut it off flush with the end of the wing. NOTE: Be very
careful when gluing the tape in the area of the Torque Rods! If you get too much Thin CA in that area, the excess could
seep into the Torque Rods, binding them up permanently.
After all the glue is dry, lightly sand the fiberglass cloth with a piece of 220 grit sandpaper to remove any lumps or high
spots. Be careful not to sand through the fiberglass cloth.