


.
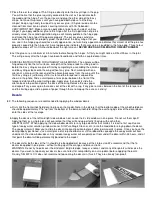
138. Put the plain end of a 3/32" dia. drill bit about 1/4" inside the back end of the vent
tube. Using the drill bit for leverage, slowly bend the back end of the vent tube
upwards about 45º, or until the end of the tube is even with the top of the stopper
cap.
139.
Carefully push the brass tubes through the two open holes in the stopper cap.
Keep pushing the tubes in until 3/8" of tube sticks out in front of the stopper cap.
(PLAN AHEAD: The two brass tubes should end up horizontally opposed to each
other at the bottom of the stopper cap. The short fuel feed tube should be on the
left side, and the long vent tube on the right.)
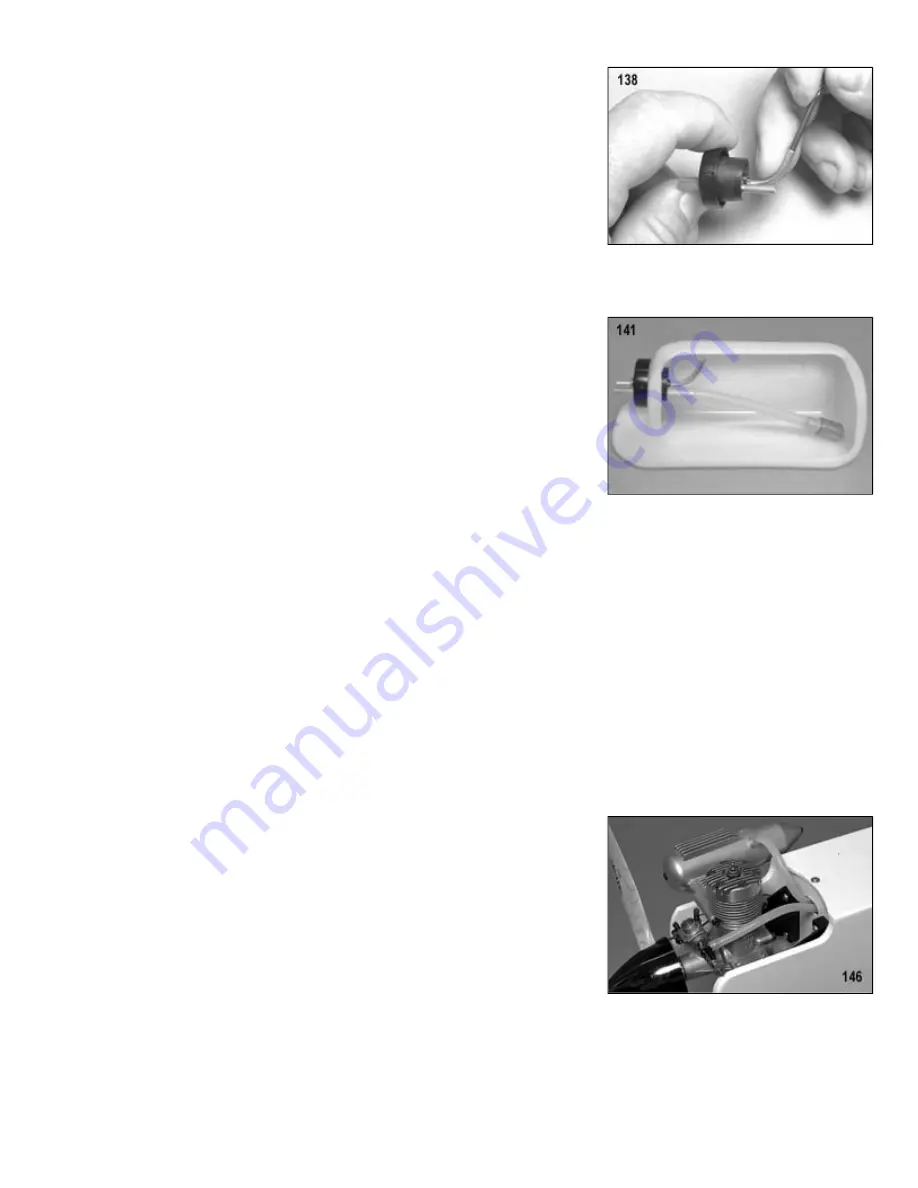
140.
Cut the piece of fuel line tubing. Slide one end of the tubing onto the brass clunk weight. Slide the other end of the tubing
over the back end of the fuel feed tube.
141.
Insert the completed assembly into the neck of the fuel tank. Rotate the stopper
cap so the brass tubes are horizontal at the bottom of the stopper. Hold the tank
up to a strong light and look inside to see if the vent tube is close to the top of the
tank. Also check to see if the brass clunk weight inside the tank swings freely
from side-to-side, whether the tank is right side up or upside down. If the clunk
weight is hitting the back wall of the tank, take the stopper cap back out, shorten
the length of the fuel line tubing a little, and then test again. When everything is
right, tighten the screw in the stopper cap until the cap is snug in the neck of the
tank.
142.
Test the fuel tank for leaks! Fill your kitchen sink with water. Slip the 12" long piece of Fuel Line Tubing onto the tank’s
vent tube. Submerge the tank in the water, holding your thumb firmly over the fuel feed tube. Blow air into the other end of
the fuel line tubing and watch for air bubbles coming around the cap of the tank. If it’s leaking, tighten the screw in the cap
a little at a time until the leaking stops.
143.
Cut two pieces of fuel tubing, approximately 6" long. Slip one piece onto the tank’s fuel feed tube and the other onto the
vent tube. Run the loose ends of the fuel line tubing through the hole in the firewall at the same time that you are placing
the tank in the fuselage.
144.
Slide the fuel tank up against the back of the firewall. Cut a piece of scrap wood (can be stick or sheet, balsa or plywood)
to use as a rear tank brace. Reach in through the servo area and wedge the brace between the fuselage sides, right up
tight against the back end of the tank. Spread some Slow CA glue on the ends of the brace to glue it to the fuselage sides.
(HINT: Put some glue on the end of a long stick or nail, then reach in and dab the glue on the ends of the brace.) This
brace will insure that the tank cannot shift backwards in flight.
145.
Cut two strips of 1/4" thick soft foam rubber to fit along the sides of the fuel tank, between the tank and the fuselage sides.
This packing keeps the tank from shifting sideways in flight.
146.
Attach the fuel feed line to the engine’s carburetor and the vent line to the
pressure fitting on the muffler. (NOTE: Trim off any excess length of fuel line
tubing. The fuel lines should be kept as short as possible for best fuel draw, but
not so short that there is danger of them coming off in flight. Leave a little slack in
the lines.)
147.
To fill a fuel tank with this vent arrangement, first remove the fuel lines from the
carburetor and the muffler pressure fitting. Pump the fuel into the tank through
the fuel feed line (carb line). When the tank is full, fuel will begin to run out the
vent line (muffler line). Stop pumping when you see the fuel start to come out the
vent line! Re-connect the fuel lines and you are ready to start the engine.
Balance Your Airplane
Yes, we know your KADET LT-25 looks done and you’re real anxious to go out and fly it, BUT WAIT A MINUTE - IT’S NOT
REALLY DONE YET! It must be balanced! All airplanes, model or full-size, must be accurately balanced in order to fly
successfully. An airplane that is not properly balanced will be unstable and will most likely crash!