background image

Design and Functional Elements

2-14

MOBIC T8 for Windows CE 3.0

C79000-G8976-C190-02

2.7

Loudspeaker

Location

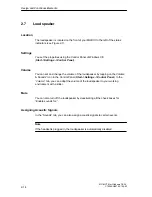
The loudspeaker is located on the front of your MOBIC to the left of the status
indicators (see Figure 2-7).

Settings

You set the properties using the Control Panel of Windows CE
(Start - >Settings - >Control Panel).

Volume

You can set and change the volume of the loudspeaker by tapping on the Volume
& Sounds” icon in the Control Panel (Start - >Settings - >Control Panel). In the
“Volume” tab, you can adapt the volume of the loudspeaker to your working
environment with a slider.

Mute

You can also turn off the loudspeaker by deactivating all the check boxes for
“Enable sounds for:”.

Assigning Acoustic Signals

In the “Sounds” tab, you can also assign acoustic signals to certain events.

Note

If the headset is plugged in, the loudspeaker is automatically disabled.

Содержание MOBIC T8 for Windows CE 3.0

Страница 1: ... Applications and Drivers 10 Repair Care and Maintenance 11 Certificates Directives and De clarations 12 Frequently Asked Questions FAQs 13 Technical Specifications 14 Glossary Index Release 12 2004 C79000 G8976 C190 02 MOBIC T8 for Windows CE 3 0 Manual SIMATIC NET Industrial Communication The following supplement is part of this documentation No Designation Drawing number Edition 1 Product infor...

Страница 2: ...ns are not taken Caution indicates that minor personal injury or property damage can result if proper precautions are not taken Caution indicates that property damage can result if proper precautions are not taken Notice highlights important information on the product using the product or part of the documentation that is of particular importance and that may have detrimental effects if ignored No...

Страница 3: ...n this component complies with the directive 89 392 EEC Correct Usage of Software Products Note the following Warning This software may only be used for the applications described in the catalog or the technical description and only in connection with software products devices or components from other manufacturers which have been approved or recommended by Siemens Before you use the supplied samp...

Страница 4: ...nt legal regulations and conditions of use Note the following Warning Turn off the MOBIC T8 in an aircraft Prevent the MOBIC T8 from being turned on accidentally Note the following Warning Turn off the MOBIC T8 if you are in the vicinity of gas stations fuel depots chemical plants or blasting operations The MOBIC T8 can interfere with technical installations Note the following Warning Improper use...

Страница 5: ...i MOBIC T8 for Windows CE 3 0 C79000 G8976 C190 02 Preface ...

Страница 6: ...se and to charge the battery The three power supply cables shipped with the unit EU USA UK meet the requirements of the respective countries S RS 232 cable This is used to establish a serial link with a host computer or other peripheral device S Pen stylus The pen is used to enter data on the touchscreen When not in use it should be kept in the loop on the hand strap S Carrying straps The device s...

Страница 7: ...n the consignment You will find Information about other accessories that do not ship with the product on the Internet at www siemens com mobic Validity of the Manual This manual applies to the following version S MOBIC T8 V 1 2 Further Documentation Literature 1 MOBIC Programming Instructions Included on the MOBIC CD in PDF format 2 Introducing Microsoft Windows CE for the Handheld PC Author Rober...

Страница 8: ...t If you have further questions on SIMATIC products please contact your Siemens representative in your local Siemens office You will find the addresses in our catalogs on the Internet and in CompuServe go autforum Workshop MOBIC Toolkit To familiarize you with the MOBIC we also offer a training course The MOBIC Toolkit package includes the following S MS eMbedded Visual Tools 3 0 S MOBIC Programmi...

Страница 9: ... Buttons 2 11 2 5 Function Keys 2 12 2 6 Status Indicators LEDs 2 13 2 7 Loudspeaker 2 14 2 8 Touchscreen 2 15 2 9 On Off Button 2 18 3 Accessories 3 1 3 1 Carrying Straps 3 2 3 1 1 Shoulder Neck Strap 3 2 3 1 2 Hand Strap 3 4 3 2 Pen 3 5 3 3 Power Supply Unit 3 6 3 4 RS 232 Cable serial port 3 6 4 Ports 4 1 4 1 RS 232 Serial Port 4 2 4 2 Infrared Port IR 4 3 4 3 Headset Port 4 5 4 4 USB Port 4 6 ...

Страница 10: ... Microsoft Pocket Outlook 6 15 6 8 1 Microsoft Terminal Server Client 6 15 7 Supplied Programs and Tools 7 1 7 1 Standard Programs 7 2 7 1 1 Microsoft Pocket Word 7 2 7 1 2 Microsoft Inbox 7 2 7 1 3 Microsoft Internet Explorer V4 0 7 3 7 1 4 Handwriting Recognition with Jot 7 4 7 1 5 Ping 7 5 7 1 6 Microsoft Terminal Server Client 7 5 7 2 MOBIC Configurator 7 6 7 2 1 Memory Tab 7 7 7 2 2 Trace Arc...

Страница 11: ...g the Screen 11 7 11 7 Pen 11 8 11 8 Battery 11 9 12 Certificates Directives and Declarations 12 1 12 1 Notes on the CE Mark 12 2 12 2 Certificates for USA Canada and Australia 12 4 13 Frequently Asked Questions FAQs 13 1 14 Technical Specifications 14 1 Glossary Glossary 1 Index Index 1 ...

Страница 12: ...e quick start section will allow an experienced user to start working with the MOBIC more or less right away You will find a complete list of the components supplied with the product and the accessories available from SIEMENS On our Web pages you will find further up to the minute information on the MOBIC How to get this information is explained in Section 1 5 1 ...

Страница 13: ...eless LAN for local communication or GSM for worldwide communication The MOBIC is designed for an industrial environment and has an extremely robust splash proof construction corresponding to IP 65 The high resolution TFT screen ensures a detailed display and easy reading even in poor lighting conditions The unit is operated simply with a touch screen using a pen or finger and also has additional ...

Страница 14: ...S Mobile Documentation Information for example about machines that could previously only be displayed on a few stationary PCs in the factory can now be displayed anywhere thanks to the mobility provided by the MOBIC This means that you have access to centrally stored data such as operating instructions or circuit diagrams for service purposes S Scheduling and Mobile Data Input The MOBIC can be use...

Страница 15: ...wo PCMCIA ports for connecting wireless adapters integrated in the casing providing IP 65 degree of protection expansions such as additional flash memory or a bar code reader 10 100 Mbps Ethernet port for connection to an industrial or office network IR port For bi directional data exchange between a host for example notebook and the MOBIC RS 232 port For example for connection with the host compu...

Страница 16: ...e touchscreen and the freely assignable function keys F1 to F5 such as acquiring data or triggering processes and starting software updates Using the mail function of Windows CE E mails can be written sent and received on site System software is also integrated in the MOBIC allowing simple individual configuration to the user s needs MOBIC Configurator With its battery the MOBIC can be operated fo...

Страница 17: ...ing carrying strap Protective cover On Off button Function keys F1 F5 Status indicators Touchscreen Loudspeaker For attaching carrying strap Figure 1 1 Front View of the MOBIC Checking the Consignment When you receive your consignment unpack all the supplied components and check that they are complete and undamaged The components of your MOBIC are listed in Section 1 3 If you discover any damage c...

Страница 18: ...brate the touchscreen see Section 11 6 Charging the Battery in the MOBIC 1 Charge the battery see Section 4 8 Ports The ports of the MOBIC are located either directly integrated in the casing under the protective cover or in the battery compartment Figure 1 2 shows the location of the ports RS 232 Infrared Ethernet RJ 45 Power supply socket Headset USB PCMCIA under protective cover Section 4 4 Sec...

Страница 19: ... reset button Function Keys The MOBIC has five function keys F1 to F5 on the right front panel of the device see Figure 1 1 You can assign repetitive tasks to these keys to suit your needs see Section 2 5 or 7 2 Status Indicators The MOBIC has LEDs on the front panel of the device below the screen see Figure 1 1 The meaning of the LEDs is explained in Section 2 6 ...

Страница 20: ...the respective countries RS 232 cable Used to connect to a host computer or another peripheral device Getting Started Brief instructions to get you off to a quick start with your MOBIC T8 Pen The pen is used to enter data on the touchscreen Caution Input on the touchscreen must only be made with the stylus point and not with the ballpoint Carrying straps The hand strap and shoulder neck strap make...

Страница 21: ...ories Accessories Accessories available from SIEMENS S Lithium ion battery S Power supply unit with cable S Protective foil S Carrying strap S Pens S Carrying case S Replaceable battery S Headset adapter S Charging tray and charging station S Protective cover for MOBIC ports ...

Страница 22: ...C79000 G8976 C190 02 1 5 Up to the MinuteInformation on the Internet In our Web site you will find wide ranging information about the product customer support and tips and tricks to help you make the best use of your MOBIC www siemens com mobic ...

Страница 23: ...Overview 1 12 MOBIC T8 for Windows CE 3 0 C79000 G8976 C190 02 ...

Страница 24: ... 0 C79000 G8976 C190 02 Design and Functional Elements This chapter describes the basic design of your MOBIC All the operator controls functional and display elements required to work with your MOBIC are illustrated and described 2 ...

Страница 25: ...IA and Ethernet ports and the power supply connector power supply unit see also Figure 2 2 S On Off button To save battery power you can set the unit to a sleep mode off and then return it to normal operation on S Function keys F1 to F5 You can assign regularly required functions to the five function keys see also Section 7 2 S Touchscreen Touch sensitive screen of your MOBIC your input interface ...

Страница 26: ...on 4 2 PCMCIA on the back in the battery com partment Section 4 6 Figure 2 2 Ports of the MOBIC Ports in the Casing S RS 232 serial port Standard serial port for example for reading out machine data or for synchronization with the host computer S An additional 5 V 200 mA power supply can be enabled on pin 9 of the RS 232 port As default this is disabled S IR Port Infrared port for bi directional e...

Страница 27: ...l Bus Note that only USB devices with Windows CE 3 0 compatible drivers can be connected The MOBIC already has a driver for keyboard and mouse S PCMCIA under the protective cover External PCMCIA slot for example for connecting a barcode reader S Ethernet RJ 45 For direct attachment to existing Ethernet networks S Power Supply Connector Used to connect the shipped power supply unit ...

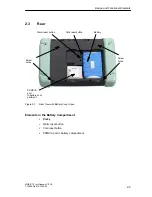
Страница 28: ...02 2 3 Rear PCMCIA port in battery com partment Warm reset button Battery Cold reset button Screw holes Screw holes Figure 2 3 Rear View with Battery Cover Open Elements in the Battery Compartment S Battery S Warm reset button S Cold reset button S PCMCIA port in battery compartment ...

Страница 29: ... body of the cell do not attempt to open a battery forcibly Order batteries only from Siemens Old lithium batteries should be returned to the battery manufacturer recycler or be disposed of as hazardous waste Backup Battery In addition to the main battery your MOBIC also has a backup battery on the motherboard The backup battery 3 6 V NIMH battery is used only to back up data while the main batter...

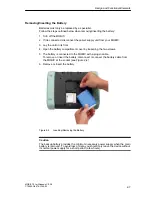
Страница 30: ...s front 4 Open the battery compartment cover by loosening the two screws 5 The battery is connected to the MOBIC with a plug in cable To remove or insert the battery disconnect or connect the battery cable from the MOBIC at the socket see Figure 2 4 6 Remove or insert the battery Figure 2 4 Inserting Removing the Battery Caution The backup battery provides the minimum necessary power supply when t...

Страница 31: ... supply unit to the main power supply If the battery is fully discharged charging takes approximately 5 5 hours Displays Charging is indicated by the red status LED The battery charge level is indicated by the battery icon in the status bar when the device is on Note You can continue to work with the MOBIC while it is being charged Charge Level of the Battery The charge level of the battery is dis...

Страница 32: ... secure the MOBIC to a surface for example on a wall with the aid of 4 screws Select a location so that the environmental conditions defined in Chapter 14 can be adhered to Screw Holes There are four M4 screw holes on the rear of the MOBIC see Figure 2 3 Caution Only use M4 screws and keep to the maximum screw in depth of 7 mm When mounting the unit do not exceed the maximum torque 2 Nm for the sc...

Страница 33: ...T8 for Windows CE 3 0 C79000 G8976 C190 02 Drilling Template The dimensions for the drilling template are shown in Figure 2 5 Front view Detail X Screw holes for wall mounting on rear of device 4 x Figure 2 5 Dimensions for a Drilling Template ...

Страница 34: ...igure 2 3 S Warm reset button Pressing the warm reset button boots the device The MOBIC must be turned on S Cold reset button Pressing the cold reset button boots the device Caution In contrast to the warm reset this cold reset button also clears the RAM and resto res the Default Registry The data in the flash are retained Note You can also start a warm reset with the MOBIC Configurator ...

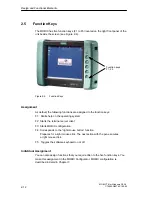
Страница 35: ...gned to the function keys F1 Starts help on the operating system F2 Starts the terminal server client F3 Starts MOBIC configuration F4 Corresponds to the right mouse button function Prepares for a right mouse click The next action with the pen executes a right mouse click F5 Toggles the software keyboard on or off Individual Assignment You can also assign functions that you require often to the fi...

Страница 36: ...f the unit yellow LED Loudspeaker green LED red LED Figure 2 7 Status Indicators and Loudspeaker Meaning of the Status Indicators Table 2 1 Red LED Green LED Yellow LED lit The battery is being charged by an external power supply user defined flashes the main battery is almost empty when a message is pending for example mail arrived user defined off Power supply unit not connected Power supply fro...

Страница 37: ...e You can set and change the volume of the loudspeaker by tapping on the Volume Sounds icon in the Control Panel Start Settings Control Panel In the Volume tab you can adapt the volume of the loudspeaker to your working environment with a slider Mute You can also turn off the loudspeaker by deactivating all the check boxes for Enable sounds for Assigning Acoustic Signals In the Sounds tab you can ...

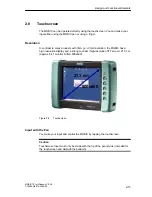
Страница 38: ...n contrast to many products with VGA or VGA resolution the MOBIC has a high resolution display and a strong contrast high resolution TFT screen 21 3 cm approx 8 4 monitor SVGA 800x600 800x600 21 3 cm Figure 2 8 Touchscreen Input with the Pen You make your input and control the MOBIC by tapping the touchscreen Caution Touchscreen input must only be made with the tip of the pen stylus intended for t...

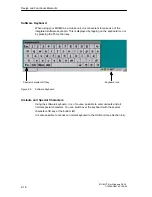
Страница 39: ...ng on the keyboard icon or by pressing the F5 function key Keyboard icon Special character shift key Figure 2 9 Software Keyboard Umlauts and Special Characters Using the software keyboard it is of course possible to enter umlauts and all normal special characters You can switch over the keyboard with the special character shift key at the bottom left It is also possible to connect a normal keyboa...

Страница 40: ...Recognition With the Jot handwriting recognition program you can also write directly on the touchscreen Whether or not Jot is activated is indicated by the icons in the status bar see Figure 2 10 and 2 11 Jot icon not activated Figure 2 10 Jot Arrow Icon Jot icon activated Figure 2 11 Jot Pen Icon ...

Страница 41: ... the on off button This is located on the right front panel of the MOBIC above the function keys see Figure 2 12 When you press this button the MOBIC is set to the Sleep mode By pressing the on off button again the device is immediately ready for operation instant on function in Windows CE On Off button Figure 2 12 Location of the On Off Button ...

Страница 42: ...3 1 MOBIC T8 for Windows CE 3 0 C79000 G8976 C190 02 Accessories This chapter describes the accessories for the MOBIC It also explains how to fit the accessories to the MOBIC 3 ...

Страница 43: ...houlder neck strap S Hand strap 3 1 1 Shoulder Neck Strap The shoulder neck strap is attached to the mounting pins see Figure 3 1 on the device Fitting the Strap You can fit the shoulder neck strap as shown in Figure 3 1 Figure 3 1 Fitting the Shoulder Neck Strap or Hand Strap Caution Make sure that the straps are securely attached to the device ...

Страница 44: ...ifferent ways When simply carrying the MOBIC around with you you can attach the strap so that it functions as a shoulder strap Figure 3 2 MOBIC with Shoulder Strap If you fit the strap to the left and right of the MOBIC you can put the strap round your neck and have your hands free to make input Figure 3 3 MOBIC with Neck Strap ...

Страница 45: ...ou can fit the shoulder neck strap as shown in Figure 3 1 You can also keep the pen in the strap Figure 3 4 MOBIC with Hand Strap Fitted Caution Make sure that the strap is securely attached to the device Possible Application The hand strap is used to hold the MOBIC during mobile operation see Figure 3 5 Figure 3 5 MOBIC in Mobile Operation with the Hand Strap ...

Страница 46: ...as a dual function It is primarily a stylus but also has a ballpoint refill that can be used to jot down notes Caution Touchscreen input must only be made with the tip of the pen stylus intended for the touchscreen and not with the ballpoint There is a loop on the hand strap where you can keep the pen Figure 3 6 Hand Strap with Pen ...

Страница 47: ... for Windows CE 3 0 C79000 G8976 C190 02 3 3 Power Supply Unit The supplied power supply unit is described in detail in Section 4 8 3 4 RS 232 Cable serial port The supplied RS 232 cable is described in detail in Section 6 2 2 ...

Страница 48: ...OBIC T8 in areas susceptible to electromagnetic interference Product information This documentation is valid for delivery units with order number 6GK1611 0TA01 1DX0 6GK1611 0TA01 1DV0 6GK1611 0TA01 0DX0 08 2006 A5E00882110 01 ...

Страница 49: ...ymbol These notices shown below are graded according to the degree of danger Danger indicates that death or severe personal injury will result if proper precautions are not taken Warning indicates that death or severe personal injury may result if proper precautions are not taken Caution with a safety alert symbol indicates that minor personal injury can result if proper precautions are not taken ...

Страница 50: ...t up and used in conjunction with this documentation Commissioning and operation of a device system may only be performed by qualified personnel Within the context of the safety notes in this documentation qualified persons are defined as persons who are authorized to commission ground and label devices systems and circuits in accordance with established safety practices and standards Trademarks A...

Страница 51: ...assembly as well as careful operation and maintenance Disclaimer of Liability We have reviewed the contents of this publication to ensure consistency with the hardware and software described Since variance cannot be precluded entirely we cannot guarantee full consistency However the information in this publication is reviewed regularly and any necessary corrections are included in subsequent editi...

Страница 52: ...card already built in This product information contains important information The notes supplement the operating instructions for the HMI device and take precedence over statements in the operating instructions the release notes and in the online help This product information contains important notes on the following issues Use in areas susceptible to electromagnetic interference Enhancement of th...

Страница 53: ...is displayed in the status area the CP 1515 is not operational but it is enabled Disable the CP 1515 if you are in an area susceptible to electromagnetic interference with the MOBIC T8 If no icon is displayed in the status area the CP 1515 has been disabled or removed Removing the CP 1515 It makes sense to remove the CP 1515 if the MOBIC T8 is to be used continually in an area susceptible to elect...

Страница 54: ...AGS641 is identified with a red x in the window Network Connections Installing the CP 1515 Procedure 1 Insert the CP 1515 in the internal slot 2 Protect the CP 1515 with the terminal block The terminal block prevents the CP 1515 from slipping out of the slot during rough usage conditions Enhancement of the WLAN range The range of the WLAN can be enhanced if you place the Wireless LAN PCMCIA card C...

Страница 55: ...the protective cover can be closed when the PCMCIA card is inserted Enhancement of the rechargeable battery time If the CP 1515 is not required removing or disabling it increases the rechargeable battery time Additional notes on this are available on the Internet at http support automation siemens com ID Nr 23335406 MOBIC T8 1 4 Product information 08 2006 A5E00882110 01 ...

Страница 56: ...ere in Chapter 4 we will describe the ports in greater detail RS 232 Infrared Ethernet RJ 45 Power supply socket Headset USB PCMCIA under protective cover Section 4 4 Section 4 5 Section 4 3 Section 4 8 Section 4 7 Section 4 1 Section 4 2 PCMCIA on the back in the battery com partment Section 4 6 Figure 4 1 Ports of the MOBIC 4 ...

Страница 57: ...port Figure 4 2 Location of the RS 232 Port Class of Protection The RS 232 port complies with class of protection IP65 Connections You can connect a cable with a 9 pin sub D female connector to this port Possible Applications Via the RS 232 port you can for example establish a connection to your host computer using the Microsoft ActiveSync program or to another peripheral device with an RS 232 por...

Страница 58: ... device 20 cm Possible Applications Using the IR port you can exchange data without a wire connection with peripheral devices that also have an infrared port for example with a laptop Cable Free Connection Using the IR port you have a convenient method with which you can connect your MOBIC to a PC with an infrared port and exchange data between the devices without any cable connection For more det...

Страница 59: ...T8 for Windows CE 3 0 C79000 G8976 C190 02 Note It is not possible to operate the infrared port and serial port at the same time Warning Do not examine the active infrared interface using optical magnification devices ...

Страница 60: ...rotection IP65 Note If you plug in a headset earphones and microphone the internal loud speaker is automatically turned off Connections You can connect a cable with a 7 pin subminiature round connector to this port Possible Applications With a headset earphones and microphone connected to the headset port you can for example record conversations A headset adapter can be ordered as a MOBIC accessor...

Страница 61: ...s of Protection Caution The USB port is a MOBIC port that does not comply with class of protection IP65 Connections You can connect a cable with a USB connector USB full speed type A plug to this port Possible Applications The USB host port of the MOBIC allows connection of USB target compatible devices Universal Serial Bus These include PC peripherals such as printers mouse keyboard WEB CAM barco...

Страница 62: ...te Note that only USB devices with Windows CE 3 0 compatible drivers can be connected When purchasing a USB device for which there is no driver installed in Windows CE make sure that the manufacturer of the device supplies a Windows CE USB driver with the device USB drivers for a mouse and keyboard are integrated in Windows CE 3 0 Special drivers do not need to be installed for these devices ...

Страница 63: ...re 4 6 Location of the PCMCIA Port Class of Protection Caution The PCMCIA port below the protective cover does not comply with class of protection IP65 in contrast to the PCMCIA port in the battery compartment Connections This port allows the use of suitable PCMCIA cards Type II Possible Applications The PCMCIA port under the protective cover is suitable for example for connecting a barcode scanne...

Страница 64: ...the card with the contacts to the front into the slot guide 2 Push the card into the slot until you feel it lock in place Removing a PCMCIA Card Follow the steps outlined below to remove a card 1 Before you remove a card make sure that it is no longer operational close down the corresponding application 2 Press the ejector button so that the card extends out of the slot 3 Pull the card carefully f...

Страница 65: ...e PCMCIA port in the battery compartment complies with class of protection IP65 in contrast to the PCMCIA port under the protective cover Inserting Removing a PCMCIA Card The procedure for inserting and removing a PCMCIA card is the same as for the PCMCIA port under the protective cover see Section 4 5 Connections This port allows the use of suitable PCMCIA cards Type II Possible Applications The ...

Страница 66: ...PCMCIA card and for which there is no driver installed in Windows CE 3 0 make sure that the manufacturer of the device supplies a Windows CE PCMCIA driver Version 3 0 For more detailed information on installing drivers refer to Chapter 10 Dimensions The maximum possible dimensions of a PCMCIA card in the battery compartment are as follows length x width x height 127 mm x 54 mm x 5 mm ...

Страница 67: ...hernet RJ 45 Port Class of Protection Caution The Ethernet RJ 45 port is a MOBIC port that does not comply with class of protection IP65 Connections To this port you can connect a cable with an RJ 45 connector cat 5 8 way RJ 45 fully shielded plug Possible Applications Using the Ethernet RJ 45 port you can connect the MOBIC to a local network for example your intranet Caution Only for use in the L...

Страница 68: ...n access the data of servers or a host computer via the Ethernet RJ 45 port you must first set the network parameters for operation To do this perform the steps described in Section 6 3 Configuration of the Ethernet Port Note It is not possible to operate Ethernet RJ 45 if a wireless LAN card is inserted ...

Страница 69: ... Connected Power Supply Unit Class of Protection Caution The power supply connector does not comply with class of protection IP65 Connecting the Power Supply Unit To connect the power supply unit and the main power supply cable UK US EU to your MOBIC and to a power outlet follow the steps below 1 Remove the protective cover from the top of the unit 2 Connect the power supply unit to the MOBIC 3 Co...

Страница 70: ...ily accessible If the MOBIC is installed in a fixed location a central power supply disconnector must be present Caution S Make sure that nobody can walk on or trip over the cables S Make sure that the power supply unit is not placed on a heat sensitive surface S In an emergency for example damaged casing controls or power supply cable penetration of fluids or foreign bodies disconnect the main po...

Страница 71: ...r Windows CE 3 0 C79000 G8976 C190 02 Getting Started This chapter describes the basic steps required to put your MOBIC into operation You should read this information carefully before starting to work with the unit 5 ...

Страница 72: ...n the unit by pressing the on off button When you first turn on the MOBIC you will be requested to calibrate the touch screen Calibrating Follow the instructions displayed to calibrate your screen The calibration program displays a crosshair in the middle and at each corner of the screen one after the other Tap with the pen exactly in the middle of the displayed crosshair When you have tapped the ...

Страница 73: ...6 1 MOBIC T8 for Windows CE 3 0 C79000 G8976 C190 02 Data Exchange This chapter describes how you communicate with the MOBIC 6 ...

Страница 74: ...cate with other computers or servers for example using S ActiveSync S Internet Explorer S FTP File Transfer Protocol S Mail S Microsoft Terminal Server S Linking network drives Hardware To transfer data to the server the following hardware can be used S Wireless LAN PCMCIA S Wireless network GSM modem PCMCIA S Serial RS 232 S Ethernet PCMCIA S IR port S Ethernet RJ 45 ...

Страница 75: ... converted immediately to a Windows CE format for example doc pwd To be able to connect your MOBIC to the host you must first install Microsoft ActiveSync on your host computer Microsoft ActiveSync is on the MOBIC CD Specifying the Partner Relationship In the partnership between your MOBIC and the host computer you can keep the data up to date on both computers by synchronizing If you modify the d...

Страница 76: ...The MOBIC has now been detected and you can establish the partnership 6 In the Set Up a Partnership dialog select Yes to specify the partnership 7 Follow the instructions on the screen until the installation is completed After successful installation of the program you will find additional information on using ActiveSync in the ActiveSync help on your host computer After installing ActiveSync you ...

Страница 77: ...e COM port of your host computer Figure 6 2 and follow the instructions on the screen Figure 6 2 Connecting the MOBIC to the Host Computer with the Supplied Serial Cable Note Use only the supplied serial cable Icon Once the connection to your MOBIC is established an icon appears in the status bar of your MOBIC in the form of a connection icon see Figure 6 3 Connection icon Status Connection active...

Страница 78: ...stablishing an Infrared Connection You can use an infrared connection to establish a direct connection between the mobile unit and the desktop computer quickly and simply You only need to align the infrared ports and establish the connection from the mobile unit This method is ideal for fast data exchange between several devices since no cables or adapters need to be replaced Infrared connections ...

Страница 79: ...e MOBIC To establish an infrared connection follow the steps as explained in the help system of ActiveSync on your host PC Start Programs Microsoft ActiveSync Help Microsoft ActiveSync Help Index IR Connections The procedure is otherwise basically the same as establishing a serial connection see 6 2 2 6 2 4 Establishing a Connection with a Host Computer via Ethernet Before you establish a connecti...

Страница 80: ...t port 4 Start ActiveSync on your MOBIC Start Programs Communication ActiveSync 5 From the upper list box Choose a method to connect to the selected desktop computer select the setting Network connection and from the list box Connect to select the computer to which you want to establish a connection Note The Connect to list displays all computers with which you have set up a partnership 6 Tap on C...

Страница 81: ...ow provides an overview of all the ports with which an ActiveSync connection can be established Table 6 1 Overview of ActiveSync Connections Connection method Operating system on the host PC Windows 95 Windows 98 Windows 2000 Windows NT Serial Yes Yes Yes Yes Ethernet Yes Yes Yes Yes Infrared Yes Yes Yes No USB No No No No ...

Страница 82: ...lease remember that the IP address must be unique Check with your network administrator S Select the Subnet Mask box Here you can enter the subnet mask for your IP address Check with your network administrator S Select the Default Gateway box Enter the address of the gateway The gateway is necessary to gain access to other networks for example the Internet S Select the Primary DNS box in the Name ...

Страница 83: ...You start the Internet Explorer with Start Programs Internet Explorer The Microsoft Internet Explorer program provides you with a subset of the functions of the Internet Explorer familiar from your PC Note Before you can view pages on an intranet or on the Internet you must first configure the network access as explained in Section 6 3 ...

Страница 84: ...orer V4 0 using a plugin interface This means that you can also load and execute Java Applets embedded in HTML pages on the MOBIC using the Internet Explorer V4 0 You can also create your own applets and run them locally on the MOBIC The JVM installed on the MOBIC S corresponds to the pJava V3 1 specification Personal Java S is based on the API Application Interface of the JDK V 1 1 8 Java Develop...

Страница 85: ...er V4 0 Using the FTP client function for example Microsoft Internet Explorer V4 0 on the MOBIC the user can read or write files of the server It is only possible to copy complete files There must also be space for the entire file on the Windows CE device The data must exist in a format that can be read by a Windows CE application ...

Страница 86: ... files on the network to be opened The network drives can be displayed with the Windows Explorer To display such drives you must specify the server name and drive name as the address in the form Computername drivename To open files you must specify the complete network path When you open a file the entire file is transferred The data must exist in a format that can be read by a Windows CE applicat...

Страница 87: ... with your network administrator to find out whether your mail server supports one of these protocols If this is the case you can add the POP3 mail or IMAP4 mail services in the inbox using Services Options In this way you can send and receive E mails as long as you have a network connection see Section 6 3 6 8 1 Microsoft Terminal Server Client In this mode the MOBIC functions simply as an input ...

Страница 88: ...Tools The MOBIC is supplied with both a number of Microsoft Windows CE standard programs and additional programs some of which were developed especially for the MOBIC This chapter lists the supplied standard programs and includes a brief description of each of these programs 7 ...

Страница 89: ...BIC Since Microsoft Word doc and Microsoft Pocket Word pwd use different file formats ActiveSync converts the file formats during transfer Starting To start Pocket Word Tap on the icon for Microsoft Pocket Word in the Start Programs menu 7 1 2 Microsoft Inbox Microsoft Inbox includes functions for sending and receiving E mails Using ActiveSync see Section 5 1 you can synchronize data in Microsoft ...

Страница 90: ...to the Internet or to an enterprise network so that you can surf on the Internet or the Intranet of an enterprise Starting To start Microsoft Internet Explorer V4 0 Tap on the icon for the Internet Explorer in the Start Programs menu Java A Java Virtual Machine was adapted using a plugin This makes it possible for you to download and execute Java Applets embedded in HTML pages via the Internet ...

Страница 91: ... Tap on the Jot icon in the system bar You can recognize whether or not Jot is active by the two icons in the system bar see Figure7 1 and Figure 7 2 S The Arrow icon see Figure 7 1 tells you that the pen can only be used for tapping in the current status The pen cannot be used for writing on the screen in this status Jot icon not active in other words command input Figure 7 1 Jot Arrow Icon S The...

Страница 92: ...uter with the IP address 142 11 52 160 Figure 7 3 Display of Ping Results Starting You start the program from the command line Start Programs Command Prompt 7 1 6 Microsoft Terminal Server Client In this mode the MOBIC functions simply as an input device thin client that requires a permanent network connection to a Windows terminal server for example in a wireless LAN You will find further informa...

Страница 93: ... S Disabling the on off button S Backup restore of the registry in the user flash S Warm reset S Format internal disk S Enable disable additional 5 V 200 mA power supply on pin 9 of the RS 232 port Starting 1 Tap on Start Programs Tools ConfigTool After you start the MOBIC Configurator a window appears see Figure 7 4 with the following six tabs Tabs Figure 7 4 MOBIC Configurator These tabs are ass...

Страница 94: ...nfigurator S RAM Total RAM available to Windows CE S RAM Object Store Programs and data installed or created later are stored here Exception Programs or data were stored in internal disk S RAM Program Store Work memory available to all programs S Storage Card External PCMCIA flash card S Internal Disk Flash For each area you can see the information Total total available memory In Use currently use...

Страница 95: ... you develop new user programs under Windows CE It supports the developer when testing or debugging programs After tapping on the Trace Archive tab you display the user interface for configuring the trace archive see Figure 7 6 Note Standard Windows CE programs do not use this trace archive Figure 7 6 User Interface for Configuring the Trace Archive ...

Страница 96: ...f the trace level of individual programs If trace output is activated the trace output depends on the local trace levels of the individual programs see below To activate the trace flag select the Trace ON option button to deactivate it select the Trace OFF option button Default setting Trace OFF Trace Output If you select the Trace to File check box and or Trace to COM you specify whether the trac...

Страница 97: ...o it using the slider The slider remains gray and cannot be moved if the Application Trace Level list box is empty The trace levels are used by the programs as follows S No Trace Output At this trace level no trace is written S Important Trace With this setting only important trace output is made for example message received function calls etc S Extended Trace This level means extended trace outpu...

Страница 98: ...onfiguring the Error Archive Note Each modification to the error archive made in the MOBIC Configurator is only entered in the registry after you tap the Apply button You can restore the default values for the error archive by simply tapping on the Set Default Settings button Error Archive Path Here you can change the path for the error archive Default setting Windows Logfiles ...

Страница 99: ...r screen at one time The range is between 1 and 10 the default setting is 2 message boxes You select the number with the UP and DOWN arrow buttons Default setting 2 Figure 7 8 Error Message Box Show Error Message Box on You can set one of three possible error levels S Critical Error This is the error level with the highest priority S Normal Error Errors with medium priority are included in this er...

Страница 100: ...to the function key assignment in the MOBIC Configurator are entered in the registry only after tapping the Apply button You can restore the default values for the function keys at any time by simply tapping on the Set Default Settings button The current configuration of the five function keys is displayed in the Function Key Assignment list boxes Default settings for the function keys F1 F5 F1 St...

Страница 101: ...in which you can select the application exe file you want to start with the particular function key The selected application is then displayed to the right of the Config Fx x 1 2 3 4 5 button Software Keyboard Toggles the software keyboard on or off Right Mouse Button Prepares a mouse click with the right mouse key The Right Mouse Key function covers two steps 1 First you select the right mouse bu...

Страница 102: ...g includes an additional output box in which the selected event is displayed Function Key Debounce Time You have the option of setting the reaction time debounce time of the five function keys F1 F5 in a range from approximately 0 to 300 milliseconds The debounce time is the time for which a key must be pressed before it triggers the keyboard event see Figure 7 9 You can make the Function key debo...

Страница 103: ...ftware tab you display the overview of all the applications installed on the MOBIC see Figure 7 12 You obtain the following information about each application S Application name Name S Version number of the application optional S Date the application was created optional Figure 7 12 Overview of all Installed Applications ...

Страница 104: ...s 7 17 MOBIC T8 for Windows CE 3 0 C79000 G8976 C190 02 7 2 6 Miscellaneous Tab If you tap on the Miscellaneous tab you display the user interface of the MOBIC Configurator in which you can make further settings see Figure 7 13 ...

Страница 105: ...Supplied Programs and Tools 7 18 MOBIC T8 for Windows CE 3 0 C79000 G8976 C190 02 ...

Страница 106: ...tap on the Apply button You can restore the default values for the Miscellaneous tab at any time simply by tapping on the Set Default Settings button Power Switch In the Power Switch group you can lock or unlock the on off switch If you select the Unlocked option this function is not disabled if you select the Locked option the function is disabled and the MOBIC is then permanently on example term...

Страница 107: ...version is entered in the Software register of the MOBIC Configurator Backups also contain information on the touchscreen calibration This means that if you restore a backup created on a different MOBIC the touchscreen must be recalibrated To calibrate the touchscreen press F1 F5 simultaneously MAC Address The MAC address of the On Board Ethernet Controller is displayed here Device ID The Device I...

Страница 108: ...CE 3 0 C79000 G8976 C190 02 Format Tapping on the Format button formats the flash Power Supply on the RS 232 Port The MOBIC provides a power supply 5V max 200 mA on the RS 232 port pin 9 This power supply can be enabled disabled As default this is disabled ...

Страница 109: ...eshooting during development and testing of application programs for your MOBIC under Windows CE How to configure the error and trace archive in the MOBIC Configurator is described in detail in the previous section 7 2 Starting Tap on the View Trace Errors icon taskbar Start Programs Tools LogView Trace Errors After you start the LogView the error archive is always displayed first see Figure 7 14 ...

Страница 110: ...he following day 12 00 00 PM S Trace Level Here you can enter one of three possible error levels see Section 7 2 2 The options are Important Trace Extended Trace Detailed Trace or Default setting S Program You can enter the name of the program that generated the messages and for which all pending messages will be displayed Default setting The display of the error archive is not updated until you t...

Страница 111: ...te and time at which the error message was generated in the format yy mm dd hh mm ss S Level Error level of the message S Program that generated the message S Message Error text with up to 10 parameters The user interface of the error archive also has its own online help You can start this using the Help menu You exit the error archive with Exit in the File menu Up to now we have only shown you th...

Страница 112: ...hive entries also have a uniform structure In contrast to the error archive however a message is displayed in the trace archive as shown below S Date Date and time at which the trace message was generated in the format dd mm yy hh mm ss S Level Trace level of the trace message S Message Trace output text Figure 7 15 Trace Archive ...

Страница 113: ...8 1 MOBIC T8 for Windows CE 3 0 C79000 G8976 C190 02 Backup and Restore This chapter explains how you can save your data 8 ...

Страница 114: ...il in Section 6 2 You have the following options S Saving individual files S Making a Backup Restore of your complete system with ActiveSync In this case a complete copy is created on your host computer and is downloaded again to the MOBIC with Restore This function also saves the registry S Running an automatic data synchronization whenever an ActiveSync connection is established see Section 6 2 ...

Страница 115: ...contains all the programs and data you installed after receiving your device A storage medium PCMCIA card is required for the backup When you cold boot the MOBIC you can if you wish restore a backup you made earlier The restore function allows you to restore a previously created backup manually Restoring the backup on the MOBIC recreates the state as it was when you made the backup In other words ...

Страница 116: ...9 1 MOBIC T8 for Windows CE 3 0 C79000 G8976 C190 02 Changing the Settings of the MOBIC This chapter explains how you can change the settings of your MOBIC to meet your own specific requirements 9 ...

Страница 117: ...is puts the unit to sleep and saves battery power Energy Saving Mode S Double tap with the pen on the Power icon in the control panel Start Settings Control Panel Power Select the Power Off tab and set the time after which the unit changes automatically to the energy saving mode The shorter the time you select times between 1 and 5 minutes can be selected the longer your battery will remain operat...

Страница 118: ...OBIC Configurator you have a tool with which you can make or modify specific settings for your MOBIC You can for example assign input that you require often for example starting a particular program to one of the five available function keys For detailed information on working with the MOBIC Configurator refer to Chapter 7 ...

Страница 119: ...10 1 MOBIC T8 for Windows CE 3 0 C79000 G8976 C190 02 Installing Additional Applications and Drivers This chapter explains how you can expand the functionality of your MOBIC 10 ...

Страница 120: ...e click on the installation program on your desktop PC otherwise double click directly on the program file exe 4 Follow the instructions displayed on your host computer The installation program now copies the required files to the MOBIC 5 Follow the instructions displayed on the MOBIC Note Applications and drivers installed by the user are installed in the battery backed RAM Uninstalling Additiona...

Страница 121: ...11 1 MOBIC T8 for Windows CE 3 0 C79000 G8976 C190 02 Repair Care and Maintenance This chapter contains useful tips and information on repair care and maintenance of your MOBIC 11 ...

Страница 122: ...er Caution Install only system expansions that are intended for this computer Installing other expansions can damage the system or violate the safety directives and regulations for interference suppression For information on the system expansions suitable for installation contact the technical customer service or sales department Note The guarantee is nullified if defects are caused on the MOBIC b...

Страница 123: ...n If the screen of your MOBIC becomes damaged make sure that any fluid escaping does not come into contact with your skin mucosa eyes mouth etc or with foodstuffs Do not inhale any vapors escaping from the screen If your skin or clothing becomes contaminated clean thoroughly with plenty of soap and water ...

Страница 124: ...eaning To clean the display of your MOBIC rub it gently with a soft cotton cloth dampened with water or denatured alcohol Note Cleaning the surface of the display with denatured alcohol can leave smears on the screen In this case polish the surface of the screen gently with a soft dry cloth ...

Страница 125: ...dges of the screen One corner of the screen protective foil bottom left has a notch At this point you can easily detach the protective foil with a fingernail and then pull it off 2 Remove any remnants of the adhesive from the surface of the screen by cleaning it gently with a soft cotton cloth dampened with denatured alcohol Make sure that all the remnants of the previous foil are removed from the...

Страница 126: ...11 6 MOBIC T8 for Windows CE 3 0 C79000 G8976 C190 02 11 5 Seals Before you replace the protective cover or the cover of the battery compartment make sure that all the seals are clean and if necessary clean them with a damp cloth ...

Страница 127: ...l if the current calibration is so out of line that the device can no longer be operated 2 Position your MOBIC as you would during normal use Make sure that the pen is held at the normal angle for writing Touch the screen only with the tip of the pen Note Accidentally touching the screen with your finger or hand during calibration can lead to an incorrect calibration 3 Calibrate the screen followi...

Страница 128: ...Repair Care and Maintenance 11 8 MOBIC T8 for Windows CE 3 0 C79000 G8976 C190 02 11 7 Pen Working with a worn or dirty pen can scratch the screen Make sure that you replace the pen in good time ...

Страница 129: ...C in a dry place S The battery must only be replaced by a specialist S When replacing a battery replace it with a battery of the same type S If a battery is defective it must no longer be used Do not touch the terminals of the battery S Batteries must be disposed of as hazardous waste according to the local regulations Warning Risk of explosion if the battery is replaced incorrectly Only replace t...

Страница 130: ...12 1 MOBIC T8 for Windows CE 3 0 C79000 G8976 C190 02 Certificates Directives and Declarations 12 ...

Страница 131: ... EN 50081 2 1993 EN 61000 6 2 1999 Household EN 50081 1 1992 EN 50082 1 1997 Installation Guidelines The product meets these requirements if you adhere to the installation instructions and safety related information contained in this manual during installation and operation Declaration of Conformity The EU declarations of conformity and corresponding documentation are available for the responsible...

Страница 132: ...duct manufacturing process development production and marketing meets the requirements of DIN ISO 9001 corresponds to EN29001 1987 This was confirmed by DQS Deutsche Gesellschaft zur Zertifizierung von Qualitätsmanagementsystemen mbH EQ Net Certificate No 1323 01 The MOBIC is supplied with the software installed Please adhere to the corresponding license agreements ...

Страница 133: ... 60950 I T E or complying with UL508 IND CONT EQ Underwriters Laboratories UL complying with Canadian Standard C22 2 No 60950 I T E or complying with C22 2 No 142 IND CONT EQ Underwriters Laboratories UL complying with Standard UL 60950 Report E21 Underwriters Laboratories UL complying with Standard UL 60950 Report E21 6641 and Canadian Standard C22 2 No 60950 I T E or complying with UL508 and C22...

Страница 134: ...ause harmful interference in which case the user will be required to correct the interference at his own expense Shielded Cables Shielded cables must be used with this equipment to maintain compliance with FCC regulations Modifications Changes or modifications not expressly approved by the manufacturer could void the user s authority to operate the equipment Conditions of Operations This device co...

Страница 135: ...13 1 MOBIC T8 for Windows CE 3 0 C79000 G8976 C190 02 Frequently Asked Questions FAQs 13 ...

Страница 136: ...restart after you have turned it on or following the suspend mode this may be due to one of the following causes S The battery is not correctly installed 1 Turn off your MOBIC 2 Install the battery correctly according to the description in Section 2 3 1 3 Turn on your MOBIC again S The battery is dead 1 Charge the battery as described in Section 4 8 S The power supply unit is not connected correct...

Страница 137: ...sed Tap on the screen to reactivate the display Ports Can the IR port be operated at the same time as the RS 232 port No Operating system Why is Windows CE used as the operating system Windows CE provides the following S Instant On Off and Reset S Significantly longer operating time due to intelligent power management What do I need to note when programming with Windows CE as opposed to Windows 9x...

Страница 138: ...ton or you can activate or deactivate the network adapter Disable network driver button Note If you change the previous adapter must be deactivated and the required adapter activated If this has not already been done the first time an adapter is activated the IP and name server configuration must be set Name Server properties page This configuration is stored even if you deactivate the adapter and...

Страница 139: ...between the MOBIC and a network computer or network folder To start the program Tap on Start Programs Tools Network Resources You establish a connection between the MOBIC and a network computer or network folder as follows 1 Open the Network Resources program 2 Tap on New Connection 3 In Remote Path specify the server and the share name of the resource as follows Servername Sharename 4 In Local Na...

Страница 140: ... The terminal server recognizes a double click only when the touchscreen is tapped twice on the same spot Due to the high resolution this is however relatively difficult Remedy In the registry of the terminal server change the maximum deviation for a double click to a higher value for example to 20 HKEY_CURRENT_USER Control Panel Mouse DoubleClickHeight 20 DoubleClickWidth 20 ...

Страница 141: ...14 1 MOBIC T8 for Windows CE 3 0 C79000 G8976 C190 02 Technical Specifications 14 ...

Страница 142: ... 02 Operating System Software Operating System MS Windows CE 3 0 Software S MS Inbox S MS Pocket Word S MS Internet Explorer V4 0 S Java Virtual Machine with plugin for Internet Explorer S MS Thin Client S Software keyboard S Jot Handwriting Recognition S MOBIC System Software ...

Страница 143: ...t Display S Type TFT color display backlit S Display size 8 4 21 3 cm S Resolution SVGA 800 x 600 pixels S Touchscreen resistive S Surface protection replaceable protective foil Operator controls S Function keys 5 in right side panel user defined S On off switch in right side panel S RESET button in battery compartment Display elements 1 LED red 1 LED green 2 LED yellow function user defined Proce...

Страница 144: ...er mono Power supply MOBIC T8 DC 16 V current input max 1 6 A from MOBIC power supply unit Supply voltage of the power supply unit AC 100 240 V 50 60 Hz Power loss typically 4 4W in operation max 8 W in operation 48 mW in standby mode Backup batter integrated S NiMH S 3 6 V 300 mAh Permitted ambient conditions see page 14 5 Shock resistance see mechanical conditions page 14 6 Resistance to vibrati...

Страница 145: ... IEC 61000 4 4 1995 burst 2kV IEC 61000 4 5 1995 surge Noise immunity to static discharge 4kV contact discharge IEC 61000 4 2 1995 Noise immunity to RF interference 10 V m with 80 amplitude modulation at 1 kHz 80 MHz to 1000 MHz in the range 87 MHz to 108 MHz 174 MHz to 230 MHz 470 MHz to 790 MHz 3 V m IEC 61000 4 3 1995 Permitted ambient conditions Operating temperature MOBIC T8 Battery charging ...

Страница 146: ...rating Acceleration 150m s2 shock duration 11 ms IEC 60068 2 27 test Ea Requirements from EN 61131 2 Freefall of unpacked MOBIC T8 Fall height 1 20 m with protective cover closed MIL Std 810E 516 4 Mechanical Data Dimensions H x W x D 19 5 x 28 4 x 5 7 cm Securing Four M4 screw holes max torque 2 Nm max screw in depth 7 mm Weight approx 1 7 kg Class of Protection Protective cover closed open IP65 ...

Страница 147: ...S Clear to send 9 5V Power supply 5 V max 200 mA Headset Pin Signal Description 1 MP Microphone positive 2 MGND Microphone ground 3 GND Signal ground 4 ASL Audio status link 5 SP Speaker positive 6 SN Speaker negative 7 n c No connection USB Pin Signal Description 1 VCCout Power supply output 0 4 A when both PCMCIA slots loaded with 600 mA together max current 0 5 A when both PCMCIA slots loaded w...

Страница 148: ...D Transmit data positive 2 TD Transmit data negative 3 RD Receive data positive 4 n c No connection 5 n c No connection 6 RD Receive data negative 7 n c No connection 8 n c No connection Functional electrical isolation 500 V DC Power supply connection Pin Signal Description 1 VCC Power supply positive 2 GND Signal ground ...

Страница 149: ...sets the MOBIC to its default status without deleting the flash COM port A serial communications port for connecting to mobile devices modems and printers Driver A control program that allows your computer to use a specific peripheral devi ce E mail Messages and other information you send or receive in your mailbox Flash Non volatile memory comparable with the hard disk of a PC Headset Combination...

Страница 150: ... A removable card such as a modem Ethernet wireless LAN or memory card complying with the PCMCIA specification Pen stylus A pointing device for selecting tapping and entering information on the touch screen Power supply unit An adapter for external power supply for the MOBIC RAM Random Access Memory Volatile memory from which data can be read and to which data can be written Data in RAM is retaine...

Страница 151: ...data on two computers to make sure that the same data are on both computers Touchscreen The touch sensitive screen of your MOBIC that recognizes when its surface is touched normally with the pen and converts this touch into the desired action for example moving the cursor Transcriber Software for handwriting recognition on your MOBIC USB Universal Serial Bus A standard for connecting peripherals U...

Страница 152: ...ive tab 7 10 Ethernet 1 4 4 12 configuration 6 10 Explorer 6 14 F F1 F5 tab 7 13 FTP server 6 13 Function keys 1 8 2 2 2 12 assignment 2 12 H Hand strap 3 4 Handwriting recognition 2 17 Headset 2 3 4 5 HTML 6 11 I Installation 6 4 Internal Disk 7 7 Internet Explorer V4 0 6 13 IR 1 4 2 3 4 3 J Java Virtual Machine 6 12 7 3 Jot 7 4 K Kalibrieren Nachkalibrieren 11 7 Keyboard events 7 15 L LED 1 4 LE...

Страница 153: ... 3 USB 1 4 2 4 4 6 Power supply 2 4 Power supply unit 1 9 connecting 4 14 Protective cover 2 2 Protective foil 1 9 11 5 R RAM 7 7 Reset 7 20 Reset button 1 8 RJ 45 2 4 RS 232 1 4 1 9 4 2 RS 232 2 3 S Schnittstellen Headset 4 5 Netzteil 4 14 PCMCIA 4 8 Seals 11 6 Serial connection 6 5 Setting the time 5 2 Shoulder neck strap 3 2 fitting 3 2 Software tab 7 16 Status indicators 1 8 2 2 2 13 meaning o...

Отзывы: