background image

ENGLISH

134

134

You can record video files onto the connected PC directly in real-time. Using this function, you can use it as a PC camera for
video chatting / conferencing. USB data streaming requires a DV Driver, Video CODEC, and DirectX 9.0 or higher installed on
the PC prior to use (refer to page 133).

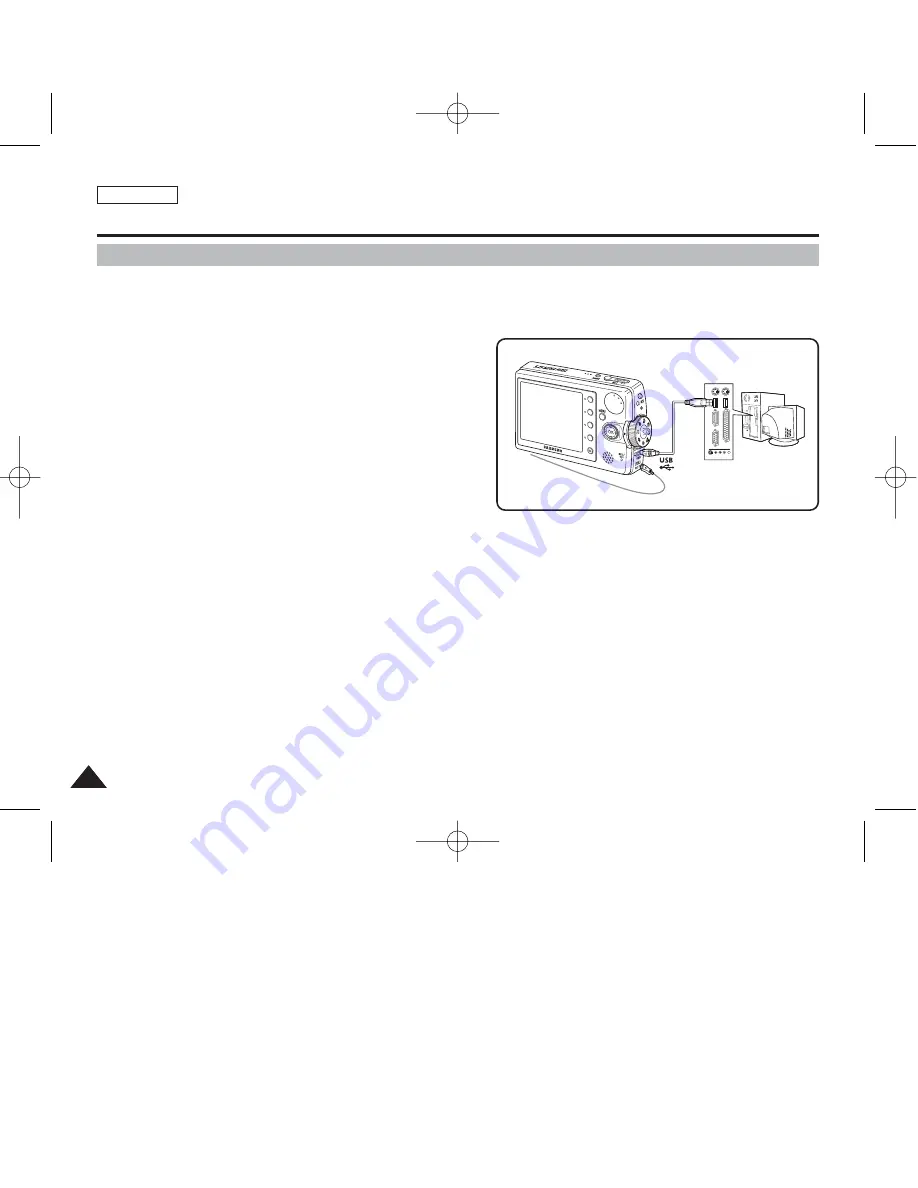
1.  Connect the Miniket Photo to the PC with the provided

USB cable as shown in the figure.

2.  Turn on your PC.

3.  Press the [POWER] button to turn on the device.

4.  Run a video chatting / conferencing application such as

Windows Messenger and enjoy the video utilisation.

Various applications take advantage of the PC camera function.
Refer to respective product documentation for further details.

5. When finished, disconnect the cable.

[ Notes ]

You must install the DV Driver (refer to page 131).

It is recommended to use an AC Power Adapter during data transfer to avoid unintended power outages.

Microsoft Windows ME or later operating systems support the PC camera function.

If the PC does not recognise the USB device when the USB cable is connected to the front USB port, try the USB port on the rear panel of
the PC.

Miscellaneous Information : Connecting To Other Devices 

Using the PC Camera Function

00934C SC-MS10 USA~152  9/30/05 11:00 AM  Page 134

Содержание Miniket Photo SC-MS10

Страница 1: ...e reference AF Auto Focus CCD Charge Coupled Device LCD Liquid Crystal Display SC MS10 MS11 MS15 ENGLISH Use only approved battery packs Otherwise there is a danger of overheating fire or explosion Samsung is not responsible for problems occurring due to using unapproved batteries US PATENT 4415844 00934C SC MS10 USA 007 9 30 05 10 54 AM Page C ...

Страница 2: ...ing prong The wide blade or the third prong are provided for your safety If the provided plug does not fit into your outlet Consult an electrician for replacement of the obsolete outlet 10 Protect the power cord from being walked on or pinched particularly at plugs convenience receptacles and the point where they exit from the apparatus 11 Only use attachments accessories specified by the manufact...

Страница 3: ...ing one blade wider than the other or a 3 wire grounding type plug a plug having a third grounding pin If you are unable to insert the plug fully into the outlet try reversing the plug If the plug still fails to fit contact your electrician to replace your outlet Do not defeat the safety purpose of the polarized plug 19 POWER CORD PROTECTION Power supply cords should be routed so that they are not...

Страница 4: ...pose you to dangerous voltage or other hazards Refer all servicing to qualified service personnel 26 DAMAGE REQUIRING SERVICE Unplug this CAMCORDER from the wall outlet and refer servicing to qualified service personnel under the following conditions a When the power supply cord or plug is damaged b If any liquid has been spilled onto or objects have fallen into the CAMCORDER c If the CAMCORDER ha...

Страница 5: ...ot installed and used in accordance with the instructions may cause harmful interference to radio communications However there is no guarantee that interference will not occur in a particular installation If this equipment does cause harmful interference to radio or television reception which can be determined by turning the equipment off and on the user is encouraged to try to correct the interfe...

Страница 6: ...upplied with the Device 13 Rear Left View 14 Front Bottom View 15 LCD Display 16 OSD On Screen Display in Photo Capture Mode Photo View Mode 16 OSD On Screen Display in Movie Record Mode Movie Play Mode 17 OSD On Screen Display in Music Play Mode 18 OSD On Screen Display in Voice Record Voice Play System Settings Mode 19 Battery Pack Installation Ejection 20 Maintaining the Battery Pack 21 Chargin...

Страница 7: ...onal Accessory 34 Inserting Ejecting the Memory Card Optional Accessory 35 Adjusting the LCD Monitor 37 Adjusting the LCD Brightness 37 Setting Date Time 38 Setting Date Time 38 Setting Date Time Format 39 Setting Date Display 40 Setting the System 41 Setting the Auto Shut Off 41 Setting the File No Function 42 Setting the Beep Sound 43 Setting the Shutter Sound 44 Selecting Language 45 Setting th...

Страница 8: ...es 60 Setting the Photo File Size 61 Setting the Photo File Quality 62 Setting the Sharpness 63 Setting the Focus Method 64 Setting the Macro Mode 65 Setting the Metering Method 66 Setting the ISO Speed Sensitivity 67 Setting the White Balance 68 Adjusting the Exposure Exposure Compensation 69 Setting the DIS Digital Image Stabiliser 70 Setting the Imprint Option 71 Setting the Digital Zoom 72 Set...

Страница 9: ...n the LCD Monitor 92 Setting the Recording Options 93 Using the Shortcut Buttons 93 Setting the White Balance 95 Setting the Program AE 96 Setting the Macro Mode 97 Setting the Movie File Size 98 Setting the Movie File Quality 99 Setting the Self Timer 100 Setting the Wind Cut 101 Setting the Digital Effects 102 Setting the Viewing Options 103 Using the Shortcut Buttons 103 Protecting Movie Files ...

Страница 10: ... 122 Setting the Voice Play Options 123 Using the Shortcut Buttons 123 Setting the Repeated Play 125 Deleting Voice Files 126 Protecting Voice Files 127 Copying Voice Files 128 Connecting to a PC 130 Supported USB Speed according to Operating System 130 Installing Software 131 Installing DV Media Pro 1 0 131 Installing DV Media Pro 1 0 Video Studio 132 Connecting To Other Devices 133 Connecting to...

Страница 11: ...rinting with DPOF 139 Cleaning and Maintenance 140 After Using the Device 140 Cleaning the Body 141 Regarding the Battery 142 Using Abroad 143 Self Diagnosis Display 144 Self Diagnosis Display 144 Checklist 144 ENGLISH 7 7 Specifications 148 Index 150 Warranty SEA users only 152 Using the Menu 146 Troubleshooting 144 Contents 00934C SC MS10 USA 007 9 30 05 10 54 AM Page 7 ...

Страница 12: ...cause damage similar to direct sunlight on one s eyesight Particular care should be observed if photographing infants when the flash should be no less than 3 feet from your subject If the device is not working properly please consult your nearest dealer or authorised SAMSUNG service centre Disassembling the device by yourself may cause irrecoverable damage which will be difficult to repair Clean t...

Страница 13: ...rights of the copyright owners and is contrary to copyright laws All the trade names and registered trademarks mentioned in this manual or other documentation provided with your Samsung product are trademarks or registered trademarks of their respective holders Notes Regarding the Miniket Photo Notes Regarding COPYRIGHT Notes Regarding Moisture Condensation 1 Do not leave the device exposed to hig...

Страница 14: ...using the Battery Pack you need to fully charge it Do not drop the Battery Pack Dropping the Battery Pack may damage it Fully discharging a Lithium Polymer battery damages the internal cells The Battery Pack may be prone to leakage when fully discharged To avoid damage to the Battery Pack make sure to remove the battery when no charge remains Clean the terminal to remove foreign substances before ...

Страница 15: ... used replacement parts specified by the manufacturer and with the same characteristics as the original part Unauthorised substitutions may result in fire electric shock or other hazards Correct Disposal of This Product Waste Electrical Electronic Equipment Applicable in the European Union and other European countries with separate collection systems This marking shown on the product or its litera...

Страница 16: ...pecial look by adding various special effects USB Interface for Data Transfer You can transfer still images and video files or any other files to a PC using the USB interface PC Cam for multi entertaining You can use the device as a PC camera for video chatting video conferencing and other PC camera applications Voice Record Playback with vast memory You can record voices and store it in the inter...

Страница 17: ... local Samsung dealer and service center You can download programs the latest driver software and CODECs from the Samsung Electronics webpage ENGLISH 13 13 Getting to know your Miniket Photo Accessories Supplied with the Device 3 Audio Video Cable 2 AC Power Adapter 1 Lithium Ion Battery Pack 5 Software CD 4 USB Cable 8 Carrying Case Option 9 Earphones Option 7 Instruction Book Quick Guide 6 Hand ...

Страница 18: ... jack 5 USB port 6 Power Adapter Receptacle 7 Connector Cover 8 Recording charging Indicator 9 Built in Speaker 10 Display Button 11 LCD Monitor ENGLISH 14 14 Name of Each Part MENU 5 25 MEGA PIXEL POWER W T USB DC IN 1 Fastening Hand strap 2 11 10 9 8 7 6 5 3 4 00934C SC MS10 USA 037 9 30 05 10 55 AM Page 14 ...

Страница 19: ...ecord Stop Button 4 Power Button 5 Built in Mic 6 Lens 7 Flash 8 Tripod Receptacle 9 OPEN Switch Battery Memory Card Slot 10 Battery Slot 11 mini SD Memory Card Slot 12 Battery Lock Switch Usable Memory Card mini SD Card 1 2 3 4 5 6 7 8 10 11 12 9 00934C SC MS10 USA 037 9 30 05 10 55 AM Page 15 ...

Страница 20: ...e Indicator 19 Metering Mode Indicator 20 Scene Mode Indicator 1 Mode Indicator 2 DPOF Indicator 3 Image Number 4 Delete Indicator 5 Protection Indicator 6 Slideshow Indicator 7 Record Play Indicator 8 Battery Life Indicator 9 Memory Type Indicator 10 Image Counter Current Total 11 Selected Image 12 Use joystick for change selection 13 Use OK button to view full screen T 2592 A ISO AUTO EV 0 12 00...

Страница 21: ... Progress Bar 4 Counter Elapsed Time 5 Volume Indicator 6 Delete Indicator 7 Protection Indicator 8 Slideshow Indicator 9 Record Play Indicator 10 Battery Life Indicator 11 Memory Type Indicator 12 Image Counter Current Total 13 Standby Play Pause Indicator Movie Record Mode A 640 REM T SF SF OFF OFF Ï AE AUTO 4 Min 4 Min OFF 1 1 1 12 00PM 2005 01 01 1 2 2 3 4 5 6 9 10 11 12 13 14 15 16 Movie Play...

Страница 22: ...Type Indicator 10 File Counter Current Total 11 Current File Information 12 Progress Bar 13 Counter Elapsed Time File Length 14 Use joystick Left Right to Search Skip 15 Use OK button to Play Pause Stop 16 Use joystick Up Down to adjust volume Music Play Mode 01 Move Move Search Stop Select Select 1 2 3 Music Play Mode 01 00 50 03 00 Move Search Search Stop Stop Select 8 9 10 4 5 17 6 7 16 15 14 1...

Страница 23: ...Volume Indicator 5 Delete Current File 6 Setup Repeat 7 Display File List 8 Record Playback Voice Record Mode SWAV0001 WAV SWAV0001 WAV 00 00 00 16 22 58 00 00 00 16 22 58 8KHz Mono 64Kbps 1 2 3 4 Voice Play Mode OFF OFF SWAV0004 WAV SWAV0002 WAV 8KHz Mono 64Kbps 00 00 05 00 00 10 00 00 16 00 00 20 Search Search Vol Stop Stop Vol 7 8 8 7 6 5 4 6 3 2 5 1 1 Mode Indicator 2 Menu Tab 3 Setup Items 4 ...

Страница 24: ...minals to remove any foreign substances before inserting the Battery Pack If the device will not be in use for a while remove the Battery Pack from the device It is recommended to prepare fully charged additional Battery Packs for outdoor use Additional Battery Packs are available at your local Samsung dealer and service center Inserting the Battery Pack Ejecting the Battery Pack Warning When you ...

Страница 25: ... it is used in temperatures below 32 F 0 C or left in temperatures above 104 F 40 C for a long period Do not put the Battery Pack near any heat sources fire or flames for example Do not disassemble process press or heat the Battery Pack Do not allow the and terminals of the Battery Pack to be short circuited It may cause leakage heat generation fire or overheating It is recommended to use original...

Страница 26: ...r functions such as zooming video playback or DIS functions The continuous recording times for video recording given in the table below are approximations Actual recording time depends on usage Continuous Recording Time Based on Battery Type Super Fine SF Fine Normal 640 x 480 320 x 240 Approx 4 Minutes Approx 7 Minutes Approx 7 Minutes Approx 15 Minutes Approx 15 Minutes Approx 30 Minutes Image R...

Страница 27: ...rging the battery the color of the charge indicator is orange The charge indicator flickers if the battery is abnormal Battery Level Indicator State Fully charged 25 50 is used 50 70 is used 75 95 is used Over 95 is used flickers The device will soon turn off Change the Battery Pack as soon as possible flickers The device will be forced to turn off after a beeping sound Message Low battery SB LH82...

Страница 28: ...niket Photo powered by the AC Power Adapter indoors where available You may charge your Miniket Photo by connecting it to a PC with the USB cable Warning It is recommended you fully charge the Battery Pack before use You should only charge the battery in an environment between 32 F 0 C and 140 F 40 C Ambient temperature may affect charging the Battery Pack too low temperature may result in longer ...

Страница 29: ... The color of the LED indicates the state of power or charging LED Color Red Orange Green During Recording Recording During Charging Charging Fully Charged LED Color Blue Power On NU Recording Charging Indicator Power Indicator 00934C SC MS10 USA 037 9 30 05 10 55 AM Page 25 ...

Страница 30: ...vice Refer to page 24 3 Press the POWER button to turn on the device 4 Select the desired mode by setting the Mode Dial 5 Press the Record Stop button to take a picture start recording video voice or play back music To set focus press the Record Stop button halfway down 6 When finished press the POWER button to turn the device off Notes You can select Video mode or Previous mode as the start up mo...

Страница 31: ...ecord play back voice sound PC Camera Mode You can use the device as a PC camera for video chatting video conferencing and other PC camera applications PictBridge Mode When you connect the device to a PictBridge supported printer with a USB cable you can print your stored pictures without a PC Storage Mode Connecting the device to a PC with a USB cable allows you to store various files in the devi...

Страница 32: ...ill turn off 4 If you press the DISPLAY button 4 times it switches to the initial normal display screen Notes Above description applies to the Photo and Video mode 1 Set the desired mode by setting the Mode Dial 2 Press the Menu button 3 Move the cursor by moving the joystick œ œ to select desired menu item and then press the OK button to confirm 4 Press the Menu button to finish DISPLAY Button ME...

Страница 33: ...g these buttons you may directly access the functions 1 Press the Mode Dial to set the desired mode 2 Press the POWER button to turn on the device 3 On the LCD monitor the function of each button is displayed Press the button to access the function directly ex In Photo Mode 4 shortcut buttons will be MENU PIXEL POWER W T Shortcut Button Mode Dial Power Button 00934C SC MS10 USA 037 9 30 05 10 55 A...

Страница 34: ...by pressing the joystick You can adjust the volume by moving the joystick up down in Video Music Voice playback modes 3 Confirm your selection by pressing the OK button ENGLISH 30 30 Menu Selection Move Upwards Move Downwards Move Left Move Right Confirm Selection While Playing Back Increase Volume Decrease Volume Move left Move right Move down Move Up Confirm selection MENU Joystick Note Use the ...

Страница 35: ...e files MP3 MP3 files MISC DPOF files are stored Do not change the file or folder name except Free You can freely change the file or folder name under the Free Video files that you have not made with this device may not play back on this device Warning Memory cards are made with precision technology It is sensitive and vulnerable to electric shock temperature and humidity be cautious with handling...

Страница 36: ...peed card Please record at lower quality message It is because the writing speed of the Memory Card is slow It is recommended to use a Memory Card of 1 25MB sec or greater data transfer rate Video file may not record playback normally when using a Memory Card bigger than 1GB Based on the device set to mono and a 64kbps transfer rate Voice recording time shown above is an estimation and is subject ...

Страница 37: ...will be stored in the built in internal memory ENGLISH 33 33 Selecting the Memory Type Getting Started Notes You may select the storage memory type in menu of Photo Video Music Voice Record System Settings mode Selected memory will be used for the storage in all modes Built in internal memory Photo video music and voice files will be stored in the built in internal memory Memory Card Photo video m...

Страница 38: ...a strong impact Do not use or store in a place that has high temperature and humidity or dusty environment Do not allow foreign substances on the Memory Card terminals Use a soft dry cloth to clean the terminals if required It is recommended to use a memory card case to avoid losing data from moving and static electricity After a period of use the memory card may get warm This is normal not a malf...

Страница 39: ...i SD Memory Card out of the slot and close the battery memory card compartment lid Notes Do not apply excessive force when you insert or eject a Memory Card Do not turn the power off while recording playing or erasing files or while formatting a Memory Card Turn the power off before you insert or eject a Memory Card to avoid losing data Do not place a Memory Card near a strong electro magnetic dev...

Страница 40: ... Setting the System 41 Setting the Auto Shut Off 41 Setting the File No Function 42 Setting the Beep Sound 43 Setting the Shutter Sound 44 Selecting Language 45 Setting the TV Standard 46 Setting the Mode Display 47 Resetting the Miniket Photo 48 Setting Memory 49 Selecting the Storage Type 49 Formatting the Memory 50 Viewing Memory Space 51 1 1 00934C SC MS10 USA 037 9 30 05 10 55 AM Page 36 ...

Страница 41: ...reen whereas moving it downwards will darken the screen Brightness range You can adjust the brightness between 0 32 steps 5 After you finish adjusting set the Mode Dial to the desired mode Notes A Brighter LCD screen setting consumes more battery power Brighten the LCD screen when the ambient lighting is too bright and the monitor is hard to see LCD Brightness does not affect the brightness of sto...

Страница 42: ...Year Month Date Hour and Minute Cursor moves to the next item Set Month and Year using the same method 5 Set all items and then press the OK button to finish Set Minute and AM PM using the same method 6 After you finish setting set the Mode Dial to the desired mode Notes You can display Date and Time on the LCD monitor by setting the Date Time option other than to Off If the Date Time display opti...

Страница 43: ... button YYYY MM DD The date is displayed in the order of Year Month Date DD MM YYYY The date is displayed in the order of Date Month Year MM DD YYYY The date is displayed in the order of Month Date Year 5 After you finish setting set the Mode Dial to the desired mode 3 4 Settings Settings Date Format Date Format YYYY MM DD DD MM YYYY MM DD YYYY Move Move Select Select Settings Date Format Move Sel...

Страница 44: ... are not displayed Date The date is displayed Time The time is displayed Date Time The date and time are displayed 4 After you finish setting set the Mode Dial to the desired mode ENGLISH 40 40 Setting the Miniket Photo Setting Date Time Setting Date Display 3 4 Settings Settings Date Time Date Time Off Date Time Date Time Move Move Select Select Settings Date Time Move Select Settings Date Time M...

Страница 45: ...ly turns off after 3 minutes 5min Automatically turns off after 5 minutes 5 After you finish setting set the Mode Dial to the desired mode Notes The Auto Shut Off will not function when you connect the AC Power Adapter to the Miniket Photo The Auto Shut Off functions when the Battery Pack is the only power source The Auto Shut Off will not function when you transfer data between the Miniket Photo ...

Страница 46: ...ber goes back to its default value 100 0001 Series Numbering is continuous between the Memory Cards so that the first file number assigned on a new Memory Card is 1 more than the last file number assigned on the previous Memory Card 5 After you finish setting set the Mode Dial to the desired mode Note When you set File No to Series each file is assigned with a different number so as to avoid dupli...

Страница 47: ...tion by moving the joystick up down and then press the OK button Off Turn the beep sound off On Turn the beep sound on 5 After you finish setting set the Mode Dial to the desired mode Notes When you set Beep Sound to Off no warning sound will be heard When the earphones or AV Audio Video cable is connected to the device the Beep Sound function will not operate Settings Beep Sound Move Select Setti...

Страница 48: ... left right œ œ 4 Select the desired option by moving the joystick up down and then press the OK button Off Turn the shutter sound off On Turn the shutter sound on 5 After you finish setting set the Mode Dial to the desired mode Settings Shutter Sound Move Select Settings Settings Off On Shutter Sound Shutter Sound Move Move Select Select 3 Settings Settings Off On Shutter Sound Shutter Sound Move...

Страница 49: ...Mode Dial to the System Settings mode 2 Press the POWER button to turn on the device The System Settings menu appears 3 Select Language by moving the joystick left right œ œ 4 Select the desired option by moving the joystick up down and then press the OK button Selectable languages are English Español Français Português Deutsch Italiano Nederlands Polski PÛÒÒÍËÈ Iran Arab Magyar ìÍ ªÌÒ Í Svenska 5...

Страница 50: ...e The System Settings menu appears 3 Select Video Out by moving the joystick left right œ œ 4 Select the desired option by moving the joystick up down and then press the OK button PAL Sets to PAL standard NTSC Sets to NTSC standard 5 After you finish set the Mode Dial to the desired mode PAL Compatible Countries Regions Australia Austria Belgium Bulgaria China CIS Czech Republic Denmark Egypt Finl...

Страница 51: ...e joystick up down and then press the OK button On Turns the Mode Display on Off Turns the Mode Display off 5 After you finish set the Mode Dial to the desired mode If it is set to On the mode screen is displayed on the LCD monitor Settings Mode Display Move Select TYPE Settings Settings Mode Display Mode Display Off On Move Move Select Select 5 Settings Mode Display Move Select Settings Mode Disp...

Страница 52: ...s Select an option by moving the joystick left right œ œ and then press the OK button Yes Starts the reset function No Cancel the reset function Warning If you reset the Miniket Photo all functions you set are initialised to the default factory settings Notes User settings and date time information are initialised when you reset After resetting the Miniket Photo set date time refer to page 38 Sett...

Страница 53: ...he internal memory Memory Card Photo video music and voice files are stored in the external mini SD memory 5 After you finish setting set the Mode Dial to the desired mode Notes Photo video music and voice files are stored in internal memory by default If you insert a Memory Card when the device is on the pop up screen will prompt you automatically to select the storage type except when in the Sys...

Страница 54: ... is pressed the message Do you want to format appears Select Yes to confirm 5 After you finish setting set the Mode Dial to the desired mode Notes There is no guarantee on the operation of a Memory Card which has not been formatted on the Miniket Photo Make sure to format any Memory Card on the Miniket Photo If there is no Memory Card inserted only the Int Memory option will be available Warning P...

Страница 55: ...e System Settings mode 2 Press the POWER button to turn on the device The System Settings menu appears 3 Select Memory Space by moving the joystick left right œ œ 4 Available free space and total memory capacity are displayed 5 After you finish set the Mode Dial to the desired mode Notes Actual storage capacity may differ from the printed memory capacity Internal and external memory spaces are dis...

Страница 56: ... Metering Method 66 Setting the ISO Speed Sensitivity 67 Setting the White Balance 68 Adjusting the Exposure Exposure Compensation 69 Setting the DIS Digital Image Stabiliser 70 Setting the Imprint Option 71 Setting the Digital Zoom 72 Setting the Multi Shot 73 Setting the Self Timer 74 Setting the Flash 75 Setting Digital Effects 77 Setting the Viewing Options 78 Using the Shortcut Buttons 78 Rot...

Страница 57: ...es If the battery is low the flash will not operate automatically In order to take pictures and save it in the external memory mini SD Memory Card insert a Memory Card and then set the storage type to Memory Card Refer to page 33 Press the MENU button in the Photo Capture mode to see the Photo Settings screen When you are finished taking pictures please turn off the device to conserve battery powe...

Страница 58: ...cal zoom preserves the image quality IN 30 2592 0 EV 0 T T 0 IN 0 30 2592 EV 0 W T W T Zoom In Zoom Out Move the W T zoom switch to W WIDE The shot subject s size is reduced and you can take a picture as if you were far away from the subject At the zoom indicator in the LCD screen the arrow moves to W The smallest rate of zoom out is the default rate original resolution of the subject Move the W T...

Страница 59: ... Each movement of the joystick goes to the previous next photo Notes If there is no file stored to view the message No stored Photo appears Moving the joystick right at the last photo will move to the first photo Moving the joystick left œ œ at the first photo will move to the last photo Moving the joystick left right œ œ button for more than 1 seconds will fast search Display time may vary depend...

Страница 60: ...red Photo appears You cannot zoom in on a TIFF image file W T W T Move the W T zoom switch to W WIDE The screen switches to multi view The photo you were viewing in the single view is selected Move the W T zoom switch to T TELE From the multi view screen it switches back to the single view screen Move the W T Zoom switch to T TELE again to enlarge the selected photo Move Move Full View Full View M...

Страница 61: ...matically 8 Select an option by moving the joystick left right œ œ and then press the OK button Yes Crops the image and saves it as a new file No Cancels cropping 9 If Yes is selected cropped image is saved and displayed on the screen Notes You cannot enlarge a cropped photo You cannot crop an image smaller than 640 x 480 pixels You cannot crop a rotated image The original photo is not overwritten...

Страница 62: ...oto capture view modes 1 Set the Mode Dial to Photo mode 2 Press the POWER button to turn on the device 3 Press the Shortcut 2 button Each press of the Shortcut 2 button cycles through the flash modes 4 An icon indicating the selected flash mode appears on the screen Note Flash modes can be set only in Manual Scene mode By default the scene mode is set to Auto IN 30 2592 1 1 EV 0 1 6 100 0001 1 1 ...

Страница 63: ...selected macro mode appears on the screen Notes Macro modes will disable flash use Macro modes can only be set in Manual Scene mode By default the scene mode is set to Auto 1 Set the Mode Dial to Photo mode 2 Press the POWER button to turn on the device 3 Press the Shortcut 4 button Each press of the Shortcut 4 button cycles through Off 2 sec 10 sec self timer modes refer to page 74 4 An icon indi...

Страница 64: ...ireworks Beach Snow 6 Press the MENU button to exit the menu An icon indicating the selected Scene mode appears on the screen If Auto is selected no icon will be displayed Notes Setting the listed functions are available only when the Manual Scene mode is selected Metering EV ISO White Balance Macro Flash and Focus While the menu screen is displayed pressing the Record Stop button will exit the me...

Страница 65: ...ve the joystick left right œ œ to select Size 5 Select an option by moving the joystick up down and then press the OK button 5M 4M 3M 2M 1M VGA 6 Press the MENU button to exit the menu An icon indicating the selected size appears on the screen Notes The photo capacity is an approximation and subject to recording conditions For e mail purposes the VGA option is appropriate When Tiff quality is sele...

Страница 66: ...ly set to 5M When Tiff quality is selected Multi Shot DIS Size Digital Zoom and Super Macro settings are not available While the menu screen is displayed pressing the Record Stop button will exit the menu ENGLISH 62 62 4 5 6 Photo Mode Setting the Capturing Options Setting the Photo File Quality 0 0 Photo Photo Photo Quality Photo Quality Tiff Super Fine Fine Normal Move Move Select Select Exit Ex...

Страница 67: ...his when you want to print Sharp As the image s edges are sharpened and emphasised some noise might occur although it is seen clearly 6 Press the MENU button to exit the menu An icon indicating the selected sharpness appears on the screen Note While the menu screen is displayed pressing the Record Stop button will exit the menu MENU 0 0 Photo Photo Sharpness Sharpness Soft Normal Sharp Move Move S...

Страница 68: ...uto While the menu screen is displayed pressing the Record Stop button will exit the menu MENU TYPE 0 0 Photo Photo Focus Focus Multi AF Center AF Spot AF Move Move Select Select Exit Exit OK Photo Focus Move Select Exit 0 0 Photo Focus Move Select Exit MENU TYPE Photo Photo Focus Focus Multi AF Center AF Spot AF Move Move Select Select Exit Exit OK 0 IN 0 30 2592 Photo Focus Move Select Exit Phot...

Страница 69: ...ene mode By default the scene mode is set to Auto While the menu screen is displayed pressing the Record Stop button will exit the menu ENGLISH 65 65 4 5 6 Photo Mode Setting the Capturing Options Setting the Macro Mode MENU 0 0 Photo Photo Macro Macro Off Macro Super Macro Move Move Select Select Exit Exit Photo Macro Move Select Exit 0 0 Photo Macro Move Select Exit MENU Photo Photo Macro Macro ...

Страница 70: ... and then press the OK button 6 Press the MENU button to exit the menu An icon indicating the selected Metering mode appears on the screen Notes Metering methods can be set only in Manual Scene mode By default the scene mode is set to Auto While the menu screen is displayed pressing the Record Stop button will exit the menu 3 IN 0 30 2592 0 Photo Metering Move Select Exit Photo Metering Move Selec...

Страница 71: ...an option by moving the joystick up down and then press the OK button 6 Press the MENU button to exit the menu An icon indicating the selected ISO Speed appears on the screen Notes The higher the ISO Speed number the higher sensitivity to light It results in brighter imaging under darker lighting High ISO Speed setting may result in picture noise ISO Speed can only be set in Manual Scene mode By d...

Страница 72: ...tton to exit the menu An icon indicating the selected white balance appears on the screen If Auto is selected no icon will be displayed Notes White Balance can be set only in Manual Scene mode By default the scene mode is set to Auto In general outdoors picture taking Auto setting will allow users to have best results As the lighting condition changes set the appropriate white balance before takin...

Страница 73: ...t an option by moving the joystick up down and then press the OK button 2 0 1 6 1 3 1 0 0 6 0 3 0 0 3 0 6 1 0 1 3 1 6 2 0 The screen brightness gets darker when the EV settings goes to a negative setting and gets brighter when it goes to a positive setting 6 Press the MENU button to exit the menu An icon indicating the selected EV mode appears on the screen Warning Do not let the CCD be exposed to...

Страница 74: ...he joystick left right œ œ to select DIS 5 Select an option by moving the joystick up down and then press the OK button Off Disables DIS function On Enables DIS function 6 Press the MENU button to exit the menu If On is selected icon appears on the screen Warning DIS has no effect on a moving subject Purposely moving the device or taking pictures in a moving vehicle will reduce the DIS s effect No...

Страница 75: ... button to turn on the device 3 Press the MENU button Menu screen appears 4 Move the joystick left right œ œ to select Imprint 5 Select an option by moving the joystick up down and then press the OK button Off Cancels imprinting Date Imprints Date only Date Time Imprints Date and Time 6 Press the MENU button to exit the menu Notes Imprinting will print the date and time information directly onto t...

Страница 76: ...le Digital zoom may produce a grainy picture 1 Set the Mode Dial to Photo mode 2 Press the POWER button to turn on the device 3 Press the MENU button Menu screen appears 4 Move the joystick left right œ œ to select Digital Zoom 5 Select an option by moving the joystick up down and then press the OK button Off Disables digital zoom Only optical zoom 3x will be supported for zooming On Enables digit...

Страница 77: ... Select an option by moving the joystick up down and then press the OK button 6 Press the MENU button to exit the menu An icon indicating the selected Multi Shot mode appears on the screen If Off is selected no icon will be displayed Notes If the Photo File Quality is set to Tiff Multi Shot is not available for setting When you set the Multi Shot enabled you cannot use the flash Restarting the dev...

Страница 78: ...n appears 4 Move the joystick left right œ œ to select Self Timer 5 Select an option by moving the joystick up down and then press the OK button 6 Press the MENU button to exit the menu Notes You can set this option using the shortcut button directly It is recommended to use a tripod for best results on Self Timer pictures Restarting the device will cancel the Self Timer setting While the menu scr...

Страница 79: ... appears on the screen If Off is selected no icon will be displayed Notes You can set this option using the short cut button directly Flash mode can only be set in Manual Scene mode By default the scene mode is set to Auto Refer to page 60 for further details It is recommended to use a tripod for best results when recording with Slow Sync flash mode While the menu screen is displayed pressing the ...

Страница 80: ...t use of flash consumes more battery power You cannot use flash with Multi Shot Effective flash range distance is less than 2 m 7 ft O O O O O O X O X X O X X X O O X O X X O X O X X O X X X X O X X X X O X X X X O X X O X O X X X X O O X X X O X X X X Scene Modes Supported Flash Modes According to the Scene Modes 00934C SC MS10 USA 089 9 30 05 10 57 AM Page 76 ...

Страница 81: ...Mode Dial to Photo mode 2 Press the POWER button to turn on the device 3 Press the MENU button Menu screen appears 4 Move the joystick left right œ œ to select Digital Effect 5 Select an option by moving the joystick up down and then press the OK button 6 Press the MENU button to exit the menu An icon indicating the selected Digital Effect appears on the screen If Off is selected no icon will be d...

Страница 82: ... 2 Press the POWER button to turn on the device 3 Press the Shortcut 1 button Each press of the Shortcut 1 button will toggle between Capture View mode 4 Moves to the Photo View mode 1 Set the Mode Dial to Photo mode 2 Press the POWER button to turn on the device 3 Press the Shortcut 2 button 4 The slideshow begins Refer to page 87 for further details on slideshow 5 Press the OK button to stop the...

Страница 83: ...Unlocked 4 The selected file is protected from erasure icon indicating the selected file is protected appears on the screen 1 Set the Mode Dial to Photo mode 2 Press the POWER button to turn on the device 3 Press the Shortcut 4 button 4 Select an option by moving the joystick up down and then press the OK button icon indicating the selected file is protected appears on the screen Yes Deletes the s...

Страница 84: ...elect Selected photo files will be protected All All photo files will be protected Cancel Cancels protection 6 If Select was selected select photo files to protect by moving the joystick left right up down œ œ and press the OK button 7 Press the Shortcut 3 button again The message Protect appears 8 Select Yes to protect the selected photo Select No to cancel protection The icon appears on the sele...

Страница 85: ...cel Cancels deletion 6 If Select was selected select photo files to delete by moving the joystick left right up down œ œ and press the OK button icon appears on the selected files 7 Press the Shortcut 4 button again The message Delete appears 8 Select Yes to delete selected files Select No to cancel deletion Refer to page 85 for further details Deleting Photo files in Multi View 5 Move Full View M...

Страница 86: ...ips the image up and down Rotates 180 8 Press the MENU button to exit the menu Notes Rotated images having a portrait ratio will have black margins on both the left right corners of the LCD when it is displayed Rotating will not affect the image quality or resolution A cropped and newly saved image cannot be rotated A rotated image cannot be cropped TIFF images cannot be rotated Rotated images may...

Страница 87: ...ick up down and then press the OK button 4M 3M 2M 1M VGA You can only resize a saved photo to be smaller than the original 8 Press the MENU button to exit the menu Notes Only JPEG images can be resized TIFF images and video files cannot be resized Resized photos are saved separately The original photo will not be deleted Rotated photos cannot be resized If there is not enough space to save the res...

Страница 88: ...screen appears Select photo files to protect by moving the joystick left right up down œ œ and press the OK button An icon indicating selected file is to be protected appears 8 Press the Shortcut 3 button The message Protect appears Select Yes or No by moving the joystick left right œ and then press the OK button to confirm 9 Press the MENU button to exit the menu Notes You can easily access this ...

Страница 89: ...ars Select photo files to delete by moving the joystick left right up down œ œ and press the OK button An icon indicating the selected file to be deleted appears 8 Press the Shortcut 4 button The message Delete appears Select Yes or No by moving the joystick left right œ and then press the OK button to confirm 9 Press the MENU button to exit the menu Notes You can easily access this function by us...

Страница 90: ...to files will be copied If All is selected the message Copy All appears Select Yes or No by moving the joystick left right œ and then press the OK button to confirm 7 If Select is selected Multi view screen appears Select photo files to copy by moving the joystick left right up down œ œ and press the OK button An icon indicating the selected file to be copied appears 8 Press the Shortcut 4 button ...

Страница 91: ...epeat option by moving the joystick up down and then press the OK button On Sets to repeat the slideshow Off Sets not to repeat the slideshow 10 Select Start by moving the joystick up down and then press the OK button Slideshow starts To stop the slideshow press the OK button Notes You can easily access this function by using the shortcut button refer to page 78 The interval between photos may var...

Страница 92: ...m 7 If Select is selected Multi view screen appears Select the photo files to delete by moving the joystick left right up down œ œ and press the OK button 8 Set the number of prints by using the Shortcut 3 and Shortcut 4 buttons and then press the Shortcut 2 button The Shortcut 3 button will increase the number of prints while the Shortcut 4 will decrease it 9 The message DPOF appears Select Yes o...

Страница 93: ...nce 95 Setting the Program AE 96 Setting the Macro Mode 97 Setting the Movie File Size 98 Setting the Movie File Quality 99 Setting the Self Timer 100 Setting the Wind Cut 101 Setting the Digital Effects 102 Setting the Viewing Options 103 Using the Shortcut Buttons 103 Protecting Movie Files 107 Deleting Movie Files 108 Copying Movie Files 109 Setting the Slideshow 110 ENGLISH 00934C SC MS10 USA ...

Страница 94: ...support users with a faster search 00 00 16 Elapsed Recording Time REM 4 Min Remaining Recording Time Notes When you are finished taking pictures please turn off the device to conserve battery power You can adjust the brightness of the LCD monitor to have a clearer view refer to page 37 The brightness of the LCD monitor will not affect the brightness of the recordings Reading the Counter 3 4 5 Rec...

Страница 95: ...OFF OFF 640 REM IN SF SF AE AUTO STBY STBY 4 Min 4 Min OFF SF T STBY 4 Min OFF SF STBY 4 Min A OFF OFF 640 REM IN SF SF AE AUTO T STBY STBY 4 Min 4 Min W T W T Zoom In Zoom Out Move the W T zoom switch to W WIDE The shot subject s size is reduced and you can take a picture as if you were far away from the subject At the zoom indicator in the LCD screen the arrow moves to W The smallest rate of zoo...

Страница 96: ...en the earphones or AV Audio Video cable is connected to the device the built in speaker will automatically turn off You can also play the video file on a TV screen by connecting the CAM to a TV Refer to page XX A video CODEC is required to play the video files recorded on the CAM on a computer Install the software provided in the bundled CD to have the CODEC automatically installed on your system...

Страница 97: ...ress the POWER button to turn on the device 3 Press the Shortcut 2 button Each press of the Shortcut 2 button cycles through Program AE modes 4 An icon indicating the selected Program AE mode appears on the screen refer to page 96 IN 00 00 16 100 0001 100 0001 1 1 OFF SF STBY 4 Min A OFF OFF 640 REM IN SF SF AE AUTO STBY STBY 4 Min 4 Min SF STBY 4 Min OFF SF STBY 4 Min A OFF OFF 640 REM IN SF SF S...

Страница 98: ...ie mode 2 Press the POWER button to turn on the device 3 Press the Shortcut 4 button Each press of the Shortcut 2 button cycles through the Digital Effects 4 An icon indicating the selected Digital Effect appears on the screen refer to page 102 S N BW BW S N N BW S S N BW S N BW A OFF SF STBY 4 Min OFF OFF 640 REM IN SF SF AE AUTO STBY STBY 4 Min 4 Min A OFF OFF 640 REM IN SF SF AE AUTO STBY STBY ...

Страница 99: ...F SF STBY 4 Min Movie Movie White Balance White Balance Auto Daylight Cloudy FluorescentH Move Move Select Select Exit Exit OK Movie White Balance Move Select Exit OFF SF STBY 4 Min OFF SF STBY 4 Min Movie White Balance Move Select Exit MENU AE Movie Movie White Balance White Balance Auto Daylight Cloudy FluorescentH Move Move Select Select Exit Exit OK OFF SF STBY 4 Min OFF SF STBY 4 Min Movie Wh...

Страница 100: ...h as on a beach or in the snow 6 Press the MENU button to exit the menu An icon indicating the selected Program AE mode appears on the screen If Auto is selected no icon will be displayed Notes You can easily access this function by using the shortcut button refer to page 93 You cannot set Macro when you are using Program AE mode other than Auto While the menu screen is displayed pressing the Reco...

Страница 101: ...the subject It is recommended to use a tripod to avoid unstable picture taking and have best results Macro setting is available only when you set Program AE to Auto While the menu screen is displayed pressing the Record Stop button will exit the menu MENU OFF SF STBY 4 Min OFF SF STBY 4 Min Movie Movie OK Macro Macro Off Macro Super Macro Move Move Select Select Exit Exit Movie Macro Move Select E...

Страница 102: ...rter maximum recording time While the menu screen is displayed pressing the Record Stop button will exit the menu A OFF OFF 640 REM IN SF SF AE AUTO STBY STBY 4 Min 4 Min OFF SF STBY 4 Min Movie Movie Size Move Select Exit Movie Movie Size Move Select Exit MENU TYPE AE 320 OFF SF STBY 4 Min OFF SF STBY 4 Min Movie Movie Movie Size Movie Size OK Move Move Select Select Exit Exit Movie Movie Size Mo...

Страница 103: ...it the menu MENU TYPE SF SF N N F F OFF SF STBY 4 Min OFF STBY 4 Min Movie Movie OK Movie Quality Movie Quality Super Fine Fine Normal N F Movie Movie Quality SF Move Move Select Select Exit Exit Move Select Exit F SF N F OFF SF STBY 4 Min OFF STBY 4 Min Movie Movie Quality MENU TYPE N N F F Movie Movie OK Movie Quality Movie Quality Super Fine Fine Normal SF SF Move Select Exit Move Move Select S...

Страница 104: ...tton will exit the menu MENU TYPE AE OFF SF STBY 4 Min OFF SF STBY 4 Min Movie Movie Self Timer Self Timer Off 2 sec 10 sec OK Move Move Select Select Exit Exit Movie Self Timer Move Select Exit OFF SF STBY 4 Min OFF SF STBY 4 Min Movie Self Timer Move Select Exit MENU TYPE AE Movie Movie Self Timer Self Timer Off 2 sec 10 sec OK Move Move Select Select Exit Exit OFF SF STBY 4 Min A OFF OFF 640 RE...

Страница 105: ...enu screen is displayed pressing the Record Stop button will exit the menu MENU TYPE AE OFF SF STBY 29 Min OFF SF 5 STBY 29 Min Movie Movie OK Wind Cut Wind Cut Off On Move Move Select Select Exit Exit Movie Wind Cut Move Select Exit OFF SF 5 STBY 29 Min OFF SF 5 STBY 29 Min Movie Wind Cut Move Select Exit MENU TYPE AE Movie Movie OK Wind Cut Wind Cut Off On Move Move Select Select Exit Exit OFF S...

Страница 106: ... AUTO 5 12 00PM 01 01 2005 STBY STBY 29 Min 29 Min SF 5 STBY 29 Min Movie Digital Effect Move Select Exit S N BW Movie Digital Effect Move Select Exit S MENU S S N N BW BW OFF SF 5 STBY 29 Min SF 5 STBY 29 Min Movie Movie OK Digital Effect Digital Effect Off Sepia Nega BLK WHT Move Move Select Select Exit Exit S N BW Movie Digital Effect Move Select Exit S S N BW OFF SF 5 STBY 29 Min SF 5 STBY 29 ...

Страница 107: ...Movie mode 2 Press the POWER button to turn on the device 3 Press the Shortcut 2 button 4 The slideshow begins To pause the slideshow press the OK button Refer to page 110 for further details on slideshow IN 00 01 36 100 0001 100 0001 1 6 OFF SF 5 STBY 29 Min IN 00 01 36 100 0001 100 0001 100 0001 00 1 6 Slide 00 01 36 00 01 36 100 0001 IN 100 0001 100 0001 00 00 00 1 6 Slide Slide 3 00 01 36 100 ...

Страница 108: ... for further details 1 Set the Mode Dial to Movie mode 2 Press the POWER button to turn on the device 3 Press the Shortcut 4 button 4 Select an option by moving the joystick left right œ œ button and then press the OK button Delete Deletes the selected movie file Refer to page 108 for further details Cancel Cancels the deletion 00 01 36 100 0001 1 6 IN 00 01 36 100 0001 100 0001 1 6 IN 00 01 36 10...

Страница 109: ...own œ œ and press the OK button icon appears on the selected files 7 Press the Shortcut 3 button again The message Protect appears 8 Select Yes to protect selected files Select No to cancel protection If Yes was selected icon appears on the protected files Notes When you attempt to delete a protected file you will hear a warning beep When you set the Beep Sound to Off there will be no beep sound b...

Страница 110: ...ss the OK button icon appears on the selected files 7 Press the Shortcut 4 button again The message Delete appears 8 Select Yes to delete selected files Select No to cancel deletion Refer to page 108 for further details Notes When you attempt to delete a protected file you will hear a warning beep When you set the Beep Sound to Off there will be no beep sound but the message Protect appears on the...

Страница 111: ...ted file to be protected appears 8 Press the Shortcut 3 button The message Protect appears Select Yes or No by moving the joystick left right œ œ and then press the OK button to confirm 9 Press the MENU button to exit the menu Notes You can easily access this function by using the shortcut button refer to page 104 When you attempt to delete a protected file you will hear a warning beep When you se...

Страница 112: ...con indicating the selected file to be deleted appears 8 Press the Shortcut 4 button The message Delete appears Select Yes or No by moving the joystick left right œ œ and then press the OK button to confirm 9 Press the MENU button to exit the menu Notes You can easily access this function by using the shortcut button refer to page 104 When you attempt to delete a protected file you will hear a war...

Страница 113: ... left right œ œ and then press the OK button to confirm 7 If Select is selected Multi view screen appears Select files to copy by moving the joystick left right up down œ œ and press the OK button An icon indicating selected file is to be copied appears 8 Press the Shortcut 4 button The message Copy appears Select Yes or No by moving the joystick left right œ œ and then press the OK button to conf...

Страница 114: ...sily access this function by using the shortcut button refer to page 103 The interval between files may vary depending on the size of the movie Slideshow starts from the current movie selected While the menu screen is displayed pressing the Record Stop button will exit the menu 00 01 36 100 0001 00 00 00 Movie Slide On Move Select Exit Movie Slide Slide On Move Select Exit MENU TYPE Movie Movie Sl...

Страница 115: ...c Files from a PC 112 Playing Music Files 113 Setting the Music Play Options 114 Using the Shortcut Buttons 114 Setting the Repeated Play 116 Setting the Equaliser 117 Deleting Music Files 118 Protecting Music Files 119 00934C SC MS10 USA 111 9 30 05 10 59 AM Page 111 ...

Страница 116: ...l find MP3 folder 6 Copy your music files and paste it into the folder MUSIC1 MUSIC2 MUSIC3 or MUSIC4 Be sure to copy your MP3 files into the existing folders under MP3 Warning IYou cannot create a new folder on your Miniket Photo set If you create a new folder on your memory card with a PC it will not play back music files stored on it Notes The music played back will begin with the first music f...

Страница 117: ...own Volume indicator appears and disappears after few seconds 1 6 1 6 00 00 03 00 00 50 03 00 00 50 03 00 01 01 Search Play Search Search Stop Stop OK KHz Volume Volume Volume Notes If a broken file name is displayed try renaming it When the earphones or AV Audio Video cable is connected to the device the built in speaker will turn off automatically A file which does not comply with the MP3 standa...

Страница 118: ...n to turn on the device 3 Press the Shortcut 2 button Each press of the Shortcut 2 button cycles through repeat modes 4 An icon indicating the selected repeat mode appears on the screen Refer to page 116 1 6 1 6 00 00 03 00 00 00 03 00 01 OK Search Search Play Play Move Select KHz Volume Volume 1 6 1 6 00 00 03 00 01 OK Search Play Move Move Select Select Volume 1 6 00 00 03 00 00 00 03 00 01 OK S...

Страница 119: ...les through Equaliser modes 4 An icon indicating the selected Equaliser appears on the screen Refer to page 117 1 6 00 00 03 00 00 00 03 00 1 6 00 00 03 00 01 01 OK Search Search Play Play Search Play KHz Volume Volume Volume 1 6 00 00 03 00 00 00 03 00 01 OK Search Search Play Play 1 6 00 00 03 00 01 Search Play Music Equalizer Move Select Exit Music Equalizer Move Select Exit Jazz 44 1KHz Volume...

Страница 120: ...his function by using the shortcut button refer to page 114 When the earphones or AV Audio Video cable is connected to the device the Beep Sound will not operate TYPE MENU 1 6 00 00 03 00 01 Search Play 1 6 00 00 03 00 01 Search Play Music Music Repeat Repeat Off One Group All Move Move Select Select Exit Exit OK Music Repeat Move Select Exit Volume Volume 1 6 00 00 03 00 01 Search Play 1 6 00 00 ...

Страница 121: ...00 01 Search Play Music Music Equalizer Equalizer Normal Pop Jazz Classic OK Move Move Select Select Exit Exit Music Equalizer Move Select Exit Jazz Volume Volume 1 6 00 00 03 00 01 Search Play 1 6 00 00 03 00 01 Search Play Music Equalizer Move Select Exit TYPE MENU Music Music Equalizer Equalizer Normal Pop Jazz Classic OK Move Move Select Select Exit Exit Jazz Volume Volume 1 6 00 00 03 00 01 S...

Страница 122: ...con appears on the selected files 7 Press the Shortcut 4 button The message Delete appears 8 Select Yes to delete selected files Select No to cancel deletion Press the MENU button to exit the menu Note After deleting a file the last file of the current folder is selected Music Mode Setting the Music Play Options 3 5 6 7 1 6 1 6 00 00 03 00 00 00 03 00 01 KHz Search Search Play Play OK Music Move S...

Страница 123: ...elect an option by moving the joystick up down and then press the OK button Select The Playlist appears and you can select files to protect All All files will be protected If All is selected the message Protect All appears Select Yes or No by moving the joystick left right œ and then press the OK button to confirm 6 If Select was selected select files to protect by moving the joystick left right u...

Страница 124: ...les 121 Playing Voice Files 122 Playing Voice Files 122 Setting the Voice Play Options 123 Using the Shortcut Buttons 123 Setting the Repeated Play 125 Deleting Voice Files 126 Protecting Voice Files 127 Copying Voice Files 128 00934C SC MS10 USA 120 9 30 05 10 59 AM Page 120 ...

Страница 125: ...ed in the list automatically During voice recording the menu is not accessed During voice recording the Mode Dial operates normally SWAV0001 WAV 00 00 00 16 22 48 SWAV0001 WAV 00 00 00 16 22 58 SWAV0001 WAV SWAV0001 WAV 8KHz Mono 64Kbps 00 00 10 16 22 48 00 00 10 16 22 48 SWAV0001 WAV SWAV0002 WAV 8KHz Mono 64Kbps 00 00 00 16 22 48 00 00 00 16 22 48 SWAV0001 WAV 00 00 00 16 22 58 SWAV0001 WAV 00 0...

Страница 126: ...V SWAV0001 WAV 00 00 00 00 00 10 OFF OFF SWAV0001 WAV SWAV0002 WAV Mono 64Kbps 00 00 00 00 00 20 00 00 00 00 00 20 OFF OFF 1 6 2 6 2 6 2 6 OK Search Play Search Search Play Play Search Stop Search Stop 8KHz Volume Volume Volume Volume Volume OFF OFF SWAV0001 WAV SWAV0002 WAV Mono 64Kbps 00 00 16 0000 20 00 00 16 00 00 20 00 00 16 0000 20 SWAV0001 WAV SWAV0001 WAV 00 00 00 00 00 10 OFF OFF SWAV0001...

Страница 127: ...0 00 10 00 00 00 00 00 10 OFF OFF SWAV0001 WAV 00 00 00 16 22 48 1 6 OK Search Search Play Play Volume Volume Shortcut buttons are provided to allow users easy access to frequently used functions Toggling Voice Record Play Mode 1 Set the Mode Dial to Voice mode 2 Press the POWER button to turn on the device 3 Press the Shortcut 1 button to switch to Voice play mode 4 Press the Shortcut 1 button It...

Страница 128: ...selected files Select Cancel to cancel deletion Refer to page 126 for further details SWAV0001 WAV SWAV0001 WAV 8KHz Mono 64Kbps 00 00 00 00 00 10 00 00 00 00 00 10 OFF OFF 1 6 OK Search Search Play Play SWAV0001 WAV 00 00 00 00 00 10 OFF 1 6 Search Play Volume Volume Volume SWAV0001 WAV 00 00 00 00 00 10 OFF 1 6 Search Play SWAV0001 W V0001 WAV SWAV0001 WAV 8KHz Mono 64Kbps 00 00 00 00 00 10 00 0...

Страница 129: ...nes or AV Audio Video cable is connected to the device the Beep Sound function will not operate TYPE MENU SWAV0001 WAV 00 00 00 00 00 10 OFF 1 6 Search Play SWAV0001 WAV 00 00 00 00 00 10 1 6 Search Play Voice Voice Repeat Repeat Off One All Shuffle Move Move Select Select Exit Exit OK Voice Repeat Move Select Exit Vol Vol SWAV0001 WAV 00 00 00 00 00 10 OFF 1 6 Search Play SWAV0001 WAV 00 00 00 00...

Страница 130: ...el deletion Press the MENU button to exit the menu Notes You can easily access this function by using the shortcut button refer to page 124 After deleting a file the last file of the current folder is selected TYPE MENU SWAV0002 WAV SWAV0003 WAV SWAV0004 WAV SWAV0005 WAV SWAV0001 WAV 00 00 00 00 00 10 OFF 1 6 Search Play Voice Voice Delete Delete Select All OK Move Move Select Select Exit Exit Sel...

Страница 131: ...e Protect appears 9 Select Yes to protect selected files Select No to cancel protection Press the MENU button to exit the menu Note icon appears on the selected files TYPE SWAV0002 WAV SWAV0003 WAV SWAV0004 WAV SWAV0005 WAV SWAV0001 WAV 00 00 00 00 00 10 OFF MENU 1 6 OK Search Play Voice Voice Protect Protect Select All Move Move Select Select Exit Exit Select Exit Move Select Volume MENU SWAV0002...

Страница 132: ...ving the joystick left right up down œ œ and press the OK button An icon indicating selected file is to be copied appears 8 Press the Shortcut 4 button The message Copy appears Select Yes or No by moving the joystick left right œ and then press the OK button to confirm 9 Press the MENU button to exit the menu Notes It copies from the currently used memory to another If the internal memory was used...

Страница 133: ...necting to a PC Using USB Cable 133 Using the PC Camera Function 134 Using as a Mass Storage Device 135 Connecting to a TV Monitor 136 Connecting to a VCR 137 Printing Photos 138 Printing with PictBridge 138 Printing with DPOF 139 Cleaning and Maintenance 140 After Using the Device 140 Cleaning the Body 141 Regarding the Battery 142 Using Abroad 143 Miscellaneous Information 5 5 00934C SC MS10 USA...

Страница 134: ...ed to a PC or using USB hubs may cause communication installation errors with the Miniket Photo Disconnecting the USB cable during the data transfer will stop the communication and may damage data stored in the memory Pentium III 800MHz Windows 98SE ME 256MB 1 2 GB or above 1024 x 768 dots 24bit color USB 1 1 CPU OS Memory Free space on the hard disk Display Resolution USB Pentium IV 2GHz Windows ...

Страница 135: ...een If it does not click Start on the left bottom of the desktop and select Run When the Run dialog window appears type in D autorun exe into the text box and then press ENTER where your CD ROM drive is set to D 1 Click DV Driver on the Setup screen Driver software required are installed automatically USB removable storage device driver Windows 98SE only USB PC CAMERA driver USB streaming driver U...

Страница 136: ...c and even 360 degree virtual reality VR scenes Application Installation Video Studio in the second CD provided 1 Insert the CD Setup screen displays automatically Follow the instruction to start installation It is a video editing tool that allows users to edit movie files Notes For photo editing use Photo Express For video editing use the Video Studio from the second CD provided It is required to...

Страница 137: ...he Stop button 2 When the message saying that it is safe to remove the hardware appears unplug the cable from the PC Warning When data communication is disrupted due to static electricity magnetic field or other reason restart the program or try to disconnect connect the communication cable again Notes Multiple USB devices connected to a PC or using USB hubs may cause communication installation er...

Страница 138: ...ws Messenger and enjoy the video utilisation Various applications take advantage of the PC camera function Refer to respective product documentation for further details 5 When finished disconnect the cable Notes You must install the DV Driver refer to page 131 It is recommended to use an AC Power Adapter during data transfer to avoid unintended power outages Microsoft Windows ME or later operating...

Страница 139: ...disconnect the cable Warning You cannot create a new folder on your Miniket Photo set If you create a new folder on your memory card using a PC it will not play back music files stored on it Notes You cannot create a new folder on your Miniket Photo set Multiple USB devices connected to a PC or using USB hubs may cause communication installation errors with the Miniket Photo If the PC does not rec...

Страница 140: ... Record mode is displayed on the TV screen 4 Set the Mode Dial to Movie mode 5 Press the Shortcut 1 button to switch to Movie view mode Select a movie file to play 6 Move the joystick left right œ œ to select a movie and then press the OK button It begins playback To pause playback press the OK button To stop playback hold down the OK button for more than 3 seconds Notes You can play back photo fi...

Страница 141: ...annel where you connected the VCR Source may be represented as Line In Input AV etc depending on the manufacturer Movie Record mode is displayed on the TV screen 5 Set the Mode Dial to Movie mode 6 Press the Shortcut 1 button to switch to Movie view mode Select a movie file to play 7 Move the joystick left right œ œ to select a movie and then press the OK button It begins playback To pause playbac...

Страница 142: ...ease the number of copies while the Shortcut 4 button will decrease the number of copies Range of possibilities 1 99 Pressing the Shortcut 3 button on 99 will set to 1 Pressing the Shortcut 4 button on 1 will set to 99 6 Press the Shortcut 1 button to begin printing Warning This function works only with printers that support PictBridge Notes Number of copies and imprint options can be set in the m...

Страница 143: ...ers Printing DPOF files in the Memory Card 1 Set the PDOF information for the photo you want to print Refer to page 88 2 Insert a memory card into the DPOF supporting printer 3 Follow the steps of the printer to print out photos Notes For further details about printing photos refer to the printer s user s manual Printing may not be performed depending on types of printers In this case download JPE...

Страница 144: ... use Battery consumption may vary depending on the condition of use Recording with many starts and stops frequent zooming and recording in low temperatures will shorten actual recording times Dispose of used battery packs promptly Do not dispose of Battery Packs by burning them The battery pack will become warm during charging and use This is not a malfunction The battery pack has a limited servic...

Страница 145: ...lean the surface To clean the lens use an optional air blower to blow out dirt and other small objects Do not wipe the lens with a cloth or your fingers If necessary use lens cleaning paper Do not use thinner alcohol or benzene for cleaning Otherwise the finish may be damaged Cleaning should be done only after the battery pack has been removed and other power sources have been disconnected Note If...

Страница 146: ...ery pack to water The battery pack is not water resistant Keep the battery out of reach of children If it is swallowed seek medical assistance immediately Wipe the battery with a clean dry cloth to ensure proper contact Do not pick up the battery using metal tools as this may cause a short circuit Do not short the battery or dispose of the battery in fire Do not disassemble the battery The battery...

Страница 147: ... cassette recorder VCR the television set or the VCR must comply with the TV standard and have the appropriate Audio Video ports Otherwise you may need to use a separate Video Format Transcoder NTSC PAL format Converter You can set the TV standard of the Miniket Photo for its video output TV Standards PAL Compatible Countries Regions Australia Austria Belgium Bulgaria China CIS Czech Republic Denm...

Страница 148: ...y card or replace with a formatted one Check the memory space or format of the memory card Delete the damaged corrupted file To delete a protected file unlock the protection prior to deletion Informs that Action Display No Power is supplied Date Time is wrong Focus does not adjust automatically The Memory Card will not load properly Color balance of the picture is not natural Digital zoom does not...

Страница 149: ...ack Data file does not comply with the supported file format Required driver application software are not properly installed Data file does not comply with a supported file format Cable connection was done improperly The Source of the TV is set improperly Mode is set to Recording mode TV set may not support on creen text display depending on manufacturer Adjust the LCD brightness page 37 Low tempe...

Страница 150: ...Center Spot Self Timer Off 2 sec 10 sec Multi Shot Off Normal AEB Digital Effect Off Sepia Nega BLK WHT 1 Memory Memory Type Int Memory Memory Card File No Reset Series 3 Date Time Date Time Set Date Format YYYY MM DD DD MM YYYY MM DD YYYY Date Time Off Date Time Date Time Auto Shut off Reset Off 3 Min 5 Min Start Mode Display Off On Format Int Memory Memory Card Memory Space 000MB 000MB 4 System ...

Страница 151: ...e Select All White Balance Auto Daylight Cloudy FluorescentH FluorescentL Tungsten 2 Play 1 Record Delete Select All Protect Select All Copy to Select All Slide Start Repeat Movie Size 640x480 320x240 Macro Off Macro Super Macro Movie Quality Super Fine Fine Normal Self Timer Off 2 sec 10 sec Wind Cut Off On Memory Type Int Memory Memory Card Memory Type Int Memory Memory Card Memory Type Int Memo...

Страница 152: ...file record play 8KHz Sampling 16bit Mono Internal flash memory mini SD Memory Card 2 5 Trans reflective 150K pixels X YY inch CCD XX pixels X3 Optical X5 Digital f 6 3 18 9mm F3 5 W 4 3 T Auto mode Scene Mode Multi Center Spot 2 0 V 0 3EV Step Auto 100 200 400 Auto Daylight Cloudy Fluorescent H Fluorescent L Tungsten Custom 2 seconds 10 seconds 3 continuous pictures AEB Automatic Exposure Bracket...

Страница 153: ... 2 0 High Speed Proprietary 3 pins connector ø3 5 Stereo Video 1 0Vp_p 75Ω Audio 7 5dBm 47KΩ 0 C 32 F 40 104 F 10 80 3 7V Li Ion Battery Pack 4 8V AC Power Adapter 90mm x 55 mm x 18 5 mm 140g Including Battery Pack Omni directional Stereo condenser microphone AC 100 240V 50 60 Hz DC 4 8V 1 0 A 0 C 32 F 40 104 F 10 80 70 mm x 30 mm x 42 mm 83g The product design and specifications are subject to ch...

Страница 154: ...ate Time Set 38 40 DIS 70 Digital Zoom 72 Digital Effect 77 DPOF 88 139 DV Media Pro 1 0 131 132 E Earphones 13 EV 69 F File No 42 Focus 64 Format 50 H Hand Strap 13 I ISO 67 Internal Memory 33 J Joystick 14 30 L Language 45 Lithium Ion Battery Pack 13 M Memory Card 34 Metering 66 Macro 59 65 Mode Dial 27 00934C SC MS10 USA 152 9 30 05 11 00 AM Page 150 ...

Страница 155: ... 119 Play 92 112 Q Quality 62 R Reset 48 S Shutter Sound 44 Sepia 77 Self Timer 74 Slideshow 87 Shortcut Button 29 T Troubleshooting 144 145 U USB mode 133 V Voice Recording 121 W Wind Cut 101 Z Zooming In and Out 54 91 00934C SC MS10 USA 152 9 30 05 11 00 AM Page 151 ...

Страница 156: ...nted to the authorized service center EXCLUSIONS WHAT IS NOT COVERED This warranty does not cover damage due to accident fire flood and or other acts of God misuse incorrect line voltage improper installation improper or unauthorized repairs commercial use or damage that occurs in shipping Exterior and interior finish lamps and glass are not covered under this warranty Customer adjustments which a...

Страница 157: ... IS MANUFACTURED BY Samsung Electronics Internet Home Page www samsung com Samsung Electronics America Inc 105 Challenger Road Ridgefield Park NJ 07660 0511 Tel 1 800 SAMSUNG 7267864 00934C SC MS10 USA 007 9 30 05 10 54 AM Page B ...

Отзывы: