background image

Sirius 830 Installation Manual

www.s-a-m.com

Workbench

Issue 2 Rev 2

Page 65

© 2016 SAM

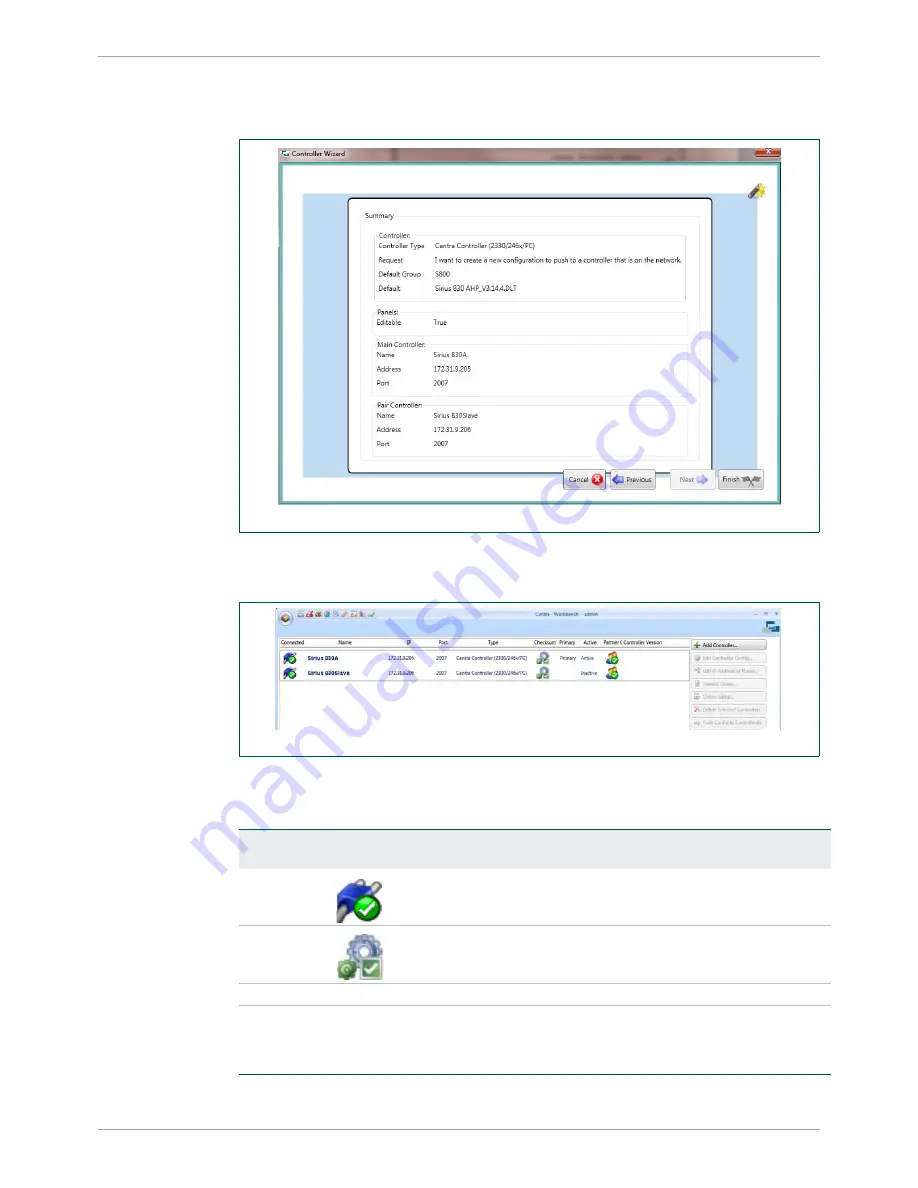
13. A summary screen is displayed (Fig 45.). If any of the parameters on this screen are 

incorrect, click the 

Previous

 button to return to the screen that requires amendment. 

edit the details, and continue through the Controller Wizard as before.

14. Confirm all of the configuration details are correct and click on the 

Finish

 button.

15. The controllers are added to the Workbench Configuration screen.

Fig 46. shows an example screen for both controllers and Table 11. describes the status of 
the controllers in the example. For full details of the status displays see the Workbench User 
manual. 

Fig 45. Controller Wizard Summary Screen

Fig 46. Controllers Added to Controller Configuration Screen

Column

Example

Status

Description

Connected

Both controllers are present and connected correctly

Checksum 

Configuration Match, both databases are identical.

Primary Primary

The controller named Sirius830A is the primary (main) controller.

Active 

Active

Inactive

The controller named Sirius830A is 

Active

 (controlling the router).

The controller named Sirius 830 Slave is 

Inactive

 ready to take over 

from the active controller in the event of a problem. 

Table 11.

Controller Status Example

Содержание Sirius 830

Страница 1: ...www s a m com Installation Quick Start Manual Sirius 830 Router A 288 x 288 non expandable 3G Compliant router with up to 140 multiviewer outputs in a 15U chassis...

Страница 2: ...Sirius 830 Installation Manual www s a m com Issue 2 Rev 2 Page 2 2016 SAM...

Страница 3: ...15 3 2 3 Power Supply Shelf 15 3 3 Ventilation 16 3 4 Electrical Requirements 17 3 4 1 Important Protective Earth Information 17 3 4 2 Cable Management 17 3 4 3 Mains Power Cables 17 3 4 4 DC Power Ca...

Страница 4: ...10 3 Signal Status 48 10 3 1 Video Signal Catsii Colors 48 10 3 2 MADI Audio Catsii Colors 49 10 4 External Control Input and Output Port Mapping 49 10 5 Default Serial Port Configuration 50 10 6 Exte...

Страница 5: ...forms and matters of copyrightable material and information now allowed by statutory or judicial law or hereinafter granted including without limitation material generated from the software programs...

Страница 6: ...Sirius 830 Installation Manual www s a m com About this Manual Issue 2 Rev 2 Page 6 2016 SAM...

Страница 7: ...ice Personal auszuf hren Um das Risiko eines lektroschocks zu reduzieren f hren Sie ausschlie lich die im Benutzerhandbuch eschriebenen Anweisungen aus es sei denn Sie haben die entsprechende Qualifik...

Страница 8: ...nde driftinstruktionerna om du ej r beh rig verl t all service till kvalificerad personal F r att reducera risken f r elektrisk st t uts tt inte apparaten f r regn eller fukt Se alltid till att appara...

Страница 9: ...the unit should be close to the unit and easily accessible 2 3 Lithium Batteries The Sirius 830 door PC and router control module s each contain a Lithium battery This symbol refers the user to impor...

Страница 10: ...sure that a fiber is connected to the board s fiber outputs before power is applied If a fiber cable e g patchcord is already connected to an output make sure that the cable s other end is connected...

Страница 11: ...wer supply shelf by this symbol located on the right side of the power supply shelf see Fig 1 Protective Earthing is a conductor in the building installation wiring or in the power supply cord connect...

Страница 12: ...sional use Part 2 Immunity Federal Communications Commission Rules 47 CFR 2009 Part 15 Subpart B Class A EMC Performance of Cables and Connectors SAM products are designed to meet or exceed the requir...

Страница 13: ...es there must be an additional 50 mm 2 inch gap on the left and right sides The full height of the Sirius 830 is 668 mm 26 3 inches Allow an additional 200 mm 8 inches behind the unit for power contro...

Страница 14: ...shelf is a separate 2U assembly Power Supply Shelves are rack mountable and can be placed above below or remote from the Sirius Frame You must allow at least 250 mm 10 Inches at the rear of the shelf...

Страница 15: ...ply Shelf 24 kg 53 lbs typical without packaging The crate containing the Sirius 830 is extremely heavy A fully populated 15RU size system with two power supply shelves and cabling weighs between 153...

Страница 16: ...r own integral cooling system Ensure the flow of air is not restricted through the vents and fan exhausts Do not obstruct the air vents situated on both sides of the frame and allow a minimum of 50 mm...

Страница 17: ...4 4 DC Power Cables The 48 V DC cables are supplied by SAM and can be ordered as either 2 5 metre cables or 8 metre cables PROTECTIVE EARTH 1 The building installation must provide a means for connect...

Страница 18: ...rate branch circuits employing separate service grounds Router Configuration Mains Supply V AC Number of Power Supply Shelves and Units Required for Redundancy All router configurations 220 240 V AC N...

Страница 19: ...ions one cable supplied with each power supply shelf Four or six PowerCon connectors for the power supply shelves depending on customer specifications four connectors supplied with a single power supp...

Страница 20: ...crate from the top end so that is in the upright position see Fig 7 5 When the frame is out of the crate move the Sirius 830 frame to the bay where it is going to be installed 6 See section 5 1 for in...

Страница 21: ...e hold of the guard by the captive screw and carefully swing open the guard to the left until the guard is at 90 to the door the guard can then be pulled outwards and away from the door When re fittin...

Страница 22: ...l the rack mounting points 3 Replace the door and reconnect the cables to the door PC If you experience any difficulties installing the Sirius frame please contact SAM Customer Support see section 1 1...

Страница 23: ...stalled rack shelf 2 Use the correct rack mount screws or bolts to secure the power supply shelf to the rack The Power Supply Shelf weighs 24 kg 53lb When lifting use the correct local Health and Safe...

Страница 24: ...Sirius 830 Installation Manual www s a m com Installation Issue 2 Rev 2 Page 24 2016 SAM...

Страница 25: ...ables connected to the router must be fitted with adequate vertical and horizontal strain relief to avoid twisting of the rear panels causing damage to the router connectors and loss of electrical sig...

Страница 26: ...ts switch in the event of the following failures Fan Controller PSU For details on the output that switches for each failure see the Sirius 800 User Manual For example the outputs can be used for warn...

Страница 27: ...h B B and Tri level Note No internal termination Ethernet A B RJ45 x 2 Ethernet for controller A and B If two Nucleus controllers are fitted both the Ethernet A and Ethernet B ports must be connected...

Страница 28: ...Sirius 830 Installation Manual www s a m com Rear Connectors Issue 2 Rev 2 Page 28 2016 SAM...

Страница 29: ...AWG 10 Cables connected to the router must be fitted with adequate vertical and horizontal strain relief to avoid twisting of the rear panels causing damage to the router connectors and loss of electr...

Страница 30: ...Sirius 830 Installation Manual www s a m com Cabling Issue 2 Rev 2 Page 30 2016 SAM Fig 15 Cable Connector Assembly instructions continued...

Страница 31: ...e section 7 4 1 Sirius 830 Default IP Addresses Controller A 172 31 9 205 Controller B 172 31 9 206 Door PC 172 31 9 207 7 4 1 Changing IP Addresses If the controller IP addresses need to be changed s...

Страница 32: ...e the Multidrop Communications protocol SW P 06 RS485 3 COM 5 supports a variety of BPX and XY control panels see Table 8 on page 50 for details Fig 17 shows the RS485 connector pin outs for Multi dro...

Страница 33: ...ar see Fig 18 1 Configure the control panel to be connected to a Nucleus controller DIP Switch 6 Down 2 Select the communications type to RS485 DIP Switch 10 Up 3 Connect the multidrop pin to pin RS48...

Страница 34: ...26776 control panel for the correct connections and configuration see Fig 19 For information on operating the 6276 control panel see section 10 6 1 1 Fig 19 6276 2U Control Panel Rear 1 Control Panel...

Страница 35: ...0 V AC nominal mains supply will draw 25 A maximum per PSU Routers powered from 220 240 V AC nominal will draw 15 A maximum per PSU Caution Ensure that the power supply shelves are correctly earthed s...

Страница 36: ...required for redundant operation Installing the PSU s with 25 A rated breakers and cabling means that in the event of one PSU failing other PSU s will not draw current beyond the breaker rating and wi...

Страница 37: ...supply alarm cables 636028 are supplied with the Sirius 830 depending on the number of power supply shelves fitted Connect each power supply shelf to the router alarm rear panel using the 25 Way conn...

Страница 38: ...ach cable is the same at high currents The power supply shelves MUST be isolated from the AC supply by means of the external distribution switch circuit breaker before connecting or disconnecting the...

Страница 39: ...edundancy in the event of one supply failing Fig 23 Power and Alarm Connections There is one spare 48 V DC connector on each power supply shelf Do not remove the covers of the unused connectors Note T...

Страница 40: ...If you need to be able to isolate an individual power supply shelf the mains supplies should be connected as described in section 8 3 3 Fig 24 Power and Alarm Connections There is one spare 48 V DC c...

Страница 41: ...LED states when the controller is running it is ready to setup Router Configuration is carried out using Workbench If the system has already been configured it returns to the state it was in all signa...

Страница 42: ...of how to add modules to the router see the Sirius 800 Maintenance Upgrade manual 9 1 3 Starting the Door PC Manually The Door PC starts automatically when the Sirius 830 is powered up If the Door PC...

Страница 43: ...oes black then power down the Sirius 830 Make sure that all the external power supply shelves are switched off as quickly as possible Method 2 1 Alternatively open the door and press and release the D...

Страница 44: ...Sirius 830 Installation Manual www s a m com Powering the Sirius 830 Issue 2 Rev 2 Page 44 2016 SAM...

Страница 45: ...left corner of the screen to display the main menu screen If Live Runner is not running double tap the Live Runner shortcut on the Microsoft Windows screen to start it up 4 Touch the Alarms button on...

Страница 46: ...If Live Runner is not running double tap the shortcut on the Microsoft Windows screen to start it up 2 Open the Catsii Control screen on the Door PC see Fig 30 by touching the Catsii button on the Mai...

Страница 47: ...Source input highlighted with a Red box around the selected text box 10 Select the Destination text box using the DST SCR button and enter 2 using the numeric keypad and the configured destination na...

Страница 48: ...signal Green pulsed off Valid 3G signal Blue Table 4 Default Video Catsii Configuration Signal Condition Video Input 5919 5915 Output 5949 5925 Default color 1 1 You can change these defaults through...

Страница 49: ...ff 64 Channel MADI 44 1 kHz Green pulsed Blue 64 Channel MADI other sample rates Green pulsed Red Valid 64 Channel MADI Redundant signal input only Green Table 6 Default Audio Catsii Configurations No...

Страница 50: ...r up to 15 controllers on addresses 1 to 16 as shown in the table below RS485 4 COM 6 General Switcher In SW P 02 for external control systems Auto mode has been configured in the default database as...

Страница 51: ...l Operation Dial up XY panel 6026776 mimicking a 6276 control panel The following is a brief description of routing a single video signal using an external XY control panel A full description of contr...

Страница 52: ...Sirius 830 Installation Manual www s a m com Testing the Sirius 830 Issue 2 Rev 2 Page 52 2016 SAM...

Страница 53: ...Workbench server or client server see section 11 2 3 for details This does not apply to Workbench clients used for configuration or to RollCall clients connected to the controller s Although Workbench...

Страница 54: ...talls it if the component is not found Note If a dialog is displayed that says Install Checker has stopped working administration rights may not have been granted on the computer Close the Install Che...

Страница 55: ...k SQLDBTool Used to backup restore create Databases Only required if SQL Management Studio is not installed SQL Server Express Basic SQL Server software Only required if SQL Server is not installed Co...

Страница 56: ...ench but not yet installed 8 The Workbench Database component will be red as Workbench has not yet been associated with a database this is normal 9 If the Configuration Helper indicates that all other...

Страница 57: ...ed and the following screen is displayed to indicate that the installation has finished 11 To stop Workbench starting immediately after installation uncheck the Launch Workbench checkbox 12 Click Fini...

Страница 58: ...he existing database from the router Door PC to a server or client server and then connect Workbench to it Important The Workbench database must be installed on the server Therefore unless already ins...

Страница 59: ...nnection settings The Connection String Editor dialog box displays 2 Either type the server details or edit the Database Connection String 3 If using a mirrored server enter Failover Partner backup se...

Страница 60: ...and LiveRunner will need to be updated see the Workbench User manual for details on restoring the database and changing the program shortcut names 4 Workbench now needs to be associated with the resto...

Страница 61: ...e the username As this is the first login the admin username is recommended as it allows configuration of both Workbench and the router 6 Type the associated password if required 7 Click on the Login...

Страница 62: ...editing the controller configurations 1 Click on the Configuration button and the Workbench Configuration screen will be displayed 2 Click on the Add Controller button on the right of the Workbench C...

Страница 63: ...Pair checkbox Name Enter the controller name to be displayed by Workbench IP Address Edit the controller IP address to match the main router control module IP Port Enter the controller IP port address...

Страница 64: ...elect the router configuration closest to the one required from the Router Configuration drop down list 11 Tick the Import information to allow editing of hardware panel configurations checkbox 12 Cli...

Страница 65: ...ollers and Table 11 describes the status of the controllers in the example For full details of the status displays see the Workbench User manual Fig 45 Controller Wizard Summary Screen Fig 46 Controll...

Страница 66: ...ol module Generic The Generic Editor see section 11 5 2 and Generic Online Editor see section 11 5 3 tools are accessed from this tab They allow advanced configuration changes to be made using a logic...

Страница 67: ...the Controller Configuration screen The Routers tab shows the currently configured router matrices buttons for basic configuration settings and a button to open the advanced configuration options 2 M...

Страница 68: ...ut to be set by clicking on it Once selected open the drop down list as shown in Fig 49 2 Select the required Switch Point for the input from the drop down list 3 Repeat as required for the other inpu...

Страница 69: ...Click on the Edit Controller button to display the Generic Configuration Editor Fig 50 The controller s configuration parameters display in a tree Click on a symbol to expand the node below it Click o...

Страница 70: ...g of the Generic Online Configuration Editor is similar to that for the Generic Configuration Editor see section 11 5 2 To configure the router control module using the Generic Editor 1 Click on the G...

Страница 71: ...allies are not reported during this process Video and audio processing is unaffected 1 With the modified controller selected click on the Push to Controller s button 2 The Workbench controller Connect...

Страница 72: ...Sirius 830 Installation Manual www s a m com Workbench Issue 2 Rev 2 Page 72 2016 SAM...

Отзывы: