LN1000 IS Annunciator
31
SECTION 8 MOUNTING
Panel mounting version
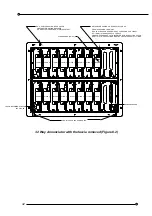
Refer to Figures 6.1 and 6.2 for panel cut-out dimensions and for details covered by the
mounting procedure which follows:
1 Prepare the panel cut out to the dimensions shown in Figure 6.1 or 6.2 for the
appropriate unit size
2 Remove rear cover, cable housing and all panel mounting clamps from the box
3 Slide the unit backwards through the cut out in the panel from the front until the front
flange gasket butts up to the panel
4 Attach all panel mounting brackets ensuring hooks are positioned into the slots
provided in the box
5 Tighten panel mounting bracket screws evenly unit the box fascia flange is tight up
against the front of the panel
6 Drill the cable housing to suit glands/grommets to be used and re-fit onto box
7 Wire as required
8 Re-fit the rear cover
Removal / fitting of Fascia Panel
Antistatic precautions should be taken when the fascia is removed and when handling
Sequence/Alarm Cards (see Appendix B for details)
Removal
1 Use the special socket provided for fastening/unfastening the fascia screws
2 Loosen fascia screws evenly until they are free. Note the screws are retained within
the fascia moulding itself
3 Holding either side of the fascia moulding, slide forwards off the alignment dowels
positioned either side on the top of the box
4 Lower the top of the fascia towards you (down), positioning the bottom of the fascia
under the bottom flange on the box to act as a hinge until the two retaining straps
hold the fascia in an open position
5 DO NOT LEAN OR REST HEAVY LOADS on the inside of the fascia
6 Full access to PCB's/alarm legends is now available


