l
In automatic mode, no fault will be set, but the gripper will continuously run the vacuum generator until a release command is
received.
l
In advanced mode, a fault flag will be set (gFLT=0x3) and the gripper will continue to run with the desired settings.
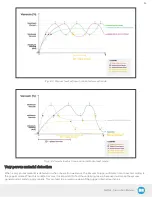
Object lost/ drop behavior
When an object is lost or dropped, the gripper will set an object flag (gOBJ=0b11). This means that the vacuum level has fallen
below 10% or below the minimum desired vacuum level for a the desired timeout value.
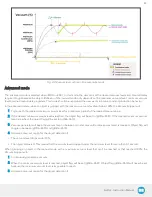
Object secured behavior
As soon as the grip command is received by the gripper:
1. The unknown object flag will be set (gOBJ=0b00).
2. If the vacuum level reaches the desired maximum vacuum level, the object secure to max flag will be set (gOBJ=0b10).
3. The vacuum generator will stop until the vacuum reach the desired minimum vacuum level.
4. The object secured to min flag will be set (gOBJ=0b01) and the vacuum generator will try to reach the maximum vacuum
again.
Object not detected behavior
When a grip command is received, the gripper will use the desired timeout value as a maximum period of time to detect an
object. When no object is detected after the timeout value, the timeout flag will be set (gFLT=0x6). To retry the same grip
command, the regulate bit needs to be re-asserted (rGTO=0b0, then rGTO=0b1). If new gripping settings are received (rMOD,
rPR, rFR, rSP), there is no need to re-assert the regulate bit.
Object release delay
When the release command is received, the vacuum gripper will open the release valve in order to let air enter the suction cups.
Once the pressure inside the suction cup is equal or greater than the ambient pressure, the gripper will set the no object flag
(gOBJ=0b11). The robot will then move away from the workpiece. Depending on the suction type, this motion might create a new
vacuum inside the suction cups. Therefore, the user can set the distance for the robot to move away from the workpiece. Once this
distance is reached, the Vacuum Gripper valve will close.
Emergency stop behavior
Depending on the robot, the behavior might be different when pushing an emergency stop. If the user wants to ensure a good
grip even in emergency stop, the vacuum gripper must be connected to a supply source that will not drop when pushing the
emergency stop. As long as the gripper is supplied, it will always try to keep the workpiece, even if the communication is stopped
with the robot.
47
Содержание AirPick
Страница 25: ...Fig 3 7 Mounting air nodes suction cups air bolts air nuts on the bracket 25...
Страница 27: ...Fig 3 9 Robotiq Vacuum Gripper with pigtail cable and device cable wiring scheme 27...
Страница 35: ...Fig 4 1 Vacuum Gripper control logic overview 35...
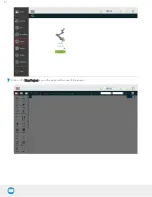
Страница 57: ...7 Click on the New Project icon in the upper left corner of the screen 57...
Страница 58: ...AirPick Instruction Manual 8 Enter a name for your program and click on the OK button 9 58...
Страница 76: ...Fig 6 5 Minimum and maximum arrangement possibilities of the air nodes position 76...
Страница 77: ...AirPick Instruction Manual 6 1 3 Air nodes Fig 6 6 Air nodes dimensions 77...
Страница 103: ...AirPick Instruction Manual 12 Appendix Fig 12 1 Pneumatic schema of the AirPick Vacuum Gripper...

