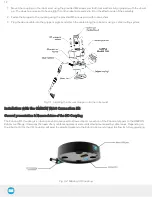
1. Mount the coupling on the robot wrist using the provided M6 screws and tooth lock washers. Align properly with the dowel
pin. The dowel pin is meant to have a tight fit on the robot side and a slip fit on the effector side of the assembly.
2. Fasten the Gripper to the coupling using the provided M5 screws and tooth lock washers.
3. Plug the device cable into the gripper's pigtail and attach the cable along the robot arm using a cable routing system.
Fig. 3-1: Installing the Vacuum Gripper onto the robot wrist
Installation with the OMRON Wrist Connection Kit
General presentation & Nomenclature of the I/O Coupling
The Robotiq I/O Coupling is a robotic peripheral designed to allow a direct connection of the Robotiq Grippers to the OMRON
Robots tool flange. It removes the need of any cable management and avoids downtime caused by cable issues. Depending on
the robot tool I/Os, the I/O Coupling will send the selected presets to the Robotiq Vacuum Gripper to allow its full programming.
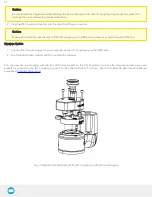
Fig. 3-2: Robotiq I/O Coupling
19
Содержание AirPick
Страница 25: ...Fig 3 7 Mounting air nodes suction cups air bolts air nuts on the bracket 25...
Страница 27: ...Fig 3 9 Robotiq Vacuum Gripper with pigtail cable and device cable wiring scheme 27...
Страница 35: ...Fig 4 1 Vacuum Gripper control logic overview 35...
Страница 57: ...7 Click on the New Project icon in the upper left corner of the screen 57...
Страница 58: ...AirPick Instruction Manual 8 Enter a name for your program and click on the OK button 9 58...
Страница 76: ...Fig 6 5 Minimum and maximum arrangement possibilities of the air nodes position 76...
Страница 77: ...AirPick Instruction Manual 6 1 3 Air nodes Fig 6 6 Air nodes dimensions 77...
Страница 103: ...AirPick Instruction Manual 12 Appendix Fig 12 1 Pneumatic schema of the AirPick Vacuum Gripper...


