


faxes. If the setting is wrong, the modem settings can be changed in the Fax/SE menu. See step
14. These settings should only be changed with guidance from your second-level support.
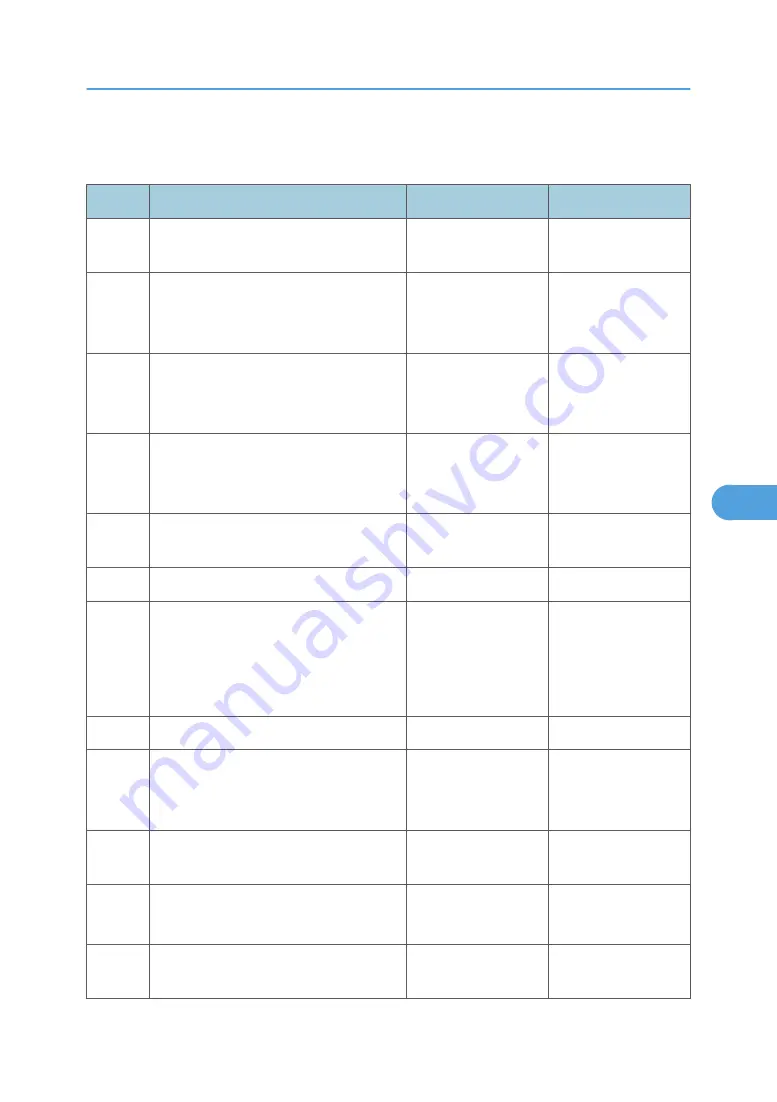
Step
Questions / actions
Yes
No
1
Is the phone line properly connected to
the modem card and the wall jack?
Go to step 3.
Go to step 2.
2
Properly connect the phone line to the
modem card and wall jack.
Did this fix the problem?
Problem resolved
Go to step 3.
3
Test the phone line’s ability to send and
receive calls.
Did the phone line work properly?
Go to step 5.
Go to step 4.
4
Use the machine on a properly
functioning phone jack.
Did this fix the problem?
Problem resolved.
Go to step 5.
5
Is the phone line being used by the
machine an analog line?
Go to step 8.
Go to step 6.
6
Is the line being used a VOIP line?
Go to step 7.
Go to step 8.
7
Have the system administrator verify that
the VOIP server is configured to receive
faxes.
Is the server properly configured?
Go to step 8.
Stop here. The issue is
VOIP related. The
VOIP provider needs
to change the server
configuration.
8
Is the machine on a PABX?
Go to step 9.
Go to step 10.
9
Enable "Behind a PABX" under fax
settings in the Administration menu.
Did this fix the issue?
Problem fixed.
Disable "Behind a
PABX", and go to
step10.
10
Is a dial prefix needed to get an outside
line?
Go to step 11.
Go to step 12.
11
Try sending a fax using a dial prefix.
Did the fax transmit?
Problem fixed.
Go to step 12.
12
Is the fax failing to send to one specific
destination?
Go to step 13.
Go to step 14.
Service Checks
275
6
Содержание LI-MF1 M126
Страница 1: ...Model LI MF1 Machine Codes M126 M127 M128 Field Service Manual 26 August 2011 ...
Страница 2: ......
Страница 3: ...Safety Notices The following laser notice labels may be attached to this machine 1 ...
Страница 4: ...2 ...
Страница 5: ...3 ...
Страница 6: ...4 ...
Страница 7: ...5 ...
Страница 8: ...6 ...
Страница 9: ...7 ...
Страница 10: ...8 ...
Страница 17: ...XPS XML Paper Specification 15 ...
Страница 29: ...M Auto compensator Overview 27 1 ...
Страница 30: ...Main Boards Controller Board 1 Product Information 28 1 ...
Страница 37: ...2 Installation Installation Refer to the User s Guide 35 2 ...
Страница 38: ...2 Installation 36 2 ...
Страница 51: ...2 Remove the three screws B securing the top of the controller shield Removal Procedures 49 4 ...
Страница 58: ...4 Remove the e clip A from the gear 5 Remove the gear B and gear shaft C 4 Replacement and Adjustment 56 4 ...
Страница 59: ...6 Remove the screw D from the gear E 7 Remove the plastic bushing F Removal Procedures 57 4 ...
Страница 118: ...13 Remove the three screws A from the left rear frame assembly 4 Replacement and Adjustment 116 4 ...
Страница 119: ...14 Remove the three screws B from the right rear frame assembly Imaging Component Removals 117 4 ...
Страница 142: ...4 Replacement and Adjustment 140 4 ...
Страница 192: ...5 System Maintenance 190 5 ...
Страница 198: ...Symptom Action Fax reception fails p 276 Fax Reception Service Check 6 Troubleshooting 196 6 ...
Страница 286: ...4 Remove the jam 5 If the paper is still not visible open the rear door 6 Troubleshooting 284 6 ...
Страница 289: ...3 Remove the jam 4 Close the rear door 5 Close the front door 6 Touch Continue Paper Jams 287 6 ...
Страница 295: ...2 Open the ADF cover 3 Unlock the ADF separator roll 4 Remove the ADF separator roll Paper Jams 293 6 ...
Страница 298: ...6 Troubleshooting 296 6 ...
Страница 302: ...7 Energy Saving 300 7 ...
Страница 303: ...Model LI MF1 Machine Codes M126 M127 M128 Appendices 12 October 2011 ...
Страница 304: ......
Страница 306: ...2 ...
Страница 322: ...1 Appendix Specifications 18 1 ...
Страница 324: ...MEMO 20 EN ...


