


Problem
Cause / action
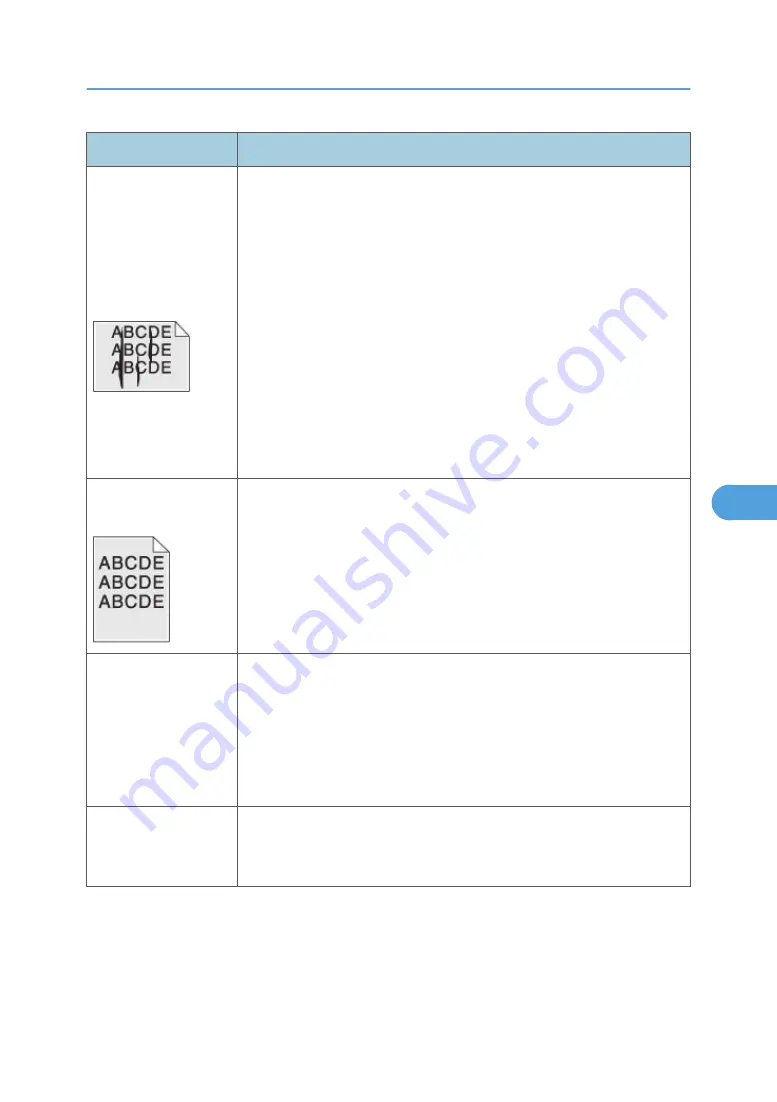
Vertical or horizontal
streaks appear on the
page
Vertical streaks
Something could be caught between the PC kit and the fuser. Check the
paper path around the fuser entry. Try a different toner cartridge.
Vertical white lines may be caused by the laser beam, which may be
partially blocked. With the machine off, clear the path or clean the lens. The
toner cartridge or fuser may be defective. Try a different toner cartridge.
Inspect the fuser at its entry for debris.
Horizontal streaks
The toner cartridge or the fuser may be the cause due to excessive page
count or defect. Replace as needed.
If the lines are parallel and match the two intended ghost images, then the
Form Type may be incorrectly set. Check those settings.
The PC cleaner sump may be full. Replace the PC kit.
Toner smears or rubs
off the page.
• Toner is not being fused to the paper. Replace the fuser.
• Change the media texture setting in the driver. If special media is
being used, such as card stock or labels, then be sure to select the
correct media type.
• Try a different kind of paper. Paper designed for copiers gives the best
quality fusing.
The print is getting light,
but the machine has not
indicated it is low on
toner.
• Toner is becoming low in the cartridge.
• The Toner Low message does not display if the 1,500-page toner
cartridge is installed.
• Remove the toner cartridge, and gently shake it from side to side to
redistribute the toner.
• Replace the toner cartridge.
The "Toner Low"
message displays.
• Remove the toner cartridge, and gently shake it from side to side to
redistribute the toner.
• Replace the toner cartridge.
Service Checks
259
6
Содержание LI-MF1 M126
Страница 1: ...Model LI MF1 Machine Codes M126 M127 M128 Field Service Manual 26 August 2011 ...
Страница 2: ......
Страница 3: ...Safety Notices The following laser notice labels may be attached to this machine 1 ...
Страница 4: ...2 ...
Страница 5: ...3 ...
Страница 6: ...4 ...
Страница 7: ...5 ...
Страница 8: ...6 ...
Страница 9: ...7 ...
Страница 10: ...8 ...
Страница 17: ...XPS XML Paper Specification 15 ...
Страница 29: ...M Auto compensator Overview 27 1 ...
Страница 30: ...Main Boards Controller Board 1 Product Information 28 1 ...
Страница 37: ...2 Installation Installation Refer to the User s Guide 35 2 ...
Страница 38: ...2 Installation 36 2 ...
Страница 51: ...2 Remove the three screws B securing the top of the controller shield Removal Procedures 49 4 ...
Страница 58: ...4 Remove the e clip A from the gear 5 Remove the gear B and gear shaft C 4 Replacement and Adjustment 56 4 ...
Страница 59: ...6 Remove the screw D from the gear E 7 Remove the plastic bushing F Removal Procedures 57 4 ...
Страница 118: ...13 Remove the three screws A from the left rear frame assembly 4 Replacement and Adjustment 116 4 ...
Страница 119: ...14 Remove the three screws B from the right rear frame assembly Imaging Component Removals 117 4 ...
Страница 142: ...4 Replacement and Adjustment 140 4 ...
Страница 192: ...5 System Maintenance 190 5 ...
Страница 198: ...Symptom Action Fax reception fails p 276 Fax Reception Service Check 6 Troubleshooting 196 6 ...
Страница 286: ...4 Remove the jam 5 If the paper is still not visible open the rear door 6 Troubleshooting 284 6 ...
Страница 289: ...3 Remove the jam 4 Close the rear door 5 Close the front door 6 Touch Continue Paper Jams 287 6 ...
Страница 295: ...2 Open the ADF cover 3 Unlock the ADF separator roll 4 Remove the ADF separator roll Paper Jams 293 6 ...
Страница 298: ...6 Troubleshooting 296 6 ...
Страница 302: ...7 Energy Saving 300 7 ...
Страница 303: ...Model LI MF1 Machine Codes M126 M127 M128 Appendices 12 October 2011 ...
Страница 304: ......
Страница 306: ...2 ...
Страница 322: ...1 Appendix Specifications 18 1 ...
Страница 324: ...MEMO 20 EN ...


