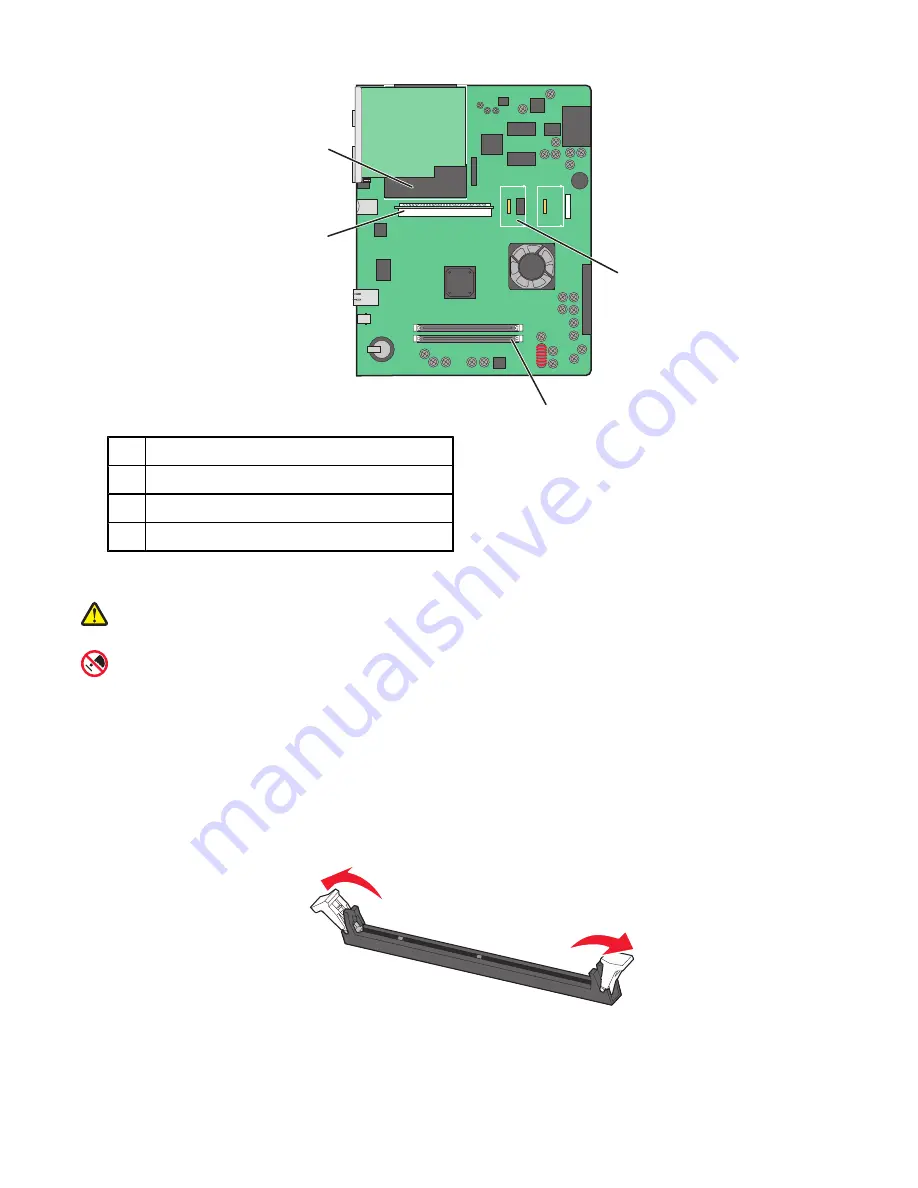
Ricoh InfoPrint 1759 Скачать руководство пользователя страница 29

1

2

3

4

1

Firmware and flash memory card connectors

2

Memory card connector

3

Internal print server connector

4

Hard disk

Installing a memory card

CAUTION: 

If you are installing a memory card after setting up the printer, turn the printer off, and unplug the

power cord from the wall outlet before continuing.

Warning: 

System board electrical components are easily damaged by static electricity. Touch something metal

on the printer before touching any system board electronic components or connectors.

An optional memory card can be purchased separately and attached to the system board. To install the memory
card:

1

Access the system board.

2

Unpack the memory card.

Note: 

Avoid touching the connection points along the edge of the card.

3

Open the memory card connector latches.

4

Align the notches on the memory card with the ridges on the connector.


29

Содержание InfoPrint 1759

Страница 1: ...InfoPrint Color 1759 MFP 1769 MFP MT 4886 4887 User s Guide S510 7102 00...

Страница 2: ......

Страница 3: ...30 Installing an internal print server or port interface card 31 Reinstalling the system board 32 Attaching cables 33 Loading paper and specialty media 35 Setting the Paper Size and Paper Type 35 Load...

Страница 4: ...d finishing features 52 Copying 56 Making copies 56 Making a quick copy 56 Copying using the ADF 56 Copying using the scanner glass flatbed 57 Copying photos 57 Copying on specialty media 57 Making tr...

Страница 5: ...5 Collate 65 Options 65 Improving copy quality 67 E mailing 68 Getting ready to e mail 68 Setting up the e mail function 68 Setting up the address book 68 Creating an e mail shortcut 69 Creating an e...

Страница 6: ...using the control panel 85 Sending a fax using the computer 85 Creating shortcuts 85 Creating a fax destination shortcut using the Embedded Web Server 85 Creating a fax destination shortcut using the...

Страница 7: ...g the Embedded Web Server 93 Creating an FTP destination shortcut using the touch screen 94 Understanding FTP options 94 Original Size 94 Sides Duplex 94 Binding 94 Resolution 94 Send As 94 Content 94...

Страница 8: ...4 Printing a directory list 104 Printing the print quality test pages 104 Canceling a print job 105 Canceling a print job from the control panel 105 Canceling a print job from the Windows taskbar 105...

Страница 9: ...ports menu 135 Settings menu 137 General Settings menu 137 Copy Settings menu 142 Fax Settings menu 144 E mail Settings menu 152 E mail Server Setup menu 155 FTP Settings menu 156 Scan to USB Settings...

Страница 10: ...ng the printer 221 Moving the printer and options to another location within the office 222 Disassembling the printer from the scanner shelf prior to the move 222 Setting the printer up in a new locat...

Страница 11: ...ing 232 Checking an unresponsive printer 232 Door A will not shut properly 232 Solving printing problems 233 Multiple language PDFs do not print 233 Control panel display is blank or displays only dia...

Страница 12: ...uality 238 Partial document or photo scans 239 Cannot scan from a computer 239 Solving fax problems 239 Caller ID is not shown 239 Cannot send or receive a fax 239 Can send but not receive faxes 241 C...

Страница 13: ...ts 250 Skewed print 250 Print is too light 250 Print is too dark 251 Solid color pages 251 Toner fog or background shading appears on the page 252 Toner rubs off 252 Toner specks 252 Transparency prin...

Страница 14: ...14...

Страница 15: ...are properly installed in their marked plug in ports CAUTION If you are installing a memory card after setting up the printer turn the printer off and unplug the power cord from the wall outlet before...

Страница 16: ...before continuing CAUTION If installing a flash memory or firmware card after setting up the printer turn the printer off and unplug the power cord from the wall outlet before continuing CAUTION If i...

Страница 17: ...ay Tray 4 8 Multipurpose feeder Basic functions of the scanner The scanner provides copy fax and scan to network capability for large workgroups You can Make quick copies or change the settings on the...

Страница 18: ...ets of plain paper in the ADF input tray Scan sizes from 114 0 x 139 4 mm 4 5 x 5 5 in to 297 18 x 431 8 mm 11 7 x 17 in Scan documents with mixed page sizes letter and legal Scan media weights from 5...

Страница 19: ...ssing data or printing Solid green The printer is on but idle Solid red Operator intervention is needed 3 Keypad Enter numbers or symbols on the display 4 Dial Pause Press to cause a two or three seco...

Страница 20: ...ortcut entry Once an entire line is deleted another press of causes the cursor to move up one line In the E mail Destination List press to delete the character to the left of the cursor If the charact...

Страница 21: ...t person Once it is set up it appears as a display item 8 Fax Access the Fax menus Other buttons that may appear on the home screen Button Button name Function Release Held Faxes If this button is sho...

Страница 22: ...rk headings Print job Copy job Fax profile FTP E mail send Each heading has a list of jobs shown in a column under it Each column can show only three jobs per screen The job appears as a button which...

Страница 23: ...ls to another value in decreasing order Right scroll increase button Scrolls to another value in increasing order Left arrow button Scrolls left Right arrow button Scrolls right Scan the ADF Scans usi...

Страница 24: ...and backward navigation is possible from this screen Sample screen two Button Button name Function Down arrow Moves down to the next screen Up arrow Moves up to the next screen Unselected radio button...

Страница 25: ...he down arrow appears at the bottom of the column Each touch of the down arrow accesses one job in the list When more than three jobs exist once the fourth job in the list is reached then an up arrow...

Страница 26: ...o return to that menu or menu item The Number of Copies is not underlined since this is the current screen If this feature is used on the Number of Copies screen before the Number of Copies is set and...

Страница 27: ...lso use them to locate a card for removal Available options Memory cards Printer memory Flash memory Fonts Firmware cards Bar Code and Forms IPDS and SCS TNe PrintCryptionTM PRESCRIBE Other internal o...

Страница 28: ...move them b Gently pull the cover and system board away from the printer and then remove it 2 Use the illustration below to locate the appropriate connector Warning System board electrical components...

Страница 29: ...oard electrical components are easily damaged by static electricity Touch something metal on the printer before touching any system board electronic components or connectors An optional memory card ca...

Страница 30: ...stalling a memory card after setting up the printer turn the printer off and unplug the power cord from the wall outlet before continuing Warning System board electrical components are easily damaged...

Страница 31: ...printer off and unplug the power cord from the wall outlet before installing an internal option If you have any other devices attached to the printer turn them off as well and unplug any cables going...

Страница 32: ...erface card with the connector on the system board Note The cable connectors on the side of the optional card must fit through the opening in the faceplate 5 Push the internal print server or port int...

Страница 33: ...en the screws firmly Attaching cables Connect the printer to the computer using a USB cable or Ethernet cable A USB port requires a USB cable Be sure to match the USB symbol on the cable with the USB...

Страница 34: ...1 USB port 2 Ethernet port 3 Scanner connector 4 Scanner connector 34...

Страница 35: ...lly for all trays that do not contain plain paper 1 Make sure the printer is on and Ready appears 2 From the control panel touch 3 Touch Paper Menu 4 Touch Paper Size Type 5 Touch the tray number or t...

Страница 36: ...the tray to help position the guides 4 Flex the sheets back and forth to loosen them and then fan them Do not fold or crease the paper Straighten the edges on a level surface 5 Load the paper stack w...

Страница 37: ...ct Load either A5 or statement size paper in the paper trays but not both Note The multipurpose feeder does not use auto size sensing and can support both A5 and statement size print jobs The Size Sen...

Страница 38: ...e process for loading paper Use these instructions to load paper in either tray 1 Grasp the handle and open the tray 2 Squeeze the length guide tab inward as shown and slide the guide to the correct p...

Страница 39: ...e secure against the edges of the paper 6 Insert the tray into the printer 7 If a different type of paper was loaded than the type previously loaded in the tray change the Paper Type setting for the t...

Страница 40: ...h to loosen them and then fan them Do not fold or crease the paper Straighten the edges on a level surface Hold transparencies by the edges and then fan them Straighten the edges on a level surface No...

Страница 41: ...nd 12 x 19 paper sizes Do not exceed the maximum stack height by forcing paper under the stack height limiter Load envelopes with the flap side up Warning Never use envelopes with stamps clasps snaps...

Страница 42: ...o the position of the paper guides in each tray except the multipurpose feeder The Paper Size setting for the multipurpose feeder must be set manually from the Paper Size menu The Paper Type setting m...

Страница 43: ...Click Paper Menu 6 Click Custom Name 7 Type a name for the paper type in a Custom Name x box Note This custom name will replace a custom type x name under the Custom Types and Paper Size Type menus 8...

Страница 44: ...lways use paper between 100 and 300 Sheffield points however smoothness between 150 and 200 Sheffield points produces the best print quality Moisture content The amount of moisture in paper affects bo...

Страница 45: ...per that has been cut or trimmed by hand Do not mix paper sizes types or weights in the same source mixing results in jams Do not use coated papers unless they are specifically designed for electropho...

Страница 46: ...e general guidelines only and that paper meeting these guidelines may still cause paper feeding problems Using letterhead Check with the manufacturer or vendor to determine whether the chosen preprint...

Страница 47: ...ered for use before buying large quantities When printing on transparencies From MarkVision Professional Print Properties or the control panel set the Paper Type to Transparency Feed transparencies fr...

Страница 48: ...r twist Are stuck together or damaged in any way Have windows holes perforations cutouts or embossing Have metal clasps string ties or folding bars Have an interlocking design Have postage stamps atta...

Страница 49: ...nd creasing may significantly affect the print quality and cause jams or other paper handling problems Check with the manufacturer or vendor to ensure the card stock can withstand temperatures up to 2...

Страница 50: ...t1 140 x 216 mm 5 5 x 8 5 in X X Tabloid 279 x 432 mm 11 x 17 in X Universal 100 x 148 mm 3 9 x 5 8 in up to 305 x 483 mm 11 7 x 19 in 2 X X 7 3 4 Envelope Monarch 98 x 191 mm 3 9 x 7 5 in X X X B5 En...

Страница 51: ...m size is 140 x 148 mm 5 5 x 5 8 in and the maximum size is 297 x 432 mm 11 7 x 17 in Paper types and weights supported by the printer The printer engine supports 60 220 g m2 16 60 lb paper weights Th...

Страница 52: ...tal transport unit 50 sheets Finisher standard bin 500 sheets Bin 1 1500 3000 sheets Bin 2 300 sheets Plain Paper Bond Letterhead Preprinted Colored Paper Card stock Glossy paper X X Labels X X Transp...

Страница 53: ...n Finishing options are not supported in this bin Bin 1 The paper capacity is 3000 sheets when the standard finisher is installed The paper capacity is 1500 sheets when the booklet finisher is install...

Страница 54: ...nd 17 in 432 mm Bin 2 booklet maker Bin 2 is available only when the booklet finisher is installed The paper capacity of Bin 2 booklet maker is 300 sheets or 20 sets of 15 sheet booklets Bin 2 finishi...

Страница 55: ...short edge orientation The short edge of the paper enters the printer first Bi fold Each page is individually folded and stacked separately Booklet fold A multiple page job is folded along the center...

Страница 56: ...s 3 From the control panel press Note If an LDSS profile has been installed you may receive an error when attempting a quick copy Contact your system support person for access 4 If you placed the docu...

Страница 57: ...Load an original document faceup short edge first into the ADF or facedown on the scanner glass Note Do not load postcards photos small items transparencies photo paper or thin media such as magazine...

Страница 58: ...ent 5 Touch Copy to and then select the size you want the copy to be Note If you select a paper size that is different from the Copy from size the printer will scale the size automatically 6 Touch Cop...

Страница 59: ...inted on mixed paper sizes corresponding to the paper sizes of the original document Example 2 Copying to a single paper size The printer has one paper tray loaded with letter size paper A document th...

Страница 60: ...to the ADF adjust the paper guides 3 On the home screen touch Copy 4 From the Scale area touch or to enlarge or reduce your output Touching Copy to or Copy from after setting Scale manually changes th...

Страница 61: ...f you do not want your copies collated 6 Touch Copy It Placing separator sheets between copies 1 Load an original document faceup short edge first into the ADF or facedown on the scanner glass Note Do...

Страница 62: ...Done 10 Touch Copy It Creating a custom job job build The custom job or job build is used to combine one or more sets of original documents into a single copy job Each set may be scanned using differ...

Страница 63: ...paper or thin media such as magazine clippings into the ADF Place these items on the scanner glass 2 If you are loading a document into the ADF adjust the paper guides 3 From the control panel press...

Страница 64: ...he touch screen A Canceling scan job screen appears The ADF clears all pages in the ADF and cancels the job Canceling a copy job while copying pages using the scanner glass Touch Cancel Job on the tou...

Страница 65: ...on an arrow to make a continuous increment Hold your finger on an arrow for two seconds to cause the pace of the change to accelerate Darkness This option adjusts how light or dark your copies will tu...

Страница 66: ...pace to bind or hole punch copies Use the increase or decrease arrows to set how much of a margin you want If the additional margin is too large the copy will be cropped Edge Erase This option elimina...

Страница 67: ...document is not a concern Text mode is recommended for receipts carbon copy forms and documents that contain only text or fine line art When should I use Text Photo mode Use Text Photo mode when copy...

Страница 68: ...rofile Getting ready to e mail Setting up the e mail function For e mail to operate it must be turned on in the printer configuration and have a valid IP address or gateway address To set up the e mai...

Страница 69: ...If you enter a number that is already in use you are prompted to select another number Creating an e mail shortcut using the touch screen 1 On the home screen touch E mail 2 Type the recipient s e mai...

Страница 70: ...t faceup short edge first into the ADF or facedown on the scanner glass Note Do not load postcards photos small items transparencies photo paper or thin media such as magazine clippings into the ADF P...

Страница 71: ...ace these items on the scanner glass 2 If you are loading a document into the ADF adjust the paper guides 3 On the home screen touch Held Jobs 4 Touch Profiles 5 Select an e mail destination from the...

Страница 72: ...ves one page in each file The file size is usually larger than an equivalent JPEG JPEG Creates and attaches a separate file for each page of your original document and is viewable by most Web browsers...

Страница 73: ...from unauthorized access Content This option tells the printer the original document type Choose from Text Text Photo or Photo Color can be turned on or off with any of the Content choices Content af...

Страница 74: ...an choose to eliminate an equal area around all four sides of the paper or pick a particular edge Edge Erase will erase whatever is within the area selected leaving nothing printed on that portion of...

Страница 75: ...omputer modem Note The printer is an analog device that works best when directly connected to the wall jack Other devices such as a telephone or answering machine can be successfully attached to pass...

Страница 76: ...ter to an answering machine telephone or other telecommunications equipment use the telephone line adapter included in the box with the printer in some countries or regions Note If you have DSL do not...

Страница 77: ...he printer Note Once this plug is removed any country or region specific equipment you connect to the printer by way of the adapter as shown will not function properly 2 Connect your telecommunication...

Страница 78: ...elephone an answering machine or other telecommunications equipment to the printer 1 Remove the plug from the back of the printer 2 Connect your telecommunications equipment directly to the EXT port o...

Страница 79: ...ny Connect the printer directly to a telephone wall jack to send and receive faxes without using a computer Note In Germany and some other countries the printer ships with a special RJ 11 plug in the...

Страница 80: ...chine and the other N slot of the telephone wall jack Connecting to a telephone Connect a telephone to the printer to use the fax line as a normal telephone line Then set up the printer wherever your...

Страница 81: ...chine Connect an answering machine to the printer to receive both incoming voice messages and faxes Note Setup steps may vary depending on your country or region 1 Make sure you have the following A t...

Страница 82: ...cord from the answering machine to the EXT port of the printer Connecting to a computer with a modem Connect the printer to a computer with a modem to send faxes from the software program Note Setup s...

Страница 83: ...plug it into an active telephone wall jack 3 Remove the protective plug from the EXT port of the printer 4 Connect a second telephone cord from the telephone to the computer modem 5 Connect a third te...

Страница 84: ...on every fax you send If there is a power failure you may have to reset the date and time To set the date and time 1 Open a Web browser 2 In the address bar type the IP address of the printer and the...

Страница 85: ...your desk This gives you the flexibility of faxing documents directly from software programs 1 From your software program click File Print 2 From the Print window select your printer and then click Pr...

Страница 86: ...ouch Cancel and reenter the information If you enter a number that is already in use you are prompted to select another number 7 Touch Fax It Using shortcuts and the address book Using fax destination...

Страница 87: ...resolution setting changes the quality of the fax Settings range from Standard fastest speed to Ultra Fine slowest speed best quality 1 Load an original document faceup short edge first into the ADF...

Страница 88: ...Mode is set to Fax Server the Delayed Send button will not appear Faxes waiting for transmission are listed in the Fax Queue 8 Touch to reduce the time or to increase the time the fax will be transmi...

Страница 89: ...text against a clean white background Text Photo Used when the original documents are a mixture of text and graphics or pictures Photograph Tells the scanner to pay extra attention to graphics and pi...

Страница 90: ...hoose to eliminate an equal area around all four sides of the paper or pick a particular edge Edge Erase will erase whatever is within the area selected leaving nothing printed on that portion of the...

Страница 91: ...option lets you print and forward received faxes to a fax number e mail address FTP site or LDSS 1 Open a Web browser 2 In the address bar type the IP address of the printer and then press Enter 3 Cli...

Страница 92: ...destination could also be another PostScript printer for example a color document can be scanned and then sent to a color printer Sending a document to an FTP server is similar to sending a fax The di...

Страница 93: ...the ADF adjust the paper guides 3 On the home screen touch FTP 4 Touch Search Address Book 5 Type the name or part of the name you are searching for and then touch Search 6 Touch the name that you wan...

Страница 94: ...ed to reduce the file size Send As This option sets the output PDF TIFF or JPEG for the scanned image PDF Output is a single file TIFF Output is a single file If Multi page TIFF is turned off in the C...

Страница 95: ...er or pick a particular edge Edge Erase will erase whatever is within the area selected leaving nothing printed on that portion of the paper Darkness Adjusts how light or dark your scanned documents w...

Страница 96: ...e document back to the computer over the network by creating a scan profile on the computer and then downloading the profile to the printer Scanning to a computer 1 Open a Web browser 2 In the address...

Страница 97: ...evice 1 Load an original document faceup short edge first into the ADF or facedown on the scanner glass Note Do not load postcards photos small items transparencies photo paper or thin media such as m...

Страница 98: ...n appears with your new setting displayed When Original Size is set to Mixed Sizes you can scan an original document that contains mixed paper sizes letter and legal size pages Orientation This option...

Страница 99: ...preserving images copied from the original document is not a concern Text mode is recommended for receipts carbon copy forms and documents that only contain text or fine line art When should I use Tex...

Страница 100: ...ed If a feature in Print Properties is unfamiliar open the online Help for more information Note Print settings selected from the driver override the default settings selected from the control panel P...

Страница 101: ...nt open click File Print 2 Click Properties Preferences Options or Setup 3 Click Other Options and then click Print and Hold 4 Select your job type Confidential Reserve Repeat or Verify and then assig...

Страница 102: ...ential Jobs 7 Enter your PIN 8 Touch the job you want to print 9 Touch Print or touch to increase the number of copies and then touch Print Confidential and Verify print jobs are automatically deleted...

Страница 103: ...face Notes If you insert the memory device when the printer requires attention such as when a jam has occurred the printer ignores the memory device If you insert the memory device while the printer i...

Страница 104: ...3 Touch Reports 4 Touch Menu Settings Page Printing a directory list A directory list shows the resources stored in flash memory or on the hard disk 1 Make sure the printer is on and Ready appears 2...

Страница 105: ...ow 2 Select a job to cancel 3 From the keyboard press Delete Canceling a print job from the Windows desktop 1 Minimize all programs to reveal the desktop 2 Double click the My Computer icon 3 Double c...

Страница 106: ...print speed or a higher toner yield Max Speed is the factory default setting Max Speed Prints in a black only mode until it receives a page with color content Then it prints in color and does not swit...

Страница 107: ...to appear before removing a tray Do not load the manual feeder while the printer is printing Wait for Load Manual feeder with x to appear Push all trays in firmly after loading paper Make sure the gu...

Страница 108: ...move all paper from the multipurpose feeder 2 Flex and stack the paper 3 Reload the multipurpose feeder 4 Adjust the paper guide 6 280 282 Cover F Horizontal Transport Unit Open Cover F and then remov...

Страница 109: ...e touching 2 Lift the green lever and then pull the paper up and toward you Note Make sure all paper fragments are removed 3 Push the green lever down 4 Close Door A 5 Touch Continue 230 231 paper jam...

Страница 110: ...2 Lift the green lever and then pull the paper up and toward you Note Make sure all paper fragments are removed 3 Push the green lever down 4 Close Door A 110...

Страница 111: ...5 Pull the multipurpose feeder down and then open Door B 6 Remove the jammed paper 7 Close Door B 8 Touch Continue 111...

Страница 112: ...1 Open Door C 2 Pull the paper down and toward you Note Make sure all paper fragments are removed 3 Close Door C 4 Open Tray 1 and then remove any crumpled paper from the tray 5 Close the tray 6 Touch...

Страница 113: ...242 244 paper jams 1 Open Door D 2 Pull the paper down and away from the printer Note Make sure all paper fragments are removed 3 Close Door D 113...

Страница 114: ...4 Clear crumpled paper from Trays 2 4 a Open Tray 2 and then remove any crumpled paper b Close Tray 2 c Open Tray 3 and then remove any crumpled paper d Close Tray 3 114...

Страница 115: ...y jammed paper g Close the inside cover and then close Tray 4 5 Touch Continue 250 paper jam 1 Remove the paper from the multipurpose feeder 2 Flex the sheets of paper back and forth to loosen them an...

Страница 116: ...d the inside of the tray until it lightly rests against the edge of the paper 5 Touch Continue 280 282 paper jams 1 Open Cover F 2 Remove the jammed paper Note If the paper jam on the right is difficu...

Страница 117: ...283 284 and 287 288 paper jams Covers knobs and handles located behind finisher Door G Cover knob or handle name 1 Cover G1 2 Cover G2 3 Knob G3 4 Cover G4 5 Cover G7 6 Knob G8 117...

Страница 118: ...er 3 Move Cover G2 to the right and then remove any jammed paper Note If the paper is jammed in the rollers rotate Knob G3 counterclockwise 4 Move Cover G4 down and then remove any jammed paper 5 Move...

Страница 119: ...If the paper is jammed in the rollers rotate Knob G8 clockwise and then remove the jammed paper 8 Close Door G 9 Touch Continue 284 286 paper jams 1 Open Door H 2 Remove the jammed paper 3 Close Door...

Страница 120: ...289 staple jam 1 Open Door G 2 Slide the G5 stapler toward the front of the finisher 3 Lift the lever and then remove the staple cartridge 120...

Страница 121: ...4 Open the staple cover 5 Remove the jammed staple and then close the cover 6 Place the staple cartridge into the upper stapler 121...

Страница 122: ...7 Open the lower staple drawer 8 Remove the staple cartridge identified on the display 9 Remove the jammed staples and then place the staple cartridge into the stapler 122...

Страница 123: ...95 paper jams 1 Remove all original documents from the ADF 2 Open the ADF cover and then remove any jammed paper 3 Raise the sheet guard and then remove any jammed paper Note If the jammed paper canno...

Страница 124: ...4 Close the ADF cover 5 Open the scanner cover and then remove any jammed pages 6 Close the scanner cover 7 Touch Continue 124...

Страница 125: ...aper Loading Custom Types Custom Names Custom Bin Names Universal Setup Bin Setup Menu Settings Page Device Statistics Network Setup Page Shortcut List Fax Job Log Fax Call Log E mail Shortcuts Fax Sh...

Страница 126: ...genta Yellow or Black PC Units Life Warning Replace Missing OK Normal Shows the status of the photoconductor units Waste Toner Box Near Full Replace Missing OK Shows the status of the waste toner bott...

Страница 127: ...A3 A4 A5 JIS B4 JIS B5 Folio Legal Letter Statement Specifies the paper size loaded in each tray Notes Letter is the US factory default setting A4 is the international factory default setting For tra...

Страница 128: ...e The paper size value must be set MP Feeder Type Plain Paper Card Stock Transparency Glossy Labels Bond Envelope Letterhead Preprinted Colored Paper Custom Type x Specifies the type of paper loaded i...

Страница 129: ...DL Envelope is the international factory default setting Manual Envelope Type Envelope Custom Type x Specifies the type of envelope being manually loaded Note Envelope is the factory default setting N...

Страница 130: ...ock Texture Smooth Normal Rough Specifies the relative texture of the card stock loaded in a specific tray Notes Normal is the factory default setting Settings appear only if card stock is supported T...

Страница 131: ...ing Settings appear only if the custom type is supported Paper Loading menu Menu item Description Card Stock Loading Duplex Off Determines whether 2 sided printing occurs for all jobs that specify Car...

Страница 132: ...rted Notes Duplex sets the printer default to 2 sided printing for every print job unless 1 sided printing is selected from Print Properties If Duplex is selected all print jobs are sent through the d...

Страница 133: ...rait Width 3 48 inches 76 1219 mm Sets the portrait width Notes If the width exceeds the maximum the printer uses the maximum width allowed 12 inches is the US factory default setting Inches can be in...

Страница 134: ...tional setting links together all available output bins except the standard bin The Type Assignment setting assigns each paper type to an output bin Assign Type Bins Plain Paper Bin Card Stock Bin Tra...

Страница 135: ...ation about configured shortcuts Fax Job Log none Prints a report containing information about the last 200 completed faxes Note The page prints when this item is selected Fax Call Log none Prints a r...

Страница 136: ...et in the printer Print Directory none Prints a list of all the resources stored on an optional flash memory card or printer hard disk Notes Job Buffer Size must be set to 100 The optional flash memor...

Страница 137: ...the text appearing on the display Note All languages may not be available for all printers Keyboard Keyboard Type English Francais Francais Canadien Deutsch Italiano Espanol Dansk Norsk Nederlands Sv...

Страница 138: ...Text x None Specifies what is displayed on the upper left and right corners of the home screen Choose from the following options IP Address Hostname Contact Name Location Date Time mDNS DDNS Service...

Страница 139: ...Rate 30 300 Specifies the number of seconds between embedded Web page refreshes Note 120 seconds is the factory default setting Contact Name none Specifies a contact name for the printer Note The cont...

Страница 140: ...job message before canceling the remainder of the print job Notes 90 seconds is the factory default setting When the timer expires any partially printed page still in the printer is printed and then t...

Страница 141: ...ets the printer to never reprint jammed pages Print Recovery Page Protect On Off Lets the printer successfully print a page that may not have printed otherwise Notes Off is the factory default setting...

Страница 142: ...sided 1 sided to 2 sided 2 sided to 1 sided 2 sided to 2 sided Specifies whether an original document is duplex two sided or simplex one sided and then specifies whether the copy should be duplex or s...

Страница 143: ...aper sources to send the copy job to for printing Note Tray 1 is the factory default setting Transparency Separators On Off Places a sheet of paper between transparencies Note On is the factory defaul...

Страница 144: ...und Removal 4 to 4 Adjusts the amount of background visible on a copy Scan edge to edge On Off Specifies if the original document is scanned edge to edge prior to copying Note Off is the factory defau...

Страница 145: ...that most of the memory is set to receive fax jobs Equal is the factory default setting Equal splits the memory for sending and receiving fax jobs into equal amounts Mostly sent specifies that most o...

Страница 146: ...ext and graphics are oriented on the page Notes Off is the factory default setting Long edge assumes binding along the long edge of the page left edge for portrait orientation and top edge for landsca...

Страница 147: ...ow Save as Shortcut On Off Lets you save fax numbers as shortcuts in the printer Max Speed 2400 4800 9600 14400 33600 Specifies the maximum speed in baud at which faxes are sent Custom Job scanning On...

Страница 148: ...source Note On is the factory default setting Paper Source Auto Tray x MP Feeder Specifies the paper source selected to supply paper for the printer to print an incoming fax Output Bin Standard Bin B...

Страница 149: ...hole punch setting for the attached finisher Note Only the settings associated with the installed finisher appear Staple 1 staples 2 staples 4 staples Off Specifies the default staple setting for the...

Страница 150: ...il Connected is the factory default setting The speaker is on and issues a noise until the fax connection is made Always On turns the speaker on Speaker Volume High Low Controls the volume setting Not...

Страница 151: ...gateway port Image Format PDF pdf TIFF tif Specifies the image type for scan to fax Content Text Text Photo Photograph Specifies the type of content that will be scanned to fax Notes Text is used whe...

Страница 152: ...e file for each page of the job Notes On is the factory default setting This menu item applies to all scan functions E mail Settings menu Menu item Description Format PDF pdf Specifies the format of t...

Страница 153: ...A4 is the international factory default setting Duplex Off Long edge Short edge Specifies how the text and graphics are oriented on the page Notes Off is the factory default setting Long edge assumes...

Страница 154: ...FF files are created with one file for each page of the job Notes On is the factory default setting This menu item applies to all scan functions Transmission Log Print log Do not print log Print only...

Страница 155: ...lt setting E mail Server Setup menu Use the following menu to configure the SMTP e mail server Menu item Description E mail Server Setup Primary SMTP Gateway Primary SMTP Gateway Port Secondary SMTP G...

Страница 156: ...an e mail only when the address contains the domain name such as a company domain name Notes E mail can only be sent to the specified domain The limit is one domain E mail Server Setup Web Link Setup...

Страница 157: ...ult setting Resolution 75 150 200 300 400 600 Specifies how many dots per inch are scanned Note 150 dpi is the factory default setting Darkness 5 to 5 Lightens or darkens the output Note 5 is the fact...

Страница 158: ...photo image in relation to file size and the quality of the image Notes 75 is the factory default setting 5 reduces the file size but the quality of the image is lessened 90 provides the best image qu...

Страница 159: ...or FTP addresses Note On is the factory default setting Background Removal 4 to 4 Adjusts the amount of background visible on a copy Note 0 is the factory default setting Contrast Best for Content 0 5...

Страница 160: ...lt setting Resolution 75 150 200 300 400 600 Specifies how many dots per inch are scanned Note 150 dpi is the factory default setting Darkness 5 to 5 Lightens or darkens the output Note 5 is the facto...

Страница 161: ...ality of the image Notes 75 is the factory default setting 5 reduces the file size but the quality of the image is lessened 90 provides the best image quality but the file size is very large This menu...

Страница 162: ...k Properties Preferences Options or Setup Duplex Bind Long Edge Short Edge Defines the way duplexed pages are bound and how the printing on the back of the page is oriented in relation to the printing...

Страница 163: ...heet between each page of the print job This setting is useful when printing transparencies or inserting blank pages in a document for notes Separator Source Tray x MP Feeder Specifies the paper sourc...

Страница 164: ...h On Off Specifies whether a print job receives hole punch finishing Notes This menu is available only when the finisher is installed Off is the factory default setting Print jobs are not hole punched...

Страница 165: ...actory default setting Toner Darkness 1 5 Lightens or darkens the printed output Notes 4 is the factory default setting Selecting a smaller number can help conserve toner If Print Mode is set to Black...

Страница 166: ...de which combinations to use to get the desired printed output From a browser window type the IP address of the printer to access a complete list of color sample pages from the Embedded Web Server Man...

Страница 167: ...r calibration Utilities menu Menu item Description Factory Defaults Do Not Restore Restore Now Returns the printer settings to the factory default settings Notes Do Not Restore is the factory default...

Страница 168: ...e Note Off is the factory default setting Setup menu Menu item Description Printer Language PS Emulation PCL Emulation Specifies the printer language used to communicate data from the computer to the...

Страница 169: ...ads in RAM is temporary Job Accounting Off On Specifies whether to store statistical information about the most recent print jobs on the hard disk Notes Statistical information includes whether the jo...

Страница 170: ...ge containing the PostScript error Note Off is the factory default setting Font Priority Resident Flash Disk Establishes the font search order Notes Resident is the factory default setting A formatted...

Страница 171: ...mbol set for each font name Notes 10U PC 8 is the US factory default setting 12U PC 850 is the international factory default setting A symbol set is a set of alphabetic and numeric characters punctuat...

Страница 172: ...settings Select the desired Paper Size and Orientation before setting Lines per Page PCL Emulation Settings A4 Width 198 mm 203 mm Sets the printer to print on A4 size paper Notes 198 mm is the facto...

Страница 173: ...the PCL 5 interpreter None ignores the Select Paper Feed command 0 199 allows a custom setting to be assigned Tray Renumber View Factory Def None Displays the factory default setting assigned to each...

Страница 174: ...r HTML documents Note The Times font will be used in HTML documents that do not specify a font Menu item Description Font Size 1 255 pt Sets the default font size for HTML documents Notes 12 pt is the...

Страница 175: ...vert On Off Inverts bi tonal monochrome images Notes Off is the factory default setting The font size can be increased in 1 point increments This setting does not apply to GIF or JPEG images Scaling A...

Страница 176: ...printer and their users Function Access Menus Enable Disable Enables access to the menus Note Enable is the factory default setting Function Access Copy Access No authentication required Require User...

Страница 177: ...sword is selected when the Scan to USB Drive button is touched a prompt for authentication appears The same prompt occurs if a function button like Scan or E mail is touched on the home screen If Func...

Страница 178: ...confidential job is held in memory before it is deleted Note Off is the factory default setting Password Protect Supplies Menu Accept Advanced Password only Accept Advanced and User Passwords Not Prot...

Страница 179: ...the Network Ports menu Note Accept Advanced Password only is the factory default setting Password Protect Shortcuts Accept Advanced Password only Accept Advanced and User Passwords Not Protected Prote...

Страница 180: ...n Time Zone Not Set US Hawaii US Alaska US Can Pacific Tijuana US Can Mountain US Can Central US Can Eastern US Can Atl Newfoundland Brasilia Braz Mid Atlantic Azores Cape Verde Is GMT Ireland London...

Страница 181: ...Yes No Specifies whether Daylight Savings time is applicable Time Server IP None Specifies the time server IP address Note The time server must be set to None to allow permanent manual time and date...

Страница 182: ...a four field IP address TCP IP Set static IP address Address Netmask Gateway Configures the TCP IP address information TCP IP Enable DHCP On Off Enable RARP On Off Enable BOOTP On Off AutoIP On Off E...

Страница 183: ...6 menu Use the following menu items to view or set the Internet Protocol version 6 IPv6 information Note This menu is available only for network models or printers attached to print servers Menu item...

Страница 184: ...er Setup SMTP Server Authentication Off Device Userid and password User ID and password User e mail and password Specifies the type of user authentication required for scan to e mail privileges Note O...

Страница 185: ...automatically switch to PCL emulation when a print job requires it regardless of the default printer language Notes On is the factory default setting When the Off setting is used the printer does not...

Страница 186: ...reduce the size of the parallel serial and USB buffers Changing this setting from the control panel and then exiting the menus causes the printer to restart The menu selection is updated Job Buffering...

Страница 187: ...language specified in the Setup menu if the PCL SmartSwitch setting is Off NPA Mode On Off Auto Sets the printer to perform the special processing required for bidirectional communication following th...

Страница 188: ...dard protocol The On setting processes raw binary PostScript print jobs NetWare menu Menu item Description Login Name none Specifies the assigned NetWare login name Print Mode PSERVER RPRINTER Shows t...

Страница 189: ...the network If no default zone exists the zone marked with an is the default setting LexLink menu Menu item Description View Nickname none Shows the assigned LexLink nickname Activate On Off Activate...

Страница 190: ...vides information about sending faxes using fax numbers shortcut numbers or the address book and changing settings FTP guide Provides information about scanning documents directly to an FTP server usi...

Страница 191: ...ll print on the paper loaded in the selected tray This may cause clipping of text or images Select the paper tray with the correct paper size Touch Use current src to ignore the message and print from...

Страница 192: ...to clear Disk Corrupted Reformat The printer attempted a hard disk recovery on a corrupted hard disk and the hard disk cannot be repaired The hard disk must be reformatted Touch Reformat disk to refo...

Страница 193: ...t power off while the printer is formatting the flash memory Incorrect orientation Change the orientation of the paper in the tray or the position of the paper guides Make sure the print job is reques...

Страница 194: ...printer finds a tray that has the correct paper type and size it feeds from that tray If the printer cannot find a tray with the correct paper type and size it prints from the default source Cancel th...

Страница 195: ...pears Printer locked enter PIN to unlock The control panel is locked Enter the correct PIN to unlock it Printing Wait for the message to clear Programming disk DO NOT POWER OFF Wait for the message to...

Страница 196: ...job One or more messages which interrupted a scan job are now cleared Replace the original documents in the scanner to restart the scan job Touch Cancel Job if a scan job is processing when the messa...

Страница 197: ...the cover is closed Sending page n The printer sends page n of the fax job where n is the number of the page sent Wait for the message to clear Note Serial x The printer is using a serial cable conne...

Страница 198: ...Cancel the current print job Waiting for redial The printer is waiting to redial the fax number Wait for the message to clear 1565 Emul Error Load Emul Option The printer automatically clears the mes...

Страница 199: ...the link buffers are set to Auto and then exit the menus to activate the link buffer changes When Ready appears enable Resource Save Install additional memory 37 Insufficient memory to collate job To...

Страница 200: ...ion x error Check that the serial cable is connected correctly and is the proper one for the serial port Check that the serial interface parameters protocol baud parity and data bits are set correctly...

Страница 201: ...Continue to clear the message The printer discards any data received through the USB port Make sure the USB Buffer menu item is not set to Disabled 57 Configuration change held jobs were not restored...

Страница 202: ...a larger hard disk 63 Unformatted disk Touch Continue to clear the message and continue printing Format the disk If the error message remains the hard disk may be defective and require replacing 80 S...

Страница 203: ...yan magenta and yellow photoconductors must all be replaced at the same time The black photoconductor can be replaced separately 88 color toner low When this message appears the toner is low When the...

Страница 204: ...If the service message appears again contact Customer Support and report the message 204...

Страница 205: ...ol panel 1 Make sure the printer is on and Ready appears 2 On the home screen touch Note If is not on the home screen print a menu settings page to review the status of the supplies Printing a menu se...

Страница 206: ...rinting the remaining copies Replacing supplies A message appears on the display when a replacement supply item is needed or when maintenance is required To order photoconductors toner cartridges a wa...

Страница 207: ...Door tab 1 Unpack the replacement waste toner box and accessories 2 Open Door E front printer door Warning To avoid overexposing the photoconductors do not leave the door open for more than 10 minutes...

Страница 208: ...3 Grasp the E6 Door tab and then push the door down 4 Remove the old printhead lens cleaner from Door E and then discard it 5 Remove the waste toner box 208...

Страница 209: ...6 Place the plastic cover over the waste toner box 7 Place the waste toner box in the recycling bag 8 Use the new printhead lens cleaner to clean the printhead lenses 209...

Страница 210: ...9 Insert the new waste toner box 10 Place the new printhead lens cleaner in the notches of Door E 11 Close Door E6 210...

Страница 211: ...the printer paper path Cleaning the printhead lenses Clean the printhead lenses when you replace the waste toner box or when you encounter print quality problems 1 Waste toner box 2 Door E6 3 Door E...

Страница 212: ...not leave the door open for more than 10 minutes 2 Grasp the E6 Door tab and then push the door down 3 Remove the waste toner box 4 Locate and remove the printhead lens cleaner from Door E Note If yo...

Страница 213: ...ded tip of the printhead lens cleaner into the first printhead lens opening 6 Push the printhead lens cleaner all the way to the back of the lens and then pull it out 7 Clean the remaining three print...

Страница 214: ...8 Insert the waste toner box 9 Place the printhead lens cleaner in the notches of Door E 10 Close Door E6 214...

Страница 215: ...ta and yellow photoconductors when 84 Replace color pc units appears 1 Open Door E front printer door Warning To avoid overexposing the photoconductors do not leave the door open for more than 10 minu...

Страница 216: ...he photoconductor s specified on the display Photoconductor color Opening name Black E1 Cyan E2 Magenta E3 Yellow E4 4 Unpack the replacement photoconductor 5 Align and insert the end of the photocond...

Страница 217: ...e tape from the top of the photoconductor 7 Press the button forward to insert the photoconductor while removing the casing 8 Lift the bar up and then press latch E5 down so that it holds the bar in p...

Страница 218: ...t continue printing until the specified cartridge is replaced 1 Make sure the printer is on and Ready or 88 Replace color toner appears 2 Unpack the new cartridge and set it near the printer 3 Open Do...

Страница 219: ...m the printer 6 Align the arrow shaped handle with the unlock symbol and then insert the toner cartridge all the way into the opening 7 Lock the cartridge by turning the arrow shaped cartridge handle...

Страница 220: ...aper from the paper support and paper exit tray 3 Dampen a clean lint free cloth with water Warning Do not use household cleaners or detergents as they may damage the finish of the printer 4 Wipe only...

Страница 221: ...cation all media handling options must be removed from the printer For shipping pack the printer and media handling options securely to avoid damage Before moving the printer CAUTION The base printer...

Страница 222: ...ter using a cart that has a surface able to support the full footprint of the printer Move the options using a cart that has a surface able to support the dimensions of the options Avoid severe jarrin...

Страница 223: ...from the back of the printer and scanner 5 Remove any paper or specialty media from the standard exit bin 6 Remove any paper or specialty media from the multipurpose feeder 7 Grasp the extension on t...

Страница 224: ...ed to roll the scanner and its shelf elsewhere the scanner weighs 25 kg 55 lb therefore it requires two people to roll it safely Setting the printer up in a new location To set up your printer configu...

Страница 225: ...Verify that the printer and scanner are functioning properly by printing a menu settings page Shipping the printer If shipping the printer the scanner and any options save the original packaging or ca...

Страница 226: ...panel menus Since many people often use a printer a support person may choose to lock the control panel menus so that the settings cannot be changed from the control panel 1 Turn the printer off 2 Fr...

Страница 227: ...inter hard disk is installed and working properly Warning All files and resources on the printer hard disk will be deleted Resources residing in the printer flash memory or RAM will not be affected 1...

Страница 228: ...be available Some data will continue to be processed while the printer is locked Reports such as user or event logs can be retrieved from a locked printer To lock control panel menus 1 Open a Web bro...

Страница 229: ...for any IP communications to take place Supporting SNMPv3 Simple Network Management Protocol version 3 SNMPv3 allows for encrypted and authenticated network connections It also lets a system support p...

Страница 230: ...s Once a password is created it must be entered to access the Configuration and Reports pages of the Embedded Web Server An administrative password for the Embedded Web Server must be created before S...

Страница 231: ...and try again 7 Select a setting for each listed port and then click Submit There are three ways to configure the TCP and UDP network ports Disabled Port is disabled and never allows network connectio...

Страница 232: ...lugged into any surge protectors uninterrupted power supplies or extension cords Other electrical equipment plugged into the outlet is working The printer is turned on The printer cable is securely at...

Страница 233: ...nd then turn the printer back on If Performing Self Test and Ready do not appear turn the printer off and contact Customer Support Error message about reading USB drive appears Make sure the USB drive...

Страница 234: ...sure printer cables are securely connected Check the cable connections to the printer and print server to make sure they are secure For more information see the setup documentation that came with the...

Страница 235: ...e and compare the settings for each tray If necessary adjust the settings from the Paper Size Type menu Note The multipurpose feeder does not automatically sense the paper size You must set the size f...

Страница 236: ...ter is plugged in the power is on and Ready appears Scanner unit does not close Make sure there are no obstructions 1 Lift the scanner unit 2 Remove any obstruction keeping the scanner unit open 3 Low...

Страница 237: ...atterns moir appear in the output On the copy screen touch the Text Photo or Printed Image icon Rotate the original document on the scanner glass On the copy screen adjust the scale setting Black text...

Страница 238: ...t successful These are possible solutions Try one or more of the following Check the cable connections Make sure the network or USB cable is securely connected to the computer and the printer An error...

Страница 239: ...the computer and the printer Solving fax problems Caller ID is not shown Contact your telecommunications company to verify that your telephone line is subscribed to the caller ID service If your regi...

Страница 240: ...e for the fax machine Is there a dial tone Place a test call to the telephone number to which you want to send a fax to make sure that it is working correctly If the telephone line is being used by an...

Страница 241: ...ow Can receive but not send faxes These are possible solutions Try one or more of the following Is the printer in Fax mode On the home screen touch Fax to put the printer in Fax mode Is the document l...

Страница 242: ...33600 7 Click Submit Blocking junk faxes 1 Open a Web browser 2 In the address bar type the IP address of the printer and then press Enter 3 Click Configuration 4 Click Fax Settings 5 Click Analog Fax...

Страница 243: ...nter Turn the printer off Wait 10 seconds Turn the printer back on Finisher If the finisher does not operate correctly these are possible solutions Try one or more of the following Make sure the conne...

Страница 244: ...ly jams These are possible solutions Try one or more of the following Check the paper Use recommended paper For more information see the chapter about paper and specialty media guidelines Make sure th...

Страница 245: ...the following paper sizes supported by Bin 2 A3 A4 B4 folio legal letter or tabloid 11 x 17 in Page that jammed does not reprint after you clear the jam In the Setup menu Jam Recovery is set to Off S...

Страница 246: ...ges 1 Turn the printer off 2 Load letter or A4 size paper in the tray in the long edge orientation 3 From the keypad hold down and while turning the printer on 4 Release the buttons when the screen wi...

Страница 247: ...aper size loaded Check the Paper Size setting Make sure the Paper Size setting matches the paper loaded in the tray Dark lines ABCDE ABCDE ABCDE One or more of the photoconductors may be defective If...

Страница 248: ...lored line white line or incorrectly colored line These are possible solutions Try one or more of the following Clean the printhead lenses The printhead lenses may be dirty Is a toner cartridge defect...

Страница 249: ...per in its original wrapper until you use it Check the Paper Type setting Make sure the Paper Type setting matches the paper loaded in the tray Check the paper Avoid textured paper with rough finishes...

Страница 250: ...ect positions for the paper size loaded Check the paper Make sure you are using paper that meets the printer specifications Print is too light These are possible solutions Try one or more of the follo...

Страница 251: ...tive Replace the toner cartridge Print is too dark Check the darkness brightness and contrast settings The Toner Darkness setting is too dark the RGB Brightness setting is too dark or the RGB Contrast...

Страница 252: ...r can be replaced separately Is there toner in the paper path Contact Customer Support Toner rubs off These are possible solutions Try one or more of the following Check the Paper Type setting Make su...

Страница 253: ...tain color What is CMYK color Cyan magenta yellow and black inks or toners can be printed in various amounts to produce a large range of colors observed in nature For example cyan and yellow can be co...

Страница 254: ...printed page has a red tint then decreasing both magenta and yellow could potentially improve the color balance My color transparencies seem dark when they are projected Is there anything I can do to...

Страница 255: ...labeled on the box through the selected color conversion table By examining Color Samples sets a user can identify the box whose color is the closest to the desired color The color combination labeled...

Страница 256: ...The closer the value is to 1 the narrower the color sample range will appear 9 Click Print to print the detailed Color Samples set Contacting Customer Support When you call Customer Support describe t...

Страница 257: ...erved UNITED STATES GOVERNMENT RIGHTS This software and any accompanying documentation provided under this agreement are commercial computer software and documentation developed exclusively at private...

Страница 258: ...cification RSS 210 Operation is subject to the following two conditions 1 this device may not cause interference and 2 this device must accept any interference including interference that may cause un...

Страница 259: ...egenden Anforderungen und den brigen einschl gigen Bestimmungen der Richtlinie 1999 5 EG befindet LEXMARK INTERNATIONAL INC 1999 5 English Hereby Lexmark International Inc declares that this type of e...

Страница 260: ...a da je ta izdelek v skladu z bistvenimi zahtevami in ostalimi relevantnimi dolo ili direktive 1999 5 ES Svenska H rmed intygar Lexmark International Inc att denna produkt st r i verensst mmelse med d...

Страница 261: ...on If your home has specially wired alarm equipment connected to the telephone line ensure the installation of this equipment does not disable your alarm equipment If you have questions about what wil...

Страница 262: ...t provide for the effective hand over of a call to another device connected to the same line This equipment should not be used under any circumstances that may constitute a nuisance to other Telecom c...

Страница 263: ...The product is generating hard copy output from hard copy original documents 850 W Scanning The product is scanning hard copy documents 240 W Ready The product is waiting for a print job 220 W Power S...

Страница 264: ...If this product has an off mode which still consumes a small amount of power then to completely stop product power consumption disconnect the power supply cord from the wall outlet Total energy usage...

Страница 265: ...203 900 999 Service message 203 Symbols scan to computer screen options 97 98 A Active NIC menu 185 address book e mail setting up 68 address book fax using 87 ADF copying using 56 Answering 191 Apple...

Страница 266: ...celing 72 e mail function setting up 68 e mail screen advanced options 73 options 72 73 E mail Server Setup menu 155 184 E mail Settings menu 152 e mailing adding message line 71 adding subject line 7...

Страница 267: ...6 228 entire printer 228 M max speed and max yield printing 106 memory card installing 29 troubleshooting 244 menu settings page printing 104 205 menus Active NIC 185 AppleTalk 189 Bin Setup 134 Confi...

Страница 268: ...int 233 Large jobs do not collate 235 multiple language PDFs do not print 233 paper curl 249 paper frequently jams 244 tray linking does not work 235 unexpected page breaks occur 235 printer configura...

Страница 269: ...8 Waiting for redial 198 printer options troubleshooting drawers 243 finisher 243 flash memory card 243 hard disk with adapter 243 internal print server 244 memory card 244 option not working 242 USB...

Страница 270: ...r 232 checking an unresponsive scanner 238 contacting Customer Support 256 Door A 232 FAQ about color printing 253 troubleshooting copy copier does not respond 236 partial document or photo copies 237...

Страница 271: ...02 USB port 33 USB USB x 198 using RJ11 adapter 76 Utilities menu 167 V Verify print jobs 100 printing from Macintosh computer 101 printing from Windows 101 W Waiting 198 Waiting for redial 198 waste...

Страница 272: ...Printed in USA S510 7102 00...

Отзывы: