MAINTENANCE
2.26
ENGINE OIL LEVEL
The oil tank is located on the left side of the vehicle. To
check the oil level:
1.
Set machine on a level surface.
2.
Start and run engine for 20-30 seconds. This will return
oil to its true level in the oil tank. About a cup of oil will
remain in the crankcase.
3.
Stop engine, remove dipstick and wipe dry with a clean
cloth.
4.
Reinstall dipstick, screwing into place.
NOTE: The dipstick must be screwed completely in to en-
sure accurate measurement.
5.
Remove dipstick and check to see that the oil level is in
the normal range. Add oil as indicated by the level on
the dipstick. Do not overfill.
NOTE: Rising oil level between checks in cool weather
driving, can indicate moisture collecting in the oil reservoir.
If the oil level is over the full mark, change the oil.
OIL AND FILTER CHANGE
1.
Place vehicle on a level surface.
2.
Run engine two to three minutes until warm.
Stop
engine.
3.
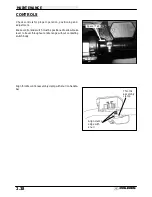
Clean area around drain plug (B) at bottom of oil tank.
4.
Place a drain pan beneath oil tank and remove drain
plug. CAUTION: Oil may be hot. Do not allow hot oil to
come into contact with skin as serious burns may result.
5.
Allow oil to drain completely.
6.
Replace sealing washer (A) on drain plug. NOTE: The
sealing surfaces on drain plug and oil tank should be
clean and free of burrs, nicks or scratches.
7.
Reinstall drain plug and torque to 14 ft. lbs. (1.9 kgm).
8.
Loosen clamp (E) or bolt (D).
9.
Remove oil hose from screen fitting (C) on bottom of
oil tank.
10. Remove screen fitting (C).
11. Clean screen thoroughly.
12. Apply Loctite
t
PST 505 or an equivalent pipe
thread sealant or PTFE sealant tape to clean, oil
free threads of fitting.
13. Install fitting and torque to 14-17 ft./lbs..
14. Install oil hose on fitting and tighten clamp to 25
inch/lbs.
Dipstick
ADD 8 OZ.
NORMAL
FULL
Maintain Oil Level In Normal Range
Screw in completely to check
Recommended Engine Oil:
Polaris Premium 4 All Season
Synthetic, 0W/40, PN 2871281
Ambient Temperature Range:
-40
°
F to 120
°
F
OR
A
B
C
C
D
E
Содержание Sportsman 400
Страница 5: ...SPORTSMAN 400 A01CH42AB SPORTSMAN 400 A01CH42AA GENERAL INFORMATION 1 3 MODEL COLOR IDENTIFICATION ...
Страница 6: ...SPORTSMAN 400 A01CH42AC GENERAL INFORMATION 1 4 MODEL COLOR IDENTIFICATION ...
Страница 21: ...Newton Meter to Pound Foot and Pound Inch GENERAL INFORMATION 1 19 TORQUE CONVERSIONS ...
Страница 22: ...Newton Meter to Pound Foot and Pound Inch GENERAL INFORMATION 1 20 TORQUE CONVERSIONS ...
Страница 94: ...ENGINE 3 25 CYLINDER HEAD EXPLODED VIEW 1 Remove the two 6mm flange bolts A from cylinder head A ...
Страница 152: ...Forward FUEL SYSTEM CARBURETION 4 2 FUEL TANK ASSEMBLY ...
Страница 325: ...BRAKES 9 22 FRONT BRAKE CALIPER EXPLODED VIEW Pads Caliper Mount Piston Pin Boot Square O Rings Adjuster Screw ...
Страница 366: ...ELECTRONIC SPEEDOMETER WIRING DIAGRAM ELECTRICAL 10 32 ...
Страница 372: ...ELECTRICAL 10 38 NOTES ...
Страница 379: ...ELECTRICAL 10 39 WIRING DIAGRAM 2001 SPORTSMAN 400 ...
Страница 380: ...ELECTRICAL 10 40 WIRING DIAGRAM 2001 SPORTSMAN 500 EARLY ...
Страница 381: ...ELECTRICAL 10 41 WIRING DIAGRAM 2001 SPORTSMAN 500 LATE ...

