BODY / STEERING / SUSPENSION
5.12
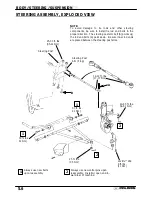
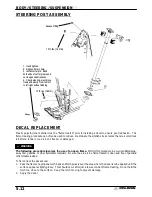
STEERING POST ASSEMBLY
Grease Fitting
12 ft. lbs. (16 Nm)
1. Hand tighten.
2. Align cotter pin hole.
3. Install cotter pin. Bend
both ends of cotter pin around
nut in opposite directions.
4. Check steering, must move
freely and easily from full left
to full right without binding.
12 ft. lbs. (16 Nm)
DECAL REPLACEMENT
Plastic polyethylene material must be “flame treated” prior to installing a decal to ensure good adhesion. The
flame treating procedure can often be used to reduce or eliminate the whitish stress marks that are sometimes
left after a fender or cab is bent, flexed, or damaged.
WARNING
The following procedure involves the use of an open flame. Perform this procedure in a well ventilated area,
away from gasoline or other flammable materials. Be sure the area to be flame treated is clean and free of gasoline
or flammable residue.
To flame treat the decal area:
1.
Pass the flame of a propane torch back and forth quickly over the area where the decal is to be applied until the
surface appears slightly glossy. This should occur after just a few seconds of flame treating. Do not hold the
torch too close to the surface. Keep the torch moving to prevent damage.
2.
Apply the decal.
Содержание Sportsman 400
Страница 5: ...SPORTSMAN 400 A01CH42AB SPORTSMAN 400 A01CH42AA GENERAL INFORMATION 1 3 MODEL COLOR IDENTIFICATION ...
Страница 6: ...SPORTSMAN 400 A01CH42AC GENERAL INFORMATION 1 4 MODEL COLOR IDENTIFICATION ...
Страница 21: ...Newton Meter to Pound Foot and Pound Inch GENERAL INFORMATION 1 19 TORQUE CONVERSIONS ...
Страница 22: ...Newton Meter to Pound Foot and Pound Inch GENERAL INFORMATION 1 20 TORQUE CONVERSIONS ...
Страница 94: ...ENGINE 3 25 CYLINDER HEAD EXPLODED VIEW 1 Remove the two 6mm flange bolts A from cylinder head A ...
Страница 152: ...Forward FUEL SYSTEM CARBURETION 4 2 FUEL TANK ASSEMBLY ...
Страница 325: ...BRAKES 9 22 FRONT BRAKE CALIPER EXPLODED VIEW Pads Caliper Mount Piston Pin Boot Square O Rings Adjuster Screw ...
Страница 366: ...ELECTRONIC SPEEDOMETER WIRING DIAGRAM ELECTRICAL 10 32 ...
Страница 372: ...ELECTRICAL 10 38 NOTES ...
Страница 379: ...ELECTRICAL 10 39 WIRING DIAGRAM 2001 SPORTSMAN 400 ...
Страница 380: ...ELECTRICAL 10 40 WIRING DIAGRAM 2001 SPORTSMAN 500 EARLY ...
Страница 381: ...ELECTRICAL 10 41 WIRING DIAGRAM 2001 SPORTSMAN 500 LATE ...


