MAINTENANCE
2.32
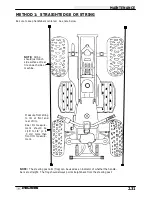
METHOD 2 CHALK
1.
Place machine on a smooth level surface.
2.
Set handlebars in a straight ahead position and
secure handlebars in this position.
NOTE:
The
steering frog can be used as an indicator of whether
the handlebars are straight. The frog should always
point straight back from the steering post.
3.
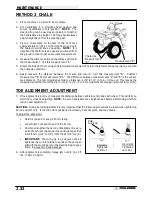
Place a chalk mark on the face of the front tires
approximately 10
″
(25.4 cm) from the floor as close to
the hub/axle center line as possible. NOTE: It is
important that both marks be equally positioned from
the ground in order to get an accurate measurement.
4.
Measure the distance between the marks and record
the measurement. Call this measurement “A”.
5.
Rotate the tires 180
°
by moving vehicle forward or backward. Position chalk marks facing rearward, even with
the hub/axle centerline.
6.
Again measure the distance between the marks and record.
Call this measurement “B”.
Subtract
measurement “B” from measurement “A”. The difference between measurements “A” and “B” is the vehicle
toe alignment. The recommended vehicle toe tolerance is 1/8
″
to 1/4
″
(.3 to .6 cm) toe out. This means the
measurement at the front of the tire (A) is 1/8
″
to 1/4
″
(.3 to .6 cm) wider than the measurement at the rear (B).
TOE ALIGNMENT ADJUSTMENT
7.
If toe alignment is incorrect, measure the distance between vehicle center and each wheel. This will tell you
which tie rod needs adjusting. NOTE: Be sure handlebars are straight ahead before determining which tie
rod(s) need adjustment.
CAUTION: During tie rod adjustment it is very important that the following precautions be taken when tightening
tie rod end jam nuts. If the rod end is positioned incorrectly it will not pivot, and may break.
To adjust toe alignment:
S
Hold tie rod end to keep it from rotating.
S
Loosen jam nuts at both end of the tie rod.
S
Shorten or lengthen the tie rod until alignment is as re-
quiredtoachievetheproper toesettingasspecified
in Method1 (1/16
″
to1/8
″
) or Method 2(1/8
″
to 1/4
″
).
S
IMPORTANT: When the tie rod end jam nuts are
tightened, be sure to hold tie rod ends so they are par-
allel with the steering arm or the steering frog, respec-
tively, to prevent rod end damage.
8.
After alignment is complete, torque jam nuts to 12-14 ft.
lbs. (1.66-1.93 kg-m).
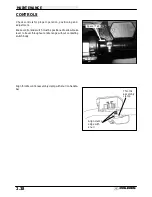
Chalk Line
Measurement
“A”
Measurement “B”
Incorrectly
Tightened
Jam Nut
Correctly
Tightened
Jam Nut
Hold
Rod End
Содержание Sportsman 400
Страница 5: ...SPORTSMAN 400 A01CH42AB SPORTSMAN 400 A01CH42AA GENERAL INFORMATION 1 3 MODEL COLOR IDENTIFICATION ...
Страница 6: ...SPORTSMAN 400 A01CH42AC GENERAL INFORMATION 1 4 MODEL COLOR IDENTIFICATION ...
Страница 21: ...Newton Meter to Pound Foot and Pound Inch GENERAL INFORMATION 1 19 TORQUE CONVERSIONS ...
Страница 22: ...Newton Meter to Pound Foot and Pound Inch GENERAL INFORMATION 1 20 TORQUE CONVERSIONS ...
Страница 94: ...ENGINE 3 25 CYLINDER HEAD EXPLODED VIEW 1 Remove the two 6mm flange bolts A from cylinder head A ...
Страница 152: ...Forward FUEL SYSTEM CARBURETION 4 2 FUEL TANK ASSEMBLY ...
Страница 325: ...BRAKES 9 22 FRONT BRAKE CALIPER EXPLODED VIEW Pads Caliper Mount Piston Pin Boot Square O Rings Adjuster Screw ...
Страница 366: ...ELECTRONIC SPEEDOMETER WIRING DIAGRAM ELECTRICAL 10 32 ...
Страница 372: ...ELECTRICAL 10 38 NOTES ...
Страница 379: ...ELECTRICAL 10 39 WIRING DIAGRAM 2001 SPORTSMAN 400 ...
Страница 380: ...ELECTRICAL 10 40 WIRING DIAGRAM 2001 SPORTSMAN 500 EARLY ...
Страница 381: ...ELECTRICAL 10 41 WIRING DIAGRAM 2001 SPORTSMAN 500 LATE ...


