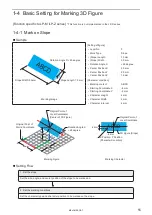


69
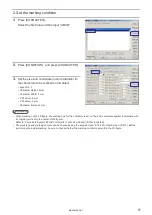
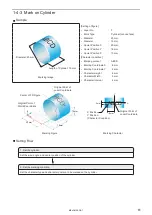
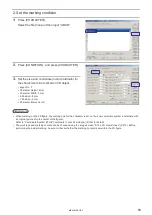
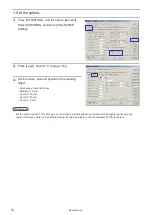
2. Set the marking condition.
1.
Press [CHARACTER].
Select the first line and then input “ABCD”.
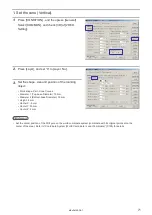
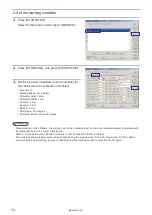
2.
Press [CONDITION] , and press [CHARACTER].
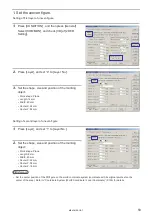
3.
Set the size and coordinate (local coordinate) for
the characters to be marked on 3D object.
•
Layer No.: 0
•
Character Height: 4 mm
•
Character Width: 3 mm
•
X Position: -8 mm
•
Y Position: -2 mm
•
Character Interval: 4 mm
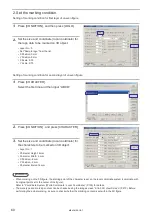
Reference
• When marking on the 3D figure, the starting point of the character is set on the local coordinate system (coordinate with
its original point set to the center of the figure).
Refer to “Coordinate System (World Coordinate / Local Coordinate)” (P.135) for details.
•
The work type and marking content can be checked using the image screen “2-14-3 3D View Screen” (P.213). Before
performing the actual marking, be sure to check whether the marking content is set within the 3D figure.
ME-LPMSZ-OP-7
Содержание LP-M Series
Страница 11: ...1 Basic Operation Procedure ME LPMSZ OP 7 ...
Страница 76: ...76 MEMO ME LPMSZ OP 7 ...
Страница 77: ...2 Description of Operation Screen ME LPMSZ OP 7 ...
Страница 102: ...102 Symbol ME LPMSZ OP 7 ...
Страница 255: ...Troubleshooting ME LPMSZ OP 7 ...
Страница 276: ...Appendix ME LPMSZ OP 7 ...
Страница 304: ...Index ME LPMSZ OP 7 ...
Страница 307: ...No 9000 0063 56V ...
Страница 308: ... Panasonic Industrial Devices SUNX Co Ltd 2013 2019 March 2019 9000 0063 56V ...