M A I N T E N A N C E
126 / 216
XS10000_manual_ger_eng_it_V1.1.2.doc
R. Kistler
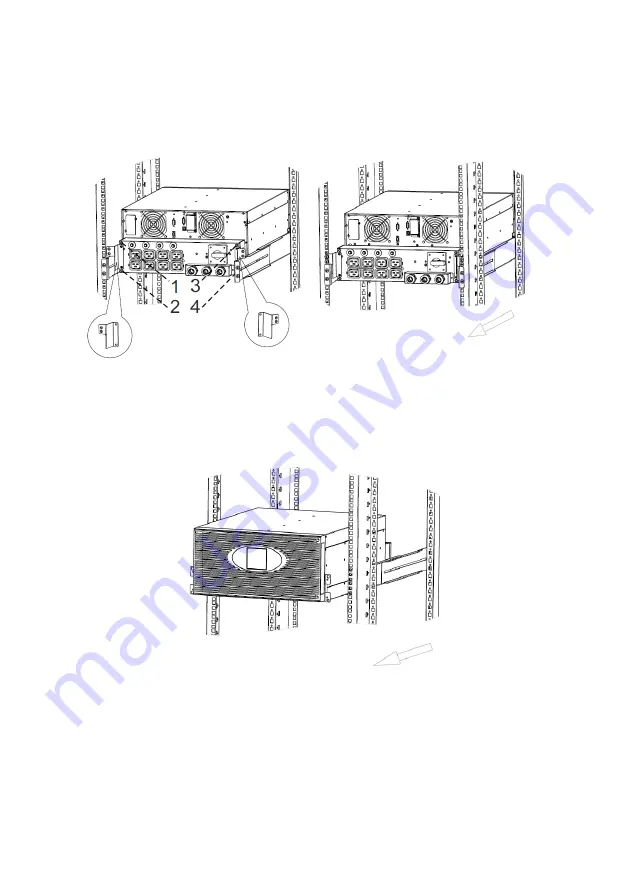
2. Secure the PDU with the support bracket to the rack and dis-
connect this from the UPS system. Unscrew the four screws to
do this (see Figure 38).
Figure 38: Removing the XANTO S 10000, step 2/3
3. Unscrew the 19" mounting bracket of the UPS system on the
front side of the rack and pull the UPS system out of the rack
(see Figure 39).
Figure 39: Removing the XANTO S 10000, step 3/3
4. Unscrew and remove the 19" mounting bracket from the UPS
system.
5. The installation of the new UPS system is done in the reverse
order.
Содержание XANTO S 10000
Страница 2: ...2 216 XS6000 XS10000_manual_ger_eng_it_V1 1 2 doc R Kistler ...
Страница 70: ...T E C H N I S C H E D A T E N 70 216 XS6000 XS10000_manual_ger_eng_it_V1 1 2 doc R Kistler 9 3 CE Bestätigung ...
Страница 72: ...72 216 XS6000 XS10000_manual_ger_eng_it_V1 1 2 doc R Kistler ...
Страница 74: ...74 216 XS6000 XS10000_manual_ger_eng_it_V1 1 2 doc R Kistler ...
Страница 142: ...T E C H N I C A L D A T A 142 216 XS6000 XS10000_manual_ger_eng_it_V1 1 2 doc R Kistler 9 3 CE conformity ...
Страница 144: ...144 216 XS6000 XS10000_manual_ger_eng_it_V1 1 2 doc R Kistler ...
Страница 146: ...146 216 XS6000 XS10000_manual_ger_eng_it_V1 1 2 doc R Kistler ...
Страница 214: ...D A T I T E C N I C I 214 216 XS6000 XS10000_manual_ger_eng_it_V1 1 2 doc R Kistler 9 3 Dichiarazione CE ...
Страница 216: ...216 216 XS6000 XS10000_manual_ger_eng_it_V1 1 2 doc R Kistler ...


