7/26/04
C-5
G. Observe the 4 marks made by the BLACK heads in the rear right hand corner -
see Figure A.
H. Using the second BLACK mark from the rear of the printer as a guide, and using a
straight edge to ensure accuracy, create a line continuing to the right side of the platen -
see
Figure A
.
I. Using masking tape, affix a piece of tape along this straight line -
see Figure A.
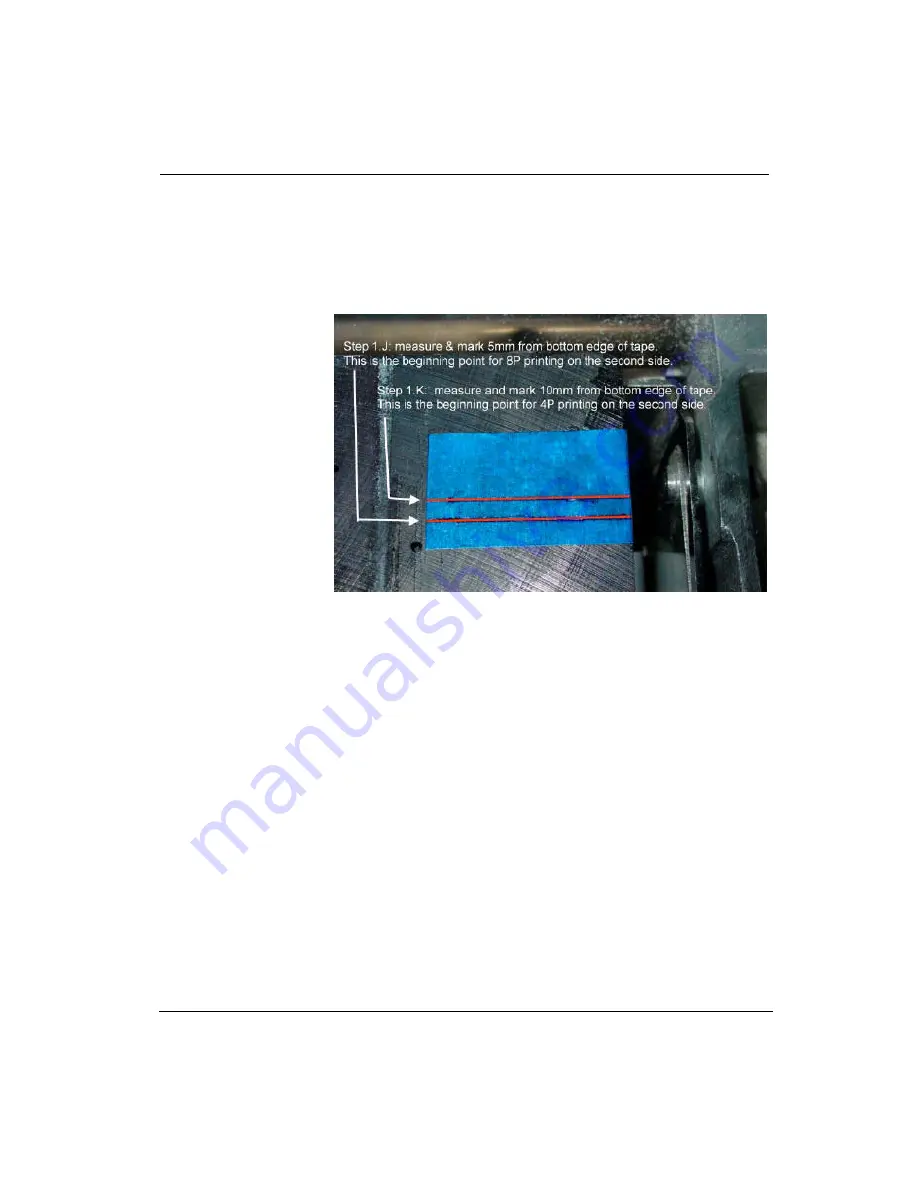
J. Measure 5 mm
from the front edge
of the tape for 8-pass
printing and draw a
straight line to the
edge of the platen. -
see figure B.
K. Measure 10 mm
from the front edge
of the tape for 4-pass
printing and draw a
straight line to the
edge of the platen. -
see figure B
.
L. These lines
accurately reflects
where your
Océ
Arizona 500 begins
Figure B
printing in 8- and
4-pass modes, and will be used to line up the image on the reverse side.
Step 2: Printing the first side of your graphic
M. From the control panel, select
Menu >>> Operator >>> Print Parameters >>>
Statistics
and turn “Statistics”
off
.
N. In Onyx Rip Queue, highlight the
Océ
Arizona 500 and select
Change
.
O. From the
Change Media and Placement
window select
Setup
.
P. From the
Placement Strategy
window, set the
Top
and
Left
offsets to
0.00
and set
Justification
to
Right
.
Q. Open the file to be printed in Pre-Flight.
R. Under
Preview & Size
tab, ensure the
X
and
Y
origins are set for
0
(zero).
S. In the
menu,
Print Setup
window, select the
Marks
tab and check to see that
Label
is
not enabled
.
T. Print the selected job(s). Be sure it is aligned to the right.
Содержание Arizona 500
Страница 1: ...Oc Arizona 500 User Manual Revision F July 26 2004 Using ColorBlend six color printing technology...
Страница 2: ...Oc Display Graphics Systems 2004 All Rights Reserved...
Страница 6: ...Oc vi...
Страница 12: ...Oc Table of Contents xii...
Страница 26: ...Oc Ink System 2 6...
Страница 54: ...Oc Media System 3 28...
Страница 88: ...Oc Control Panel 4 34...
Страница 106: ...Oc Printer Maintenance 5 18...
Страница 114: ...Oc Error Messages and Troubleshooting 6 8...
Страница 116: ...Oc A 2 Figure A 1 Copies Reprints Menu...
Страница 117: ...7 26 04 A 3 Figure A 2 Print Parameters Menu...
Страница 118: ...Oc A 4 Figure A 3 Test Prints Menu...
Страница 119: ...7 26 04 A 5 Figure A 4 Maintenance Menu Part 1...
Страница 120: ...Oc A 6 Figure A 5 Maintenance Menu Part 2...
Страница 121: ...7 26 04 A 7 Figure A 6 Prewarm Menu...
Страница 122: ...Oc A 8 Figure A 7 Media Menu...
Страница 123: ...7 26 04 A 9 Figure A 8 Ink Menu...
Страница 124: ...Oc A 10 Figure A 9 About Printer Menu...
Страница 125: ...7 26 04 A 11 Figure A 10 Units Menu...
Страница 126: ...Oc A 12 Figure A 11 Set Clock Menu...
Страница 127: ...7 26 04 A 13 Figure A 12 Configure I O Menu...
Страница 128: ...Oc A 14...
Страница 136: ...Oc B 8 The printer is now ready to receive the first print of the day Photo 1...
Страница 137: ...7 26 04 B 9 Photo 2 Photo 3...
Страница 138: ...Oc B 10 Photo 4 Photo 5...
Страница 152: ...Oc C 14...
Страница 156: ...Oc Index Index 4...


