background image

0

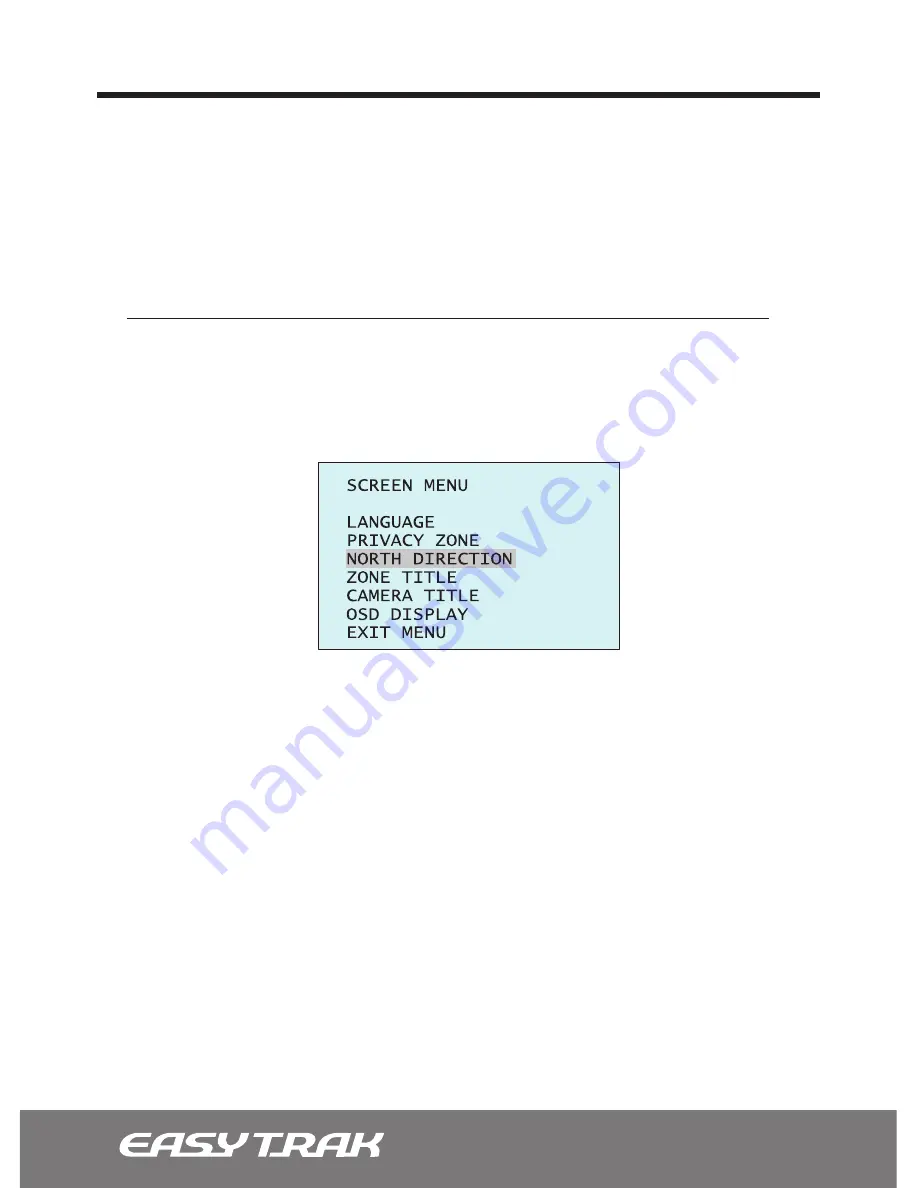
3.3.3 North Direction ([MENU] Button 

_

 Screen 

_

 North Direction)  

North Direction is a user-defined setting that may correspond to magnetic north or well-
known landmark. It is used to approximate the camera’s pointing direction while Direction 
Indicator is in operation.

>> To designate the ‘NORTH DIRECTION,’ please follow the instruction below.

1. Press the [Menu] button on the Controller Keyboard, the OSD (On Screen Display) Main 
menu appears on the screen. Select the ‘SCREEN’ option. Scroll down to ‘NORTH 
DIRECTION,’ then press the Joystick handle to the right to access the sub-menu.

2. Intiate the view selection by twisting Joystick handle. When prompted, aim the camera 
to the desired location, then press the [Near] or the [Far] button to designate the ‘NORTH 
DIRECTION.’

3.3.4 Zone Title ([MENU] Button 

_

 Screen 

_

 Zone Title)  

Zone Title is a user-defined setting that helps identify certain areas of the monitored 
perimeter.

1. Press the [Menu] button on the Controller Keyboard, the OSD (On Screen Display) Main 
menu appears on the screen. Select the ‘SCREEN’ option. Scroll down to ‘ZONE TITLE,’ then 
press the Joystick handle to the right to access the sub-menu.

3.3 Programming the Screen Functions

Содержание Easy Trak SD-Z36

Страница 1: ......

Страница 2: ...ware and software described herein at any time without prior notice No part of this guide may be reproduced transmitted transcribed stored in a retrieval system or translated into any language in any form by any means without prior written permission of NUVICO NUVICO makes no warranties for damages resulting from corrupted or lost data due to a mistaken operation or malfunction of the cameras peri...

Страница 3: ...ead symbol within an equilateral triangle is intended to alert the user to the presence of uninsulated dangerous voltage within the product s enclosure that may be of sufficient magnitude to constitute a risk of electric shock to persons CAUTION The exclamation point within an equilateral triangle is intended to alert the user to the presence of important operating and maintenance servicing instru...

Страница 4: ...RENCE TO RADIO COMMUNICATIONS OPERATION O F THIS EQUIPMENT IN A RESIDENTIAL AREA IS LIKELY TO CAUSE HARMFUL INTERFERENCE IN WHICH CASE THE USER WILL BE REQUIRED TO CORRECT THE INTERFERENCE AT HIS OWN EXPENSE CAUTION CHANGES OR MODIFICATIONS NOT EXPRESSLY APPROVED BY THE PARTY RESPONSIBLE F OR COMPLIANCE COULD VOID THE USER S AUTHORITY TO OPERATE THE EQUIPMENT THIS CLASS A DIGITAL EQUIPMENT COMPLIE...

Страница 5: ...t of the obsolete outlet Protect the power cord from being walked on or pinched particularly at plugs conve nience receptacles and the point where they exit from the equipment Only use attachments accessories specified by the manufacturer Unplug this equipment during lightning storms or when unused for long periods of time Refer all servicing to qualified service personnel Servicing is required wh...

Страница 6: ...yTrak PTZ Dome Directly to the DVR 2 1 4 Connecting the EasyTrak PTZ Dome to the Controller Keyboard via J Box 2 1 5 Connecting the EasyTrak PTZ Dome to the DVR via J Box 2 1 6 DIP Switch Layout Diagram 2 1 7 Principle of Termination 2 1 8 EasyTrak PTZ Dome Camera Address ID 2 1 9 Setting Protocols 2 2 0 Connections 2 2 1 Mounting the EasyTrak PTZ Dome Camera 2 2 2 Power On Boot Up Sequence 3 0 Do...

Страница 7: ...ne 3 3 3 North Direction 3 3 4 Zone Title 3 3 5 Camera Title 3 3 6 OSD Display 3 4 0 Camera 3 4 1 Focus Control 3 4 2 WB Control 3 4 3 AE Control 3 4 4 Night Shot 3 4 5 Camera Default 3 5 0 Setup 3 5 1 Flip 3 5 2 Speed 3 5 3 Panning Range 3 5 4 Tilt Over Angle 3 5 5 Calibration 3 5 6 LIne Lock 3 5 7 Factory Default 3 5 8 Erase Data 3 5 9 System Information 37 38 38 40 40 42 42 43 44 44 45 46 47 48...

Страница 8: ...rveillance path up to 240 sec 16 Scans 8 available speed from slow to medium panning with smooth DiagonalScan 8 Tours Each tour consists of up to 64 Preset Pattern and Scan Smooth DiagonalScan mode and programmable individual dwell time camera functions and speed 8 Alarm inputs with 1 8 priority 2 Auxiliary outputs programmable to NC NO 8 Privacy Zones Video off or up to 8 masked blocks 64 steps o...

Страница 9: ...Model 3 Installation Manual 4 Mounting Hardware Available Models NTSC SD Z36N PHW Pendant Housing SD Z36N FMH Flush Mount Housing PAL SD Z36P PHW Pendant Housing SD Z36P FMH Flush Mount Housing EasyTrak PTZ Dome Camera Dimensions See the diagram below for the exact dimensions for the EasyTrak PTZ Dome Camera Dimensions UNIT inches mm 12 5 318 7 9 0 228 9 4 240 3 2 80 5 3 7 94 5 1 130 1 38 35 7 1 1...

Страница 10: ...nal Controller Keyboard and a variety of external switching devices such as Multiplexers MUXes and Digital Video Recorders DVRs may be incorporated to accommodate the needs from a small to a large surveillance security system Figure 1 Illustrates Sample Installation Configuration ...

Страница 11: ... Installation and Configuration IN OUT SLAVE 1 DOME 2 RS 232C ALARM DVR DVR J BOX BACK DVR ALARM PC DC12V J BOX FRONT KEYBOARD CONTROLLER BNC MONITOR REAR V ID E O C O M M R X R X PO W ER AC 24V AC 24V HEATER 2 AUX OUTPUT 8 ALARM INPUT FULL DUPLEX MODE RS 422 DOME1 DOME1 CONTROLLER DOME RX RX STP AWG 22 AC 24V POWER ...

Страница 12: ...85 Tx Tx of the DVR into Rx Rx of the PTZ dome camera Com Port of the DVR Figure 3 Illustrates connecting EasyTrak PTZ to the DVR 2 1 4 Connecting the EasyTrak PTZ Dome into the Controller Keyboard via J box Figure 4 Illustrates connecting EasyTrak PTZ to the Controller via J box Rx Rx Tx Tx IN OUT SLAVE 1 DOME 2 RS 232C ALARM DVR DVR DATA 1 DATA 1 REAR DOME 1 DOME 2 DVR Rx Rx ...

Страница 13: ...ting the EasyTrak PTZ Dome to the DVR via J box Figure 5 Illustrates connecting EasyTrak PTZ dome DVR into the Controller Keyboard Com Port of the DVR IN OUT SLAVE 1 DOME 2 RS 232C ALARM DVR DVR DATA 1 DOME 1 DOME 2 DVR Tx Tx Rx Rx DATA 1 REAR Rx Rx ...

Страница 14: ...cedure involves proper setting of the configu ration switches indicated below Figure 6 Indicates layout of the configuration switches Connector Board CPU Board 1 2 3 4 5 6 7 8 9 0 S2 S1 9 8 7 6 5 4 3 2 0 1 S4 S5 Address ID Selection Switches Selection Switches Protocol S1 Selection Switches Termination Pull Up Down Heater AC 24V Comm RX TX Power AC 24V Video Fan Heater S3 0 9 8 7 6 5 4 3 2 1 S6 Re...

Страница 15: ...ination switch settings and Figure 7 for examples of devices requiring termination Note Total length of the cable for communication should not exceed 1 2 km or 74 miles Figure 7 Illustrates the PTZ dome camera termination settings OFF X ON X X OFF 2 3 1 ON X X X 4 ON OFF Not Terminated Pull Up Down Normal Terminated S1 of Connector Board S1 ON 1 2 3 4 Unless communication error occurs position the...

Страница 16: ...on ON SW1 Termination ON SW1 Termination ON S1 Dome1 port Termination ON S3 Dome2 port Termination ON SW1 Termination ON SW1 Termination ON SW1 Termination ON SW1 Termination ON S1 Dome1 port Termination ON S4 DVR port Termination ON DVR Termination ON SW1 Termination ON SW1 Termination ON S1 Dome1 port Termination ON DVR Termination ON SW1 Termination ON SW1 Termination ON S1 Dome1 port Terminati...

Страница 17: ...Port 2 Dome ID 2 Cam Port 16 Dome ID 16 If more than 16 PTZ cameras are installed using two or more DVRs the following formula is usedful to determine the Dome ID ID 16x n 1 m Where n number of DVR m Camera Port Refer to Figure 9 for setting the EasyTrak PTZ dome camera address ID and protocol selection Figure 9 Setting the EasyTrak PTZ camera address ID and protocol 2 Installation and Configurati...

Страница 18: ... dome camera is installed with a device other than a recommended PTZ camera controller Figure 7 Illustrates the Protocol Selection Tables S4 DIP S W S5 S6 FUNCTION Comm Video Camera Baud Rate Protocol Extended ID On On Off D2 Off Off Off D4 On On On Off D3 Off On D1 LG SN HT HN CAMERA STW Reserved RS 422 PAL NTSC COMM RS 485 VIDEO Off D6 On On S6 D10 Off Off On Off Off Off D5 On Off D9 Off Off Off...

Страница 19: ... camera RS 485 does not allow for a star connection layout A Splitter is required if a star connection layout is desired RS 485 guarantees 1 2 Km of data line routing A Repeater is recommended to extend over 1 2 Km Refer to Figure 2 Basic Installation Diagram AL1 to 8 Alarm In Magnetic PIR or other external sensor devices can be used to signal the PTZ camera reacting to an event Refer to Chapter 3...

Страница 20: ...ower EasyTrak PTZ dome camera can activate external devices such as buzzers or lights using dry contact relays Connect the device to the NO NC Alarm Out and COM Common connectors See Chapter 3 Program and Operation for configur ing alarm output Connect the AC 24V 40VA power to the camera Use certified Listed Class 2 power supply transformer only ...

Страница 21: ...tion Installation Hint 1 Firmly hold the PTZ camera head as illustrated above 2 Align the two yellow stickers on left side of the camera then slide the camera up along the guide rail until the hook on the left side snap into place 3 Move the other side up until the right hook snap into place 4 Once both sides are securely latched on screw in the lock screw located at the bottom of the right hook Y...

Страница 22: ...oot up sequence is complete SD SERIES Vx xxx CAMERA TYPE xxxx WAIT DOME SETTING INIT TILT ORIGIN SET OK INIT PAN ORIGIN SET OK INIT CAMERA SET OK 001PRESET W EMPTY DATA ALARM 1 360 0 090 0 CAM xxxx Preset No Information Alarm Display Dome Camera Title Dome Camera ID Compass Direction Pan Tilt Angle Preset Title Or Area Title On Screen Display in Normal Control Mode RAM TEST CHECK NO OK CHECK 5555 ...

Страница 23: ...elected camera ID will be displayed on the monitor Principle of joystick usage in the programming editing mode is displayed below Button or Joystick movement in menu Function Joystick left or right Go into the sub menu items Execute the command exit Change value Navigate through the menu items Joystick up or down Navigate through the menu items Joystick down Finish editing title Zoom handle twist ...

Страница 24: ... Patterns Scans or setup complicated Tours Press the Menu button on the Controller Keyboard the OSD On Screen Display Main menu appears on the screen Select the FUNCTION option then press the Joystick handle to the right to access the FUNCTION sub menu Note To accessed the EasyTrak PTZ dome camera s OSD menu using your DVR press the Menu button while in the PTZ menu FUNCTION HOME FUNCTION PRESET P...

Страница 25: ...o display the PTZ main menu 2 Highlight FUNCTION and enter the sub menu by pressing the Joystick handle to the right or twist the handle CW or CCW Repeating the same method enter HOME FUNCTION sub menu 3 Under FUNCTION Automatically highlighted scroll through the available pre pro grammed Presets Tours Patterns and AutoScans and designate a HOME FUNCTION 4 Define the NUMBER of the desired Preset T...

Страница 26: ...set programming menu allows for up to 31 pages with each page programmable up to 8 presets To program the PRESET please follow the instructions below 1 Press the Preset button to display the PTZ Preset menu Menu Button _ Function _ Preset Shortcut Preset 2 Select an empty Preset slot Using the Joystick aim the camera to the desired location For zoom operation twist the Joystick handle 3 After the ...

Страница 27: ...SD menu is being access through the DVR access the PTZ menu and press the ESC button on the DVR or E button on the EV Series DVR Deleting the Programmed Preset To delete a programmed Preset press Home or DEL button while highlighting the undesirable Preset Overwriting the Programmed Preset Overwriting the programmed Preset is possible without having to go through the camera s OSD main menu Pressin...

Страница 28: ...attern slot SEC must read 000 While pressing down the Shift button move the Joystick in a desired pattern for up to 240 seconds For zoom operation twist the Joystick handle then release the Shift button to record the pattern Alternatively the Pattern recording can also be initiated by twisting the Joystick handle Once the PTZ dome camera has been moved in a desired pattern press the Near or Far bu...

Страница 29: ...ld you want to program another Pattern simply repeat steps 2 3 while highlighting the next empty Pattern slot Note You must SAVE AND EXIT to finalize the programming pressing ESC button while programming will exit programming without saving If the PTZ dome camera s OSD menu is being access through the DVR access the PTZ menu and press the ESC button on the DVR or E button on the EV Series DVR Dele...

Страница 30: ...cut Scan 2 Select an empty Scan slot START and END field should read NONE The SCAN 01 is named automatically A new custom name may be entered by twisting the Joystick handle 3 Move the cursor down to the SPEED option and determine the scanning speed Note The number speed setting of 1 8 allows for horizontal panning only For diagonal Scan use the either the Slow or the Medium setting 3 1 Programmin...

Страница 31: ... Move the cursor down to the DIR option Determine the direction of the Scan to either CW or CCW 7 Move the cursor down to the SWAP option You can swap the START position with the END position using this option 8 Finish the Scan programming by scrolling down to the bottom to SAVE AND EXIT Note You must SAVE AND EXIT to finalize the programming pressing ESC button while programming will exit program...

Страница 32: ...ons then loop the same set of functions IF Tour 01 Executes as Follows Note Tour 04 programmed within the Tour 02 was skipped because it is considered a third level Tour Tour 02 Executes as Follows Note Tour 04 programmed within Tour 02 would run successfully in this example because it is now considered a second level Tour 3 1 Programming the PTZ Functions Tour 01 Preset 02 Preset 03 Tour 02 Tour ...

Страница 33: ...ot can be located 3 Move the cursor down to the FUNC option Select a predefined function in the undefined slot by pressing the one of the function buttons Preset Pattern Scan or Tour Note If Preset is selected the Preset view can be recalled by pressing the Preset button again TOUR 01 xxxxxxxxxxxxxxxx 01 08 FUNC NO S DW TITLE PRST 064 S 03 PTRN 004 S 03 SCAN 016 S 03 TOUR 004 S 03 03 03 03 03 PREV...

Страница 34: ...peed and dwell time between the selected functions 6 Repeat steps 3 5 for each available slot until the desired Tour is entered 7 Finish the Tour programming by scrolling down to the bottom to SAVE AND EXIT Note You must SAVE AND EXIT to finalize the programming pressing ESC button while programming will exit programming without saving If the PTZ dome camera s OSD menu is being access through the ...

Страница 35: ...otal of 9 levels Including 0 of priority Levels 1 8 supports Presets Pxx only However the hightest priority level 0 supports sophisticated functions such as Pattern Pxx Scan Axx and Tour Txx 3 2 Programming the Alarm NO Alarm Input Number FUNC Priority 1 8 Preset Priority 0 Pattern Scan Tour PRI Lower Number Higher Priority IN NO NC Normally Open Closed OFF Ignore OUT R01 Relay Out 1 R02 Relay Out...

Страница 36: ...ed 4 Finish the Alarm setup programming by scrolling down to the bottom to SAVE AND EXIT Note You must SAVE AND EXIT to finalize the programming pressing ESC button while programming will exit programming without saving If the PTZ dome camera s OSD menu is being access through the DVR access the PTZ menu and press the ESC button on the DVR or E button on the EV Series DVR Deleting the Programmed A...

Страница 37: ...gs 1 Press the Menu button on the Controller Keyboard the OSD On Screen Display Main menu appears on the screen Select the SCREEN option Then press the Joystick handle to the right at the desired option to access its sub menu 3 3 Programming the Screen Functions MAIN MENU FUNCTION ALARM SCREEN CAMERA SETUP EXIT MENU SCREEN MENU LANGUAGE PRIVACY ZONE NORTH DIRECTION ZONE TITLE CAMERA TITLE EXIT MEN...

Страница 38: ...out the designated private area at all times EasyTrak PTZ dome camera offers masking of up to 8 unwanted areas To program the PRIVACY ZONE please follow the instructions below 1 Press the Menu button on the Controller Keyboard the OSD On Screen Display Main menu appears on the screen Select the SCREEN option Scroll down to PRIVACY ZONE then press the Joystick handle to the right to access the sub ...

Страница 39: ...smaller area zoom in closer until the entire view is the object you wish to mask 3 To enter a zone name move the cursor over to the TITLE section and enter a custom by twisting the Joystick handle 4 Repeat steps 2 3 for each available slot until all the desired Privacy Zones has been entered 5 Finish the Privacy Zone setup programming by scrolling down to the bottom to SAVE AND EXIT Note You must ...

Страница 40: ...n to NORTH DIRECTION then press the Joystick handle to the right to access the sub menu 2 Intiate the view selection by twisting Joystick handle When prompted aim the camera to the desired location then press the Near or the Far button to designate the NORTH DIRECTION 3 3 4 Zone Title MENU Button _ Screen _ Zone Title Zone Title is a user defined setting that helps identify certain areas of the mo...

Страница 41: ...itiate the view selection by twisting the Joystick handle When prompted aim the camera to the desired location then press the Near or the Far button to designate the start area 4 Repeat the same method described above designate the END area 5 Repeat steps 2 4 for each available slot until all the desired Zone Titles has been entered 6 Finish the Zone Title programming by scrolling down to the bott...

Страница 42: ... by scrolling down to the bottom to SAVE AND EXIT 3 3 6 OSD Display MENU Button _ Screen _ OSD Display Access the the OSD Display section of the OSD Main menu to enable or disable the various titles and functions covered in the previous programming sections 1 Press the Menu button on the Controller Keyboard Select the SCREEN option Scroll down to OSD DISPLAY then press the Joystick handle to the r...

Страница 43: ...MERA option Then press the Joystick handle to the right at the desired option to access its sub menu Note The menu features will vary depending on the camera module CAMERA MENU FOCUS CONTROL WB CONTROL AE CONTROL BACK LIGHT OFF SHARPNESS 9 DIGITAL ZOOM OFF NIGHT SHOT CAMERA DEFAULT SAVE AND EXIT 3 4 Programming the Camera Functions MAIN MENU FUNCTION ALARM SCREEN CAMERA SETUP EXIT MENU BACK LIGHT ...

Страница 44: ...ing time 3 4 2 WB Control MENU Button _ Camera _ WB Control The WB Control White Balance function is used to manually control the White Balance by increasing or decreasing the R Red or B Blue color values it can also be set to AUTO recommanded or one of 4 pre configured settings The pre configured settings are as follows INDOOR OUTDOOR ONE PUSH or ATW Note R GAIN B GAIN is only adjustable while in...

Страница 45: ...ally to produce the best possible picture under any lighting conditions IRIS PRIO Iris Priority will keep the Iris setting as first priority and adjust the Gain Brightness and Shutter automatically SHUTTER PRIO Shutter Priority will keep the Shutter setting as first priority and adjust the Iris Gain and Brightness automatically BRIGHT Brightness Priority will keep the Brightness setting as first p...

Страница 46: ...to force the Color mode under poor lighting or B W mode during daytime 1 While on Manual mode switch the LOCAL CONTROL to ON to forced B W mode or OFF to force the color mode Note The AUTO setting is recommanded for most environments 2 Once the desired changes have been made scroll down to the bottom to EXIT NIGHT SHOT SETUP MODE AUTO LOCAL CONTROL OFF EXIT 3 4 Programming the Camera Functions MOD...

Страница 47: ...tton on the Controller Keyboard Select the CAMERA option Scroll down to CAMERA DEFAULT then press the Joystick handle to the right to access the sub menu 2 Upon entering the sub menu you will be prompted to reset to factory default Press the ENTER or the MENU button for YES or ESC button for NO Note You must SAVE AND EXIT to finalize the programming pressing ESC button while programming will exit ...

Страница 48: ... factory default Erase the FUNCTION data or view the system information 1 Press the Menu button on the Controller Keyboard the OSD On Screen Display Main menu appears on the screen Select the SETUP option Then press the Joystick handle to the right at the desired option to access its sub menu MAIN MENU FUNCTION ALARM SCREEN CAMERA SETUP EXIT MENU SETUP MENU FLIP FUNCTION ON SPEED FAST PANNING RANG...

Страница 49: ... 2 Speed MENU Button _ Setup _ Speed This function is used to define the speed of the PTZ dome camera when controlled manually using the Controller Keyboard or through the DVR remote 1 Choose one of 3 available settings SLOW MEDIUM or FAST 3 5 3 Panning Range MENU Button _ Setup _ Panning Range This function is used to limit the panning ability of the EasyTrak PTZ dome camera if installed near a w...

Страница 50: ...d aim the camera to the desired location then press the Near or the Far but ton to designate the RIGHT LIMIT 3 Repeat the same method described above designate the LEFT LIMT position 4 Move the cursor down to the ENABLE option enable or disable this function 5 Move the cursor down to the SWAP option You can swap the RiGHT LIMIT position with the LEFT LIMIT position using this option 6 Finish the p...

Страница 51: ...e function ON to view additional 5º above the horizon Although the ceiling line and the trim ring is now visable during wide angle view the viewing angle will narrow during zooming in operation to clear the obstructed view W O BUBBLE The tilt range of the PTZ dome camera is limited and the view is partially obstructed WITH BUBBLE The tilt range of the PTZ dome camera is limited to view only below ...

Страница 52: ...ugh external forces will be automatically corrected from this point on 1 Press the Menu button on the Controller Keyboard Select the SETUP option Scroll down to CALIBRATION then press the Joystick handle to the right to access the sub menu 2 Scroll down to AUTO CALIBRATION and press the Joystick handle to the right to enable the function ON 3 Finish the programming by scrolling down to the bottom ...

Страница 53: ...roblem 1 Press the Menu button on the Controller Keyboard Select the SETUP option Scroll down to LINE LOCK then press the Joystick handle to the right to access the sub menu 2 Select the synchronizing method of either INTERNAL or EXTERNAL Choose EXTERNAL to adjust the phase of the picture with other cameras 3 Scroll down to PHASE and adjust the phase level to the desired level 4 Finish the program...

Страница 54: ... option Scroll down to FACTORY DEFAULT then press the Joystick handle to the right to access the sub menu 2 Upon entering the sub menu you will be prompted to reset to factory default Press the ENTER or the MENU button for YES or ESC button for NO Note You must SAVE AND EXIT to finalize the programming pressing ESC button while programming will exit programming without saving If the PTZ dome camer...

Страница 55: ... the SETUP option Scroll down to ERASE DATA then press the Joystick handle to the right to access the sub menu 2 Upon entering the sub menu you will be prompted to erase the programmed data Press the ENTER or the MENU button for YES or ESC button for NO Note You must SAVE AND EXIT to finalize the programming pressing ESC button while programming will exit programming without saving If the PTZ dome...

Страница 56: ...The information may be needed for servicing and troubleshooting purposes 1 Press the Menu button on the Controller Keyboard Select the SETUP option Scroll down to SYSTEM INFORMATION then press the Joystick handle to the right to access the information SYSTEM INFORMATION CAMERA TYPE XXXXXXX H W VERSION V1 00 ROM VERSION V1 00 PROTOCOL EZ BUADRATE 9600BPS EXIT MENU ...

Страница 57: ...itches are ON Check that the BNC connectors are securely connected See Figure 4 Poor video quality Check the voltage level of the dome camera Check the power supply voltage nominal 24VAC Dome cameras lose their positions Reset the cameras using the Dome configuration menus Check if there is unusual sound Check the voltage level of the dome camera Camera number does not match the multiplexer number...

Страница 58: ...n Heater Within 90 RH 24VAC 40VA Camera Only 24VAC 50VA Technical Specifications Video Format Image Sensor Horizontal Resolution Wide Dynamic Range Day Night Functionality Lens Type Auto Focus Auto Iris Angle of View Communication Sync System Effective Pixels HxV Electronic Shutter Main Video Output Minimum Illumination S N Ratio BLC Focus WB Iris Gain Control Pan Travel Range Manual Speed Manual ...

Страница 59: ...o Pan Instant Digital Flip 8 2 5ºC 45ºC Normal 40ºC 45ºC Fan Heater Within 90 RH 24VAC 40VA Camera Only 24VAC 50VA Technical Specifications Video Format Image Sensor Horizontal Resolution Wide Dynamic Range Day Night Functionality Lens Type Auto Focus Auto Iris Angle of View Communication Sync System Effective Pixels HxV Electronic Shutter Main Video Output Minimum Illumination S N Ratio BLC Focus...

Страница 60: ......

Отзывы: