72
www.climacoolcorp.com
WYE Strainers
Start-Up Procedure
1 .
To remove all fluid from the strainer belly, a drip-leg can
be installed or the piping can be placed at a 1/4” slope.
Note:
With piping systems that contain fluids other
than water or when the working temperature is above
120°F, fluid must be drained to safe area, away from
the operator. Operators should always be fitted with
appropriate equipment (goggles, gloves, vests etc .)
when venting or servicing is performed .
2 .
Start the piping system by opening the outlet valve
nearest the WYE strainer’s outlet first. Then gradually
open the inlet valve nearest the WYE strainers’ inlet,
approximately 25% of normal operational flow. It
is important to start the system gradually to avoid
displacing or damaging the WYE strainer .
3 .
Continue to open the inlet valve until the desired service
flow has been reached.
Maintenance
WYE strainers require little monitoring once they are properly
installed. The pressure differential across the strainer should
be checked periodically to determine if the screen needs
to be cleaned or replaced. If the pressure differential goes
unchecked and the screen becomes completely clogged, the
screen will break and require replacing .
Note:
Strainer screens
are not designed to withstand the same pressure ratings as
the housings . If the screen becomes completely clogged, it
will be exposed to the same pressure as the housing . In most
cases, this will cause the screen to fail and potentially damage
downstream equipment .
Regular maintenance involves:
•
Timely cleaning or replacement of screen
•
Periodically checking for leaks
During normal use, the screen will become clogged
with foreign matter, causing the differential pressure to
increase. Once the differential pressure has increased to
an unacceptable value, typically by 5 psi to 10 psi, it is time
to clean or replace the screen . It is not advisable to let the
differential pressure increase by 20 psi. This may cause the
screen to fail and possibly damage downstream equipment .
A convenient and safe way to determine when the screen
needs to be replaced is to install pressure gauges on
the inlet and outlet sides of the strainer . The maximum
acceptable pressure drop across the strainer will indicate
when the screen needs to be replaced . Screen size and
construction determine the maximum pressure drop that a
strainer screen can withstand .
Screen Removal/Cleaning/Replacement
1 .
Isolate the strainer by closing the inlet and outlet valve
connections on either side of the WYE strainer . Make
sure valves are bubble tight .
2 .
Open vent to relieve pressure inside and drain fluid
from the strainer .
3 .
Once pressure is relieved, remove the WYE side cap
or cover .
4 .
Remove screen and clean . Do not permit screed to
dry as it will be difficult to remove debris after it has
hardened . Avoid banging or hitting the screen to
remove stubborn debris .
5 .
Inspect screen and cover gasket for damage . If either is
damaged, replace . Always ensure there is a spare gasket
and screen on hand prior to maintenance .
6 .
Remove any debris or sludge from within the strainer .
7 .
Replace cleaned or new screen into its original position,
ensuring it is squarely positioned on the screen .
8 .
Replace cover gasket and cap or cover . Tighten cap or
cover to specified torque rating.
Follow the Start-up procedure outlined within the Operation
Instructions .
Содержание CLIMACOOL UCR 30
Страница 19: ...17 www climacoolcorp com Voltage Phase Monitor Wiring Diagram...
Страница 29: ...27 www climacoolcorp com Evaporator Water Pressure Drop Charts...
Страница 30: ...28 www climacoolcorp com Glycol Performance Adjustments Factor Charts...
Страница 41: ...39 www climacoolcorp com Condenser Layout for RC1 007A H24 and RC1 008A H24 1 Row 2 Fan 1140RPM...
Страница 42: ...40 www climacoolcorp com Condenser Layout for RC2 019A 026A and 31A H48 and RC2 038A H44 2 Row 4 Fan 1140RPM...
Страница 43: ...41 www climacoolcorp com Condenser Layout for RC2 018A X48 RC2 026A X40 and RC2 032A X44 2 Row 4 Fan 830 RPM...
Страница 47: ...45 www climacoolcorp com 45 www climacoolcorp com Condenser Layout for RC2 048A Q82 2 Row 8 Fan 540RPM...
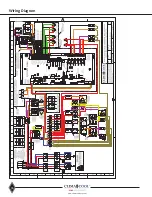
Страница 78: ...76 www climacoolcorp com Wiring Diagram...
Страница 79: ...77 www climacoolcorp com Wiring Diagram...
Страница 80: ...78 www climacoolcorp com Wiring Diagram CoolLogic Control Panel...
Страница 81: ...79 www climacoolcorp com Wiring Diagram CoolLogic Control Panel...

