34
www.climacoolcorp.com
Head Pressure Control Valve Operation (LAC-10)
Brazing Procedures for Head Pressure
Control Valve
Any of the commonly used brazing alloys for high side
usage are satisfactory, however, when soldering or brazing,
it is very important that the internal parts be protected
by wrapping the valve with a WET cloth to keep the body
temperature below 250°F for the LAC . Also, when using high
temperature solders, the torch tip should be large enough to
avoid prolonged heating of the copper connections . Always
direct the flame away from the valve body. The remote bulb
is intended to be mounted to sense outside ambient air
temperature . Do not mount to any refrigerant line .
CAUTION: Inert gases must be added to the system
carefully through a pressure regulator. Unregulated gas
pressure can seriously damage the system and endanger
human life. Never use oxygen or explosive gases.
The table below lists the maximum values each valve can
withstand without damage . Precautions must be taken to
keep test or operating pressures below these values .
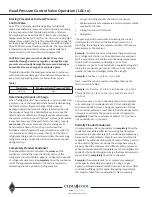
Table 7
Type Valve
Maximum Rated Pressure PSIG
LAC-10
680
Determining Amount of Charge
When “refrigerant side” head pressure control is utilized on
a system, one of the most important factors is determining
the total system refrigerant charge . While on most
packaged units the amount of charge is listed on the unit,
the required charge for a field built-up system cannot be
listed by the manufacturer . Charge is usually added when
the system is started up until “proper” system performance
is reached, however, if the system is to function properly
year-round,
the correct amount of extra charge must
be calculated ahead of time . The project submittal
includes a total refrigerant charge calculation as well . It is
recommended to charge no more than 65% of the listed
refrigerant charge prior to startup and have the remaining
refrigerant charge on site that can be trimmed as needed
during startup .
Completely Flooded Condenser
The easiest method is to calculate the
volume
of the
condenser coil and then use the density factor of the
refrigerant shown in Table 8, page 34, to figure the pounds
of refrigerant necessary to
completely
flood the condenser
coil at the appropriate ambient . The factors involved in
calculating the extra pounds of refrigerant are:
1 .
Length of tubing and return bends in condenser
2 .
Minimum ambient temperature at which systems will be
required to function
3 .
Tubing size and wall thickness
4 .
Refrigerant
The primary point to remember in selecting the proper
density factor is that when the liquid drain valve LAC is
throttling, the refrigerant temperature will be at the same
temperature as the ambient .
Example:
Calculate the extra refrigerant charge necessary
for a refrigerant R-410A, roof mounted remote condenser
(40°F evaporator and a minimum condensing temperature
of 90°F) with compressor unloading to 50% of full
compressor capacity . To determine the equivalent length of
tubing in a condenser, proceed as follows: First, count the
number of tubes and multiply this by their length .
Example:
150 tubes x 7 .55 feet = 1132 .5 feet
Next, count the return bends and multiply them by the
factor shown in Table 8 .
Example:
150 bends x .250 for 1/2 inch bends = 37 .5 feet
Then add this 37 .5 feet to the 1132 .5 feet for a total of
1170 feet
The system uses a 30 hp condensing unit with a condenser
coil containing 1170 equivalent feet of 1/2 inch tubing tubes
and return bends . Assume a design temperature of minus
20°F minimum ambient. From Table 8, find the density factor
necessary to calculate the pounds of extra refrigerant to
completely
flood the condenser at minus 20°F: 1170 feet x
.102 pounds/foot = 119 pounds .
Partially Flooded Condenser
On many systems it is not necessary to
completely
flood the
condenser to maintain sufficient operating head pressure
(equivalent to approximately 90°F condensing temperature)
because of a milder climate . Therefore, a second method is
available . The additional information found in Tables 9 and 10
can be used to figure more closely the charge necessary to
properly flood the condenser for sufficient head pressure at
various minimum ambient temperatures . (The multipliers are
applied to the extra refrigerant charge that was calculated in
the method to
completely
flood the condenser).
Example:
The example calls for a compressor equipped
with capacity unloading at roughly 50% using hot gas
bypass/combination liquid injection circuits . Since the chiller
controller will likely call for unloading during low ambient,
this must be taken into consideration . This is necessary
Содержание CLIMACOOL UCR 30
Страница 19: ...17 www climacoolcorp com Voltage Phase Monitor Wiring Diagram...
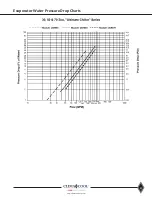
Страница 29: ...27 www climacoolcorp com Evaporator Water Pressure Drop Charts...
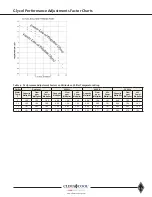
Страница 30: ...28 www climacoolcorp com Glycol Performance Adjustments Factor Charts...
Страница 41: ...39 www climacoolcorp com Condenser Layout for RC1 007A H24 and RC1 008A H24 1 Row 2 Fan 1140RPM...
Страница 42: ...40 www climacoolcorp com Condenser Layout for RC2 019A 026A and 31A H48 and RC2 038A H44 2 Row 4 Fan 1140RPM...
Страница 43: ...41 www climacoolcorp com Condenser Layout for RC2 018A X48 RC2 026A X40 and RC2 032A X44 2 Row 4 Fan 830 RPM...
Страница 47: ...45 www climacoolcorp com 45 www climacoolcorp com Condenser Layout for RC2 048A Q82 2 Row 8 Fan 540RPM...
Страница 78: ...76 www climacoolcorp com Wiring Diagram...
Страница 79: ...77 www climacoolcorp com Wiring Diagram...
Страница 80: ...78 www climacoolcorp com Wiring Diagram CoolLogic Control Panel...
Страница 81: ...79 www climacoolcorp com Wiring Diagram CoolLogic Control Panel...


