


7156 Service Guide
Chapter 3: Diagnostics
September 1998
27
Checking and Adjusting the MICR Check Reader (Common Board and RS-232C Models)
The adjustment described in this section cancels or sharply reduces extraneous signals
picked up by the Magnetic Ink Character Recognition (MICR) check reader. Use these
procedures on newer LCSIO (RS-485) models with the common PC board and on all RS-
232C models (older RS-232C boards and newer common PC boards).
Older LCSIO (RS-485) models have a MICR amplifier board that requires different
procedures for checking and adjusting. See the next section., “Checking and Adjusting the
MICR Check Reader (LCSIO—RS-485 MICR Amplifier Board).”
Note:
The MICR check reader feature has been factory adjusted for a normal operating
environment with a host computer. However, additional devices, such as CRT monitors or
large metal surfaces near the printer, can affect the printer's magnetic field, causing
intermittent reading errors when the MICR check reader is in operation.
This condition can be easily diagnosed by checking the MICR check reader adjustment and
readjusting it if the factory setting has been altered. Follow the procedures in this section to
check and adjust the MICR check reader.
Check the MICR Check Reader Adjustment
Caution:
Electro Static Discharge may damage the PC board. Wear a grounded wrist strap
and use a static mat or other ESD protected work surface whenever you work with the PC
board.
Note:
The operator panel may differ depending on the model. To put the printer on- or
off-line, use a paper clip or other pointed object to depress the plunger (in place of the On
Line button) on models with that item.
1.
Open the front cover.
2.
On models with the On Line button (or plunger), press the On Line button (or plunger)
to put the printer off-line.
3.
On models without the On Line button (or plunger), press the reset button (under the
DIP switches).
Caution:
The DIP switches are pre-set at the factory and should generally not be changed.
If you must change them, do so carefully to avoid changing other functions.
4.
Set the DIP switches to the settings in the table.
Switch 8: On = knife, Off = non-knife
Switch 1
Switch 2
Switch 3
Switch 4
Switch 5
Switch 6
Switch 7
On
Off
Off
Off
Off
Off
On
5.
Close the front cover and press the On Line button (or plunger) on those models.
The green LED flashes when the printer cycles. The settings are entered into EEROM.
6.
On models without the On Line button (or plunger), press the reset button (under the
DIP switches).
The green LED flashes when the printer cycles. The settings are entered into EEROM.
Содержание 7156
Страница 1: ...NCR 7156 Thermal Receipt and Impact Slip Printer Service Guide BD20 1437 A Issue B September 1997...
Страница 16: ......
Страница 20: ...Chapter 1 About the 7156 Printer 7156 Service Guide September 1998 6...
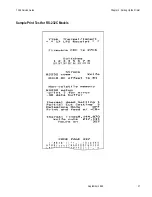
Страница 31: ...7156 Service Guide Chapter 2 Setting Up the Printer September 1998 17 Sample Print Test for RS 232C Models...
Страница 32: ...Chapter 2 Setting Up the Printer 7156 Service Guide September 1998 18 Sample Print Test for LCSIO RS 485 Models...
Страница 34: ...Chapter 2 Setting Up the Printer 7156 Service Guide September 1998 20...
Страница 72: ...Chapter 5 Adjustments 7156 Service Guide September 1998 58...
Страница 79: ...7156 Service Guide Chapter 6 Removing the Thermal Receipt Mechanism September 1998 65...
Страница 81: ...7156 Service Guide Chapter 6 Removing the Thermal Receipt Mechanism September 1998 67...
Страница 99: ...7156 Service Guide Chapter 8 Replacing the Thermal Receipt Mechanism September 1998 85...
Страница 101: ...7156 Service Guide Chapter 8 Replacing the Thermal Receipt Mechanism September 1998 87...
Страница 108: ......
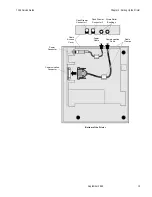
Страница 148: ...Chapter 14 Replacing the Print Mechanism 7156 Service Guide September 1998 134 Enhanced Common PC Board Connectors...
Страница 149: ...7156 Service Guide Chapter 14 Replacing the Print Mechanism September 1998 135 RS 232C PC Board Connectors...
Страница 154: ......
Страница 158: ...Chapter 15 Removing the Base Feed Mechanism 7156 Service Guide September 1998 144...
Страница 164: ...Chapter 16 Forms Compensation Arm Assembly 7156 Service Guide September 1998 150...
Страница 172: ...Chapter 18 Solenoid and Pivot Arm Assemblies 7156 Service Guide September 1998 158...
Страница 178: ......
Страница 198: ...Appendix D Ordering Paper and Supplies 7156 Service Guide September 1998 184...
Страница 204: ...Index 7156 Service Guide September 1998 190...
Страница 205: ......
Страница 206: ...BD20 1437 A Issue B 0998 NCR is the name and mark of NCR Corporation 1997 1998 NCR Corporation Printed in U S A...


