-56-
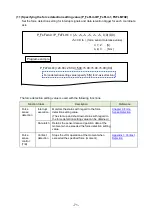
Practice 1: Specifying the force coordinate system
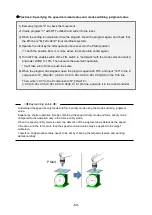
1) Execute program "1" to check the movement.
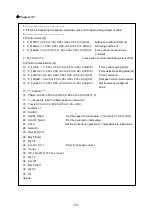
2) Create program "1" with RT ToolBox3 and write it to the robot.
3) When the writing is completed, close the program. Open the program again, and check that the
8th line is "M_FsCod0=0" (tool coordinate system).
4) Operate the robot by the JOG operation and move it to the PStart position.
5) Turn OFF the enable switch of the T/B, switch to "Automatic" with the mode selection switch,
and lower OVRD to 10%. Then execute the automatic operation.
6) The force sensor is enabled for 60 seconds in the program. When the force in the upper
direction is applied to the tip of the hand, check that the Z-axis data displayed on the GOT
changes to the "+" side.
7) When the servo of the robot is turned OFF, set "M_FsCod0 = 1" of program "1" with RT
ToolBox3 again, and write the program to the robot.
8) After OVRD is lowered to 10%, execute the automatic operation.
The force sensor is enabled for 60 seconds in the program. When the force in upper direction is
applied to the tip of the hand, check that the Z-axis data displayed on the GOT changes to "+"
side.
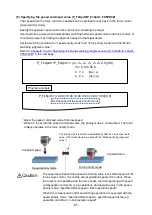
The value displayed on the GOT is the value that is converted to the one in the robot coordinate
system. It is not the value of the force sensor itself.
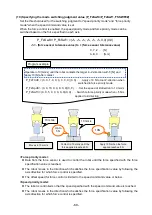
When the FSC On command is executed, the value is displayed on the coordinate system set in the
control mode, and when the FSC Off command is executed, the value is displayed on the tool
coordinate system (installation position specified in "force sensor" of the parameter).
Key learning points
Apply force to Z-direction.
Содержание MELFA BFP-A3614
Страница 1: ...Mitsubishi Industrial Robot Robot Seminar Textbook Force Sensor Application BFP A3614 ...
Страница 2: ......
Страница 8: ... Revision History Print Date Instruction Manual No Revision content 2018 07 31 BFP A3614 First print ...
Страница 33: ... 22 b CR800 R controller CN1 connector CR800 R controller front To OPT1 connector CPU module SSCNET III cable ...
Страница 34: ... 23 2 F series a CR750 D controller ...
Страница 35: ... 24 b CR751 D controller ...
Страница 36: ... 25 c CR750 Q CR751 Q controller CPU module ...
Страница 75: ... 64 MEMO Please use this page for your memo ...
Страница 95: ... 84 MEMO Please use this page for your memo ...
Страница 103: ... 92 MEMO Please use this page for your memo ...
Страница 111: ... 100 MEMO Please use this page for your memo ...
Страница 119: ... 108 MEMO Please use this page for your memo ...
Страница 123: ... 112 MEMO Please use this page for your memo ...
Страница 129: ... 118 MEMO Please use this page for your memo ...
Страница 133: ... 122 MEMO Please use this page for your memo ...
Страница 137: ... 126 MEMO Please use this page for your memo ...
Страница 143: ... 132 MEMO Please use this page for your memo ...
Страница 149: ... 138 MEMO Please use this page for your memo ...
Страница 153: ... 142 MEMO Please use this page for your memo ...
Страница 159: ... 148 MEMO Please use this page for your memo ...
Страница 171: ... 160 MEMO Please use this page for your memo ...
Страница 183: ... 172 MEMO Please use this page for your memo ...
Страница 191: ... 180 MEMO Please use this page for your memo ...
Страница 211: ......


