2AR
3-3-50
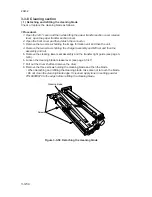
( 2 ) Cleaning the drum
Clean the drum as follows when an image formation problems occur or if the drum is
soiled.
<Precautions>
• Avoid direct sunlight or strong light when cleaning the drum.
• Dust in the air and from the polishing cloth may damage the drum during subsequent
operation. Avoid working in a dusty environment.
• Clean the drum entirely even if it is soiled only locally.
• Do not use organic solvents such as alcohol or thinner to clean the drum.
<Required supplies>
• Polishing cloth: specified synthetic cotton
• Toner
<Procedure>
1. Remove the drum from the image formation unit (see page 3-3-47).
2. Apply a polishing cloth to the drum and gently wipe the drum taking care not to
damage the surface.
3. Apply toner to another cloth and wipe the drum surface with it in the same manner.
4. Refit the drum.
5. Refit all removed parts and let the machine stand for 30 minutes.
6. Make a test copy and check the image.
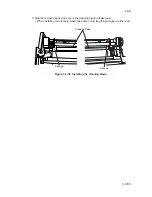
Drum
Polishing cloth
Figure 3-3-54 Cleaning the drum
Содержание PointSource Ai 3010
Страница 1: ...3010 S M MCA SERVICE MANUAL Published in Apr 00 2AR70765 Revision 5 PointSource Ai 3010 R...
Страница 2: ...Service Manual PointSource Ai 3010...
Страница 13: ...3010 S M MCA THEORY AND CONSTRUCTION SECTION I I Theory and Construction Section...
Страница 14: ...2AR CONTENTS 1 1 Specifications 1 1 1 Specifications 1 1 1...
Страница 18: ...2AR CONTENTS 1 2 Handling Precautions 1 2 1 Drum 1 2 1 1 2 2 Developer and toner 1 2 1...
Страница 61: ...3010 S M MCA ELECTRICAL SECTION II II Electrical Section...
Страница 62: ...2AR CONTENTS 2 1 Electrical Parts Layout 2 1 1 Electrical parts layout 2 1 1 1 Copier 2 1 1...
Страница 92: ...3010 S M MCA III Set Up and Adjustment Section III SET UP AND ADJUSTMENT SECTION...
Страница 108: ...3 1 15 2AR This page has been left blank intentionally 2AR 5...
Страница 136: ...3 2 11 2AR 1 This page is intentionally left blank...
Страница 191: ...3 2 62 2AR 1 This page is intentionally left blank...
Страница 196: ...3 2 61 2AR 1 This page is intentionally left blank...
Страница 255: ...3 2 38 2AR 1 This page is intentionally left blank...
Страница 384: ...2AR 1 3 6 15 This page is intentionally left blank...
Страница 398: ...3 6 27 2AR 1 3 Main PCB CN9 CN5 CN2 CN3 CN4 IC11 IC12 CN1 CN8 CN10 CN11 CN6 CN7...
Страница 431: ...2AR General connection diagram 3 7 43 General wiring diagram 3 7 44 2AR 1...


