2AR
3-3-45
( 2 ) Replacing the tungsten wire and shield grid (reference)
Take the following procedure when the tungsten wire is broken or to be replaced.
<Precautions>
• Use the specified tungsten wire.
• The part of the wire wrapped around the charger spring must not protrude from the
main charger rear housing.
• The cut end of the tungsten wire must not protrude more than 2 mm from under the
tungsten wire retainer pin.
• Use clean, undamaged tungsten wire.
• Keep the tungsten wire taut by stretching it.
• Clean the shield grid with a wet cloth followed by a dry cloth when replacing the
tungsten wire.
• Do not use organic solvents such as alcohol or thinner to clean the shield grid.
<Procedure>
1. Remove the two screws holding the image formation unit and then the unit.
2. Remove the screw and slide off the charger assembly from the image formation
unit.
3. Remove the main charger front and rear lids.
4. Remove the shield grid from the front of the charger assembly.
5. Remove the tungsten wire retainer pin and the charger spring from the charger
terminal, and then the tungsten wire.
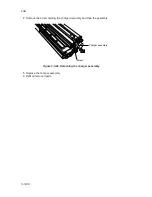
Tungsten wire
Tungsten
wire retainer pin
Main charger
rear lid
Main charger front lid
Main charger
housing
Charger
terminal
Charger spring
Shield grid
Figure 3-3-49 Detaching the tungsten wire
2AR-1
Содержание PointSource Ai 3010
Страница 1: ...3010 S M MCA SERVICE MANUAL Published in Apr 00 2AR70765 Revision 5 PointSource Ai 3010 R...
Страница 2: ...Service Manual PointSource Ai 3010...
Страница 13: ...3010 S M MCA THEORY AND CONSTRUCTION SECTION I I Theory and Construction Section...
Страница 14: ...2AR CONTENTS 1 1 Specifications 1 1 1 Specifications 1 1 1...
Страница 18: ...2AR CONTENTS 1 2 Handling Precautions 1 2 1 Drum 1 2 1 1 2 2 Developer and toner 1 2 1...
Страница 61: ...3010 S M MCA ELECTRICAL SECTION II II Electrical Section...
Страница 62: ...2AR CONTENTS 2 1 Electrical Parts Layout 2 1 1 Electrical parts layout 2 1 1 1 Copier 2 1 1...
Страница 92: ...3010 S M MCA III Set Up and Adjustment Section III SET UP AND ADJUSTMENT SECTION...
Страница 108: ...3 1 15 2AR This page has been left blank intentionally 2AR 5...
Страница 136: ...3 2 11 2AR 1 This page is intentionally left blank...
Страница 191: ...3 2 62 2AR 1 This page is intentionally left blank...
Страница 196: ...3 2 61 2AR 1 This page is intentionally left blank...
Страница 255: ...3 2 38 2AR 1 This page is intentionally left blank...
Страница 384: ...2AR 1 3 6 15 This page is intentionally left blank...
Страница 398: ...3 6 27 2AR 1 3 Main PCB CN9 CN5 CN2 CN3 CN4 IC11 IC12 CN1 CN8 CN10 CN11 CN6 CN7...
Страница 431: ...2AR General connection diagram 3 7 43 General wiring diagram 3 7 44 2AR 1...


