background image

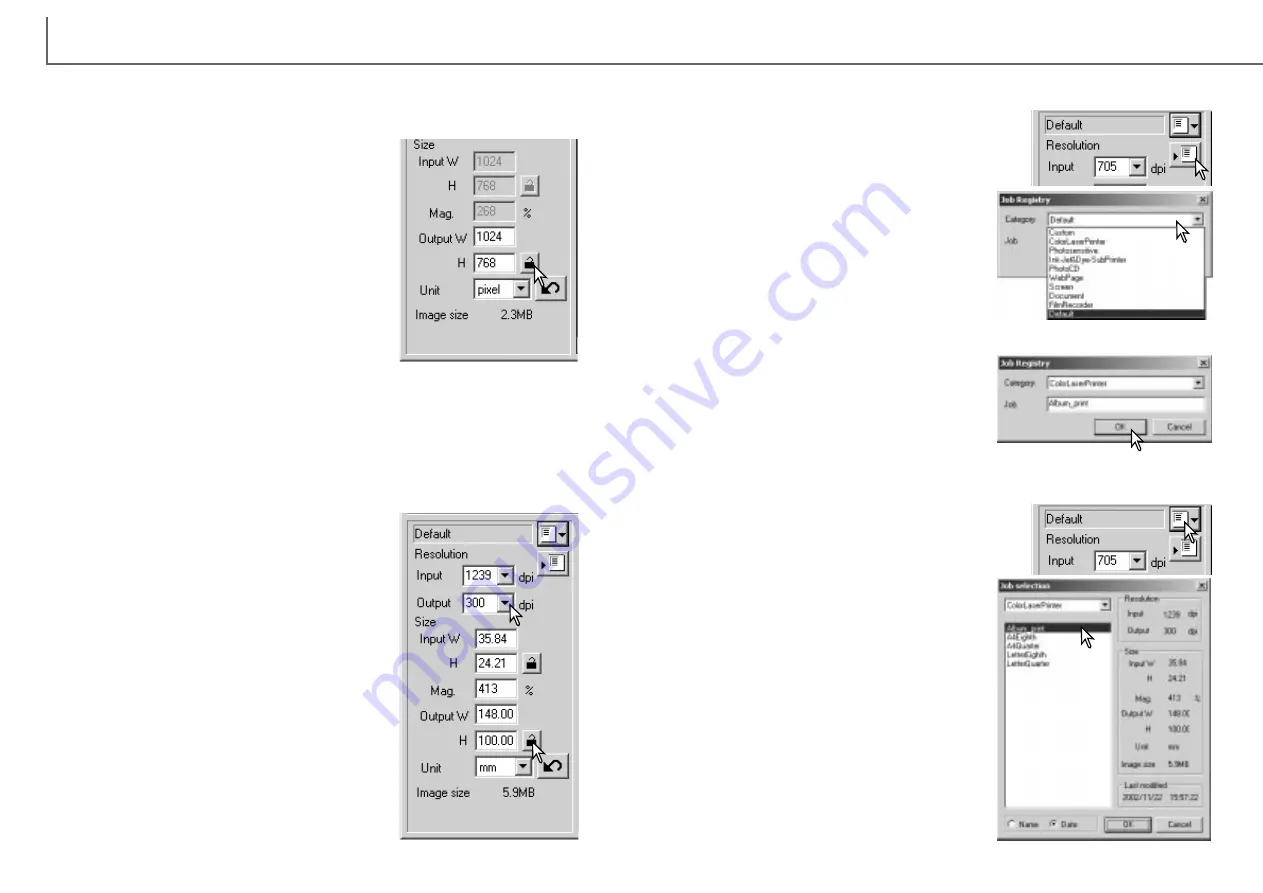
Example 2: setting output by print size and output resolution. This example creates
a 148mm X 100mm image to be printed on a 300 dpi printer.

Select millimeters from the unit list box.

Enter the output resolution of the printer in the output-
resolution list box: 300.

Enter the output size; 148 for the width and 100 for
the height. Click on the output-size lock button to fix
the values.

Use the mouse to adjust the cropping frame over the
prescan image to define the final scanning area. Click
on the frame of the cropping area to resize the box;
the input resolution will adjust according to the crop-
ping area. Click and drag the center of the area to
move the frame. 

The scan settings are complete and the final scan can
be made. Once made, scan settings remain in effect
until changed.

Example 1: setting the scanner output by pixels. This example creates an image
with the pixel dimension of 1024 X 768.

Select pixel from the unit list box. The output-resolu-
tion and input-size boxes are deselected.

Enter the dpi resolution for the output size; 1024 for
the width and 768 for the height. Click the output-size
lock button to fix the values; the output-size boxes will
be deselected.

Use the mouse to adjust the cropping frame over the
prescan image to define the final scanning area. Click
on the frame of the cropping area to resize the box.
The input resolution will adjust according to the crop-
ping area. Click and drag the center of the area to
move the frame. 

The scan settings are complete and the final scan can be made. Once made, scan
settings remain in effect until changed.

D

IMAGE SCAN DUAL III UTILITY

ADVANCED SCANNING

56

Frequently used scan settings can be saved.

A Job file can be deleted. Once deleted, it can not be recovered.

Scan setting examples

Saving scan settings as a Job

Deleting a Job

With the settings to be saved in the scan setting win-
dow, click the save Job button. The Job-registry dia-
log box will open.

Select the category in which to save the settings
from the drop-down menu.

Enter the Job name. Click OK to save the set-
tings. See page 42 to load a Job.

Select the Job file to be deleted from the Job
categories in the selection window. Use the fol-
lowing key(s) to delete the selected file:

Windows - delete key
Macintosh - command key + D.

Click the load Job button.

57

Содержание AF-2840

Страница 1: ...INSTRUCTION MANUAL E...

Страница 2: ...al use Windows software The appearance of the screens may differ from the examples when using Macintosh or other Windows operating systems Every precaution has been taken to ensure the accuracy of thi...

Страница 3: ...film holders 22 Using the APS Adapter AD 10 sold separately 22 Ejecting a film holder 23 Easy Scan Utility 24 Launching the Easy Scan Utility 24 Using the Easy Scan Utility 25 DiMAGE Scan Dual III Uti...

Страница 4: ...age correction tab 64 Guide to image processing tool 65 Undoing and redoing image corrections 66 Tracking image corrections Snapshot button 66 Comparing pre and post correction images 67 Saving image...

Страница 5: ...product emits a strange odor heat or smoke discontinue use Immediately unplug the product The continued use of a damaged product or part may cause injuries or fire Take the product to a Minolta Servi...

Страница 6: ...A 16 bit or greater color monitor High Color or medium color quality Windows XP A monitor with 1024x768 pixels or greater is recommended A monitor with 640 x 480 pixels can also be used Mac OS 8 6 to...

Страница 7: ...It will be displayed with its location in the run dialog box D Driver English Setup exe Click OK In the example below the hard disk is drive C the CD ROM drive is drive D and the operat ing system is...

Страница 8: ...lder will contain the following items DS Dual3 Utility DS Dual3 Easy DS Dual3 Plug in and Read Me See page 85 for the default location of installed files and folders Before using the software read the...

Страница 9: ...nto the CD ROM drive Adobe Photoshop Elements AutoPlay screen will appear Follow the instructions on the screen to install the software After accepting the end user license agreement click the explore...

Страница 10: ...scanner with the computer and peripheral devices on follow the cautions below Never connect or disconnect the cable while the computer the scanner or other devices are operating or transferring data D...

Страница 11: ...cover Slide the two protrusions on the left side of the cover into the two slots in the base 2 Carefully lower the cover taking care not to move the film Snap the cover closed by pressing the two pus...

Страница 12: ...tops The scanner detects the holder and automatically loads the film Do not remove the holder until the film has been rewound see the ejecting a film holder section below Do not remove the APS film fr...

Страница 13: ...i sample scanning Automatic cropping to inside edge p 37 Color matching is on with the output color space set to sRGB p 60 Auto exposure with all film except black and white slides Launching the Easy...

Страница 14: ...dis played The image to be scanned can be selected on this screen Click the frame of the image to be scanned The border is highlighted to indicate selection Only one image can be selected Make the des...

Страница 15: ...r the file size and the more deterioration to the image quali ty TIFF this high resolution bitmap can be opened on any computer platform The color depth of this format can be selected in the preferenc...

Страница 16: ...31 More index scan functions More prescan functions AE area selection p 50 AE lock p 50 Point AF p 52 Manual focus p 52 Image processing p 64 81 Three types of scans can be made singularly or in combi...

Страница 17: ...the bottom right corner Selecting index thumbnails Making an index scan With a loaded film holder in the scanner click the index scan button in the main window to start the scan The frame num ber of...

Страница 18: ...ails and prescan images can be changed with the flip and rotate buttons on the tool bar Fit to window button Normally index thumbnails and prescan images are displayed based on their size and resoluti...

Страница 19: ...BASIC SCANNING 36 Main window and prescan tab Film format p 31 Film type p 31 Index scan button p 33 Prescan button p 37 Scan button p 43 Help Preference button p 44 Rotate left button p 34 Rotate rig...

Страница 20: ...press the prescan button the cropping frame can be adjusted or reset Cropping is a method of recomposing the image by eliminating unnecessary space around the subject Many images are improved by cutt...

Страница 21: ...ed on the tab Macintosh The RGB display will show the color values for any point on the image Simply place the mouse pointer on the image area to see the RGB val ues of that point Pressing the shift k...

Страница 22: ...input the scan settings yourself DiMAGE Scan Dual III Utility gives you an easier choice the Job function This function automatically loads the scan settings based on the final use of the image The sc...

Страница 23: ...on allows the selection of high speed index scans or a quality index scans with prescans Simply click the appropriate radio button The speed setting allows faster index scans Only index thumbnails are...

Страница 24: ...ck box This is rec ommended when making settings for specific films 47 DIMAGE SCAN DUAL III UTILITY ADVANCED SCANNING 46 Exposure control tab Save setting button Load setting button Reset button Apply...

Страница 25: ...log box will appear Enter the file name and select the file destination Click the save button The film holder does not have to be in the scanner to save the file An index file can be displayed in the...

Страница 26: ...n the preferences box To use it with color negatives the exposure control for negatives must be set to auto in the preferences box p 44 AE area selection allows the use of a small area within the imag...

Страница 27: ...ithin the image with contrast or detail The manual focus functions cannot focus on a low contrast image area such as a cloudless or overcast sky Click the manual focus button The mouse point er will c...

Страница 28: ...rom the magnification needed to match the output For example to make a 144 mm x 96 mm print at a resolution of 150 dpi from 35mm film image size 36mm x 24mm the magnification can be calculated by divi...

Страница 29: ...024 for the width and 768 for the height Click the output size lock button to fix the values the output size boxes will be deselected Use the mouse to adjust the cropping frame over the prescan image...

Страница 30: ...Custom Wizard settings have been saved they will be displayed in this window To use any set tings simply select it with the mouse The Custom Wizard is an automated scanning routine Insert a film holde...

Страница 31: ...andard is wider than ColorMatch RGB The exten sive color range makes it ideal for prepress use However the range is so great that it includes many colors that cannot be printed with a four color print...

Страница 32: ...an application with a monitor correction display function such as Adobe Photoshop ver 5 or later With an application without a monitor correction display function such as Photoshop Elements or when t...

Страница 33: ...ution within the image Adjustments can be made to highlights mid tones and shadows in the color and luminance channels p 71 78 Selective color palette advanced tool to make precise adjustments to a sp...

Страница 34: ...with the undo button Click the reset all button to cancel all image corrections applied to the image The undo redo and reset all buttons only affect tools used in the image correction tab Comparing pr...

Страница 35: ...ge is applied to the prescan image This procedure can be repeated until the desired correction is obtained Click the reset button to cancel any changes The difference between the images can be changed...

Страница 36: ...w values Click the reset button to cancel any changes Clicking the auto setting button corrects the brightness and contrast automatically without affecting the color balance Click the reset button to...

Страница 37: ...return to the original freehand curve Drawing tone curves by freehand Using tone curves Reset button Auto setting button p 77 Output shadow and highlight text boxes p 76 Output shadow and highlight s...

Страница 38: ...dows This is a simple technique to make a subject hid den in the shadows brighter Unlike the bright ness level control p 70 this method of correc tion will not loose details in the highlight areas of...

Страница 39: ...detail they may contain will be lost This can be an important tool for improving copy images of text on a white back ground Uneven illumination or faded or stained paper can be distracting when copyi...

Страница 40: ...ck point values are set to 255 and 0 for each RGB level Changing these values allow the calibration of an image with no true white or black Double click on either the white point or black point but to...

Страница 41: ...rs are reassigned a new hue based on the position the barn is green the tree is blue and the sky is red The HSB color space is similar but with many more hues see the color example on page 91 Unlike t...

Страница 42: ...can be used to make scan settings based on the final use of the image See making the final scan using Job section in page 42 The following charts list the parameters of the scanner s Job files based o...

Страница 43: ...ds Windows DS Dual3 folder DS Dual3 Utility DS Dual3 Easy DS Dual3 Plug in Read Me Mac OS 8 6 9 2 2 Mac OS X System folder Preferences folder DS Dual3 folder Prefs folder Help folder Job folder Profi...

Страница 44: ...nd restart the computer Cannot verify home position message appears during scanning Select an autofocus option in the preference window or use point AF or manual focus The scanned image is not sharp C...

Страница 45: ...hina 200 240V AC 50 60Hz for continental Europe Oceania and Asia except for Taiwan Japan Hong Kong and China With supplied AC adapter The adapter unit varies with the destina tion Dimensions 145 W x 1...

Страница 46: ...unt of green Increase the amount of blue Decrease the amount of red Knowing the complementary colors is very important in color balancing If the image has a specific color cast either subtracting the...

Страница 47: ...Amalienstrasse 59 61 A 1131 Wien Austria Minolta Camera Benelux B V Zonnebaan 39 P O Box 6000 NL 3600 HA Maarssen The Netherlands Belgian Branch Prins Boudewijnlaan 1 B 2550 Kontich Belgium Minolta Sc...

Отзывы: