


MA-5151-ENG
PATTERN CONTROLLER STARBI
USE
4-15
19.
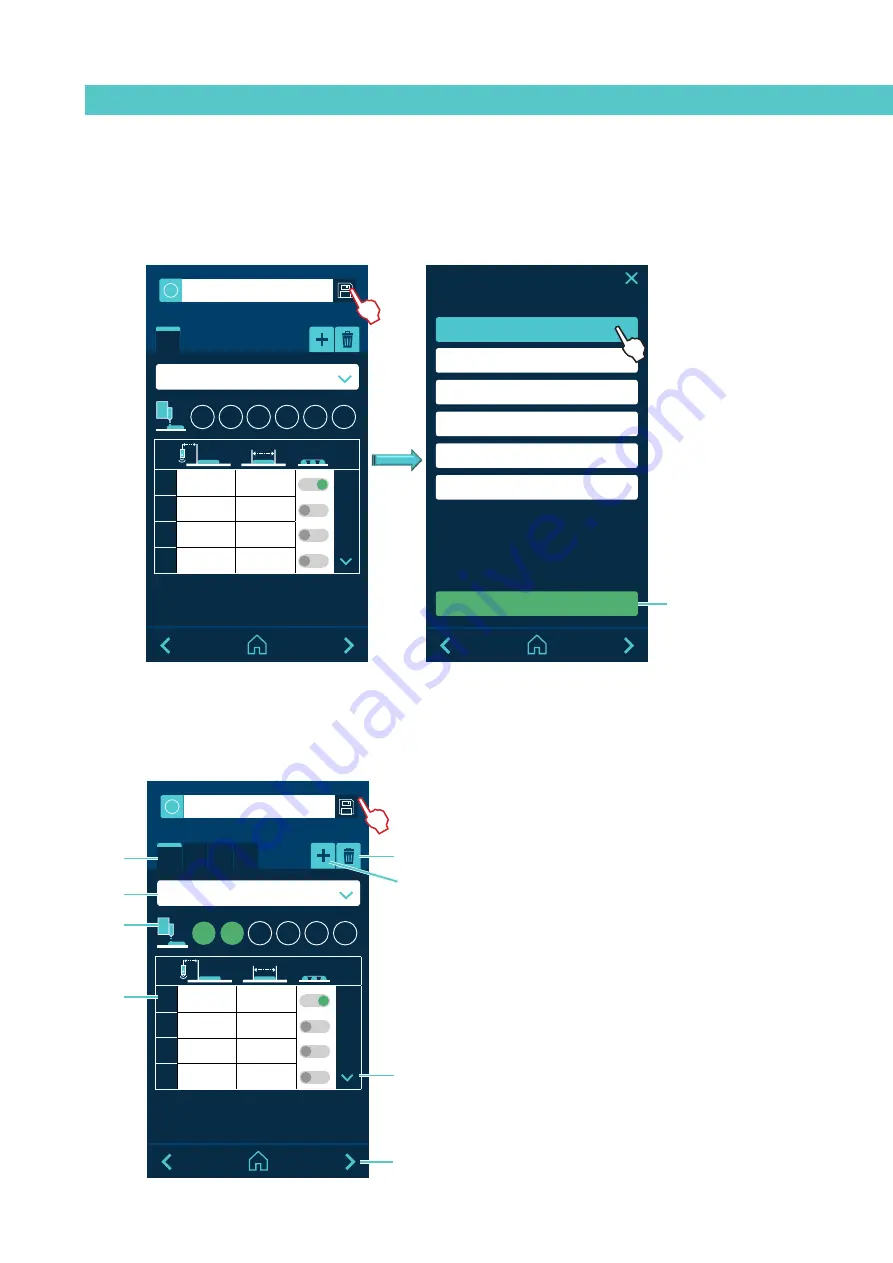
EDIT PRODUCT BY TIME
screen.
Once the photocell is selected, a pattern is configured according to the
parameters described below.
A- The patterns are displayed as they are created or deleted,
depending on the number of configured channels 2, 4 or 6.
B- Press to add pattern (≤ number of channels).
C- Press to delete pattern (≥1). Delete the selected pattern.
D- Select the photocell.
E- The selected channels are in green. The channels already
selected in previous patterns are in grey and if they are
free (unselected) they will appear empty (background
colour).
F- Only 4 beads (1, 2, 3, 4) appear. You can move the table with
the arrows. When pressing the DOWN arrow, beads 1, 2,
3, 4 disappear and beads 5, 6, 7, 8 appear. Press the UP
arrow to return to beads 1, 2, 3, 4.
G- Up to 8 beads for each pattern. The green switch if it is
dotting, the grey switch if it is not dotting.
H- Skip to advanced parameters screen.
STARBI.
W
i
5.
6.
7.
8.
1
2
3
4
5
6
P1
P2 P3 P4
Product 0
Select your FC
Unit: ms
A
D
E
G
B
C
F
H
18.
EDITING PRODUCT BY TIME
screen.
The screen appears when you name a new product from the NEW PRODUCT
screen or if you select an existing one from the EDIT PRODUCT screen. The
first step is to select the photocell and then edit the pattern.
STARBI.
Select your FC
FC1
FC2
FC3
FC4
FC5
FC6
Select
STARBI.
W
i
5.
6.
7.
8.
1
2
3
4
5
6
P1
Product 0
Select your FC
Unit: ms
Confirm select
!
!