background image


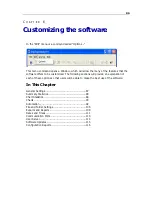
Chapter 6    Customizing the software 

93 


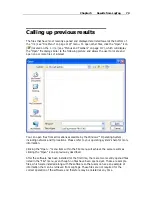
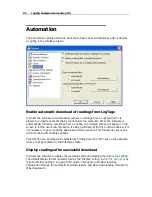
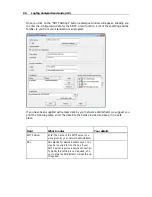
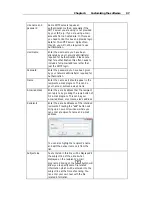
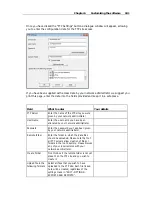
Only show the latest set of readings after download 

Instructs the software to only display the most recently retrieved set of readings on the 
screen. If there are multiple windows of readings open and being displayed, all of these 
windows will therefore be automatically closed and only the most recently retrieved set of 
readings will be displayed. 


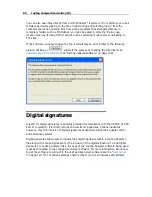
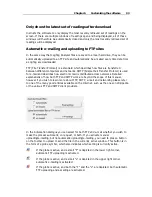
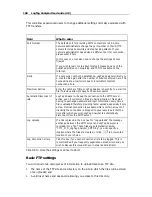
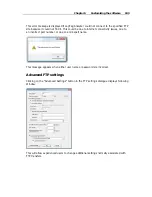
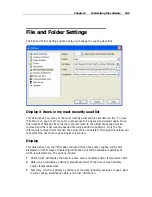
Automatic e-mailing and uploading to FTP sites 

In the same way that LogTag Analyzer files are saved to a local hard drive, they can be 
automatically uploaded to an FTP site and automatically be e-mailed every time data from 
a LogTag are downloaded. 

FTP (File Transfer Protocol) is a standard which describes how files are transferred 
between different computers and networks. SMTP (Simple Mail Transfer Protocol) is used 
for e-mail and describes how electronic mail is distributed across networks. Detailed 
explanations of how both FTP and SMTP work are beyond the scope of this manual, 
however if you wish to learn more about FTP, SMTP, e-mail and networking please refer 
to one of the many good articles available on the Internet, such as the ones on Wikipedia 
or the various FTP and SMTP client providers. 


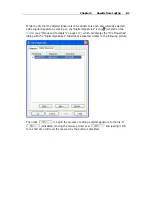
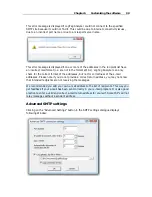
In the Automation dialogue you can select for both FTP and e-mail whether you wish to 
make the process automatic, on request, or both. If you activate manual 
uploading/e-mailing, but not automatic uploading/e-mailing, you need to press a button 
on the toolbar to upload or send the file in the currently active window. This button is in 
the form of a globe symbol, which also indicates which setting is currently active. 


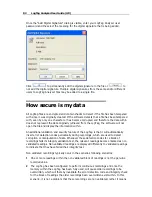
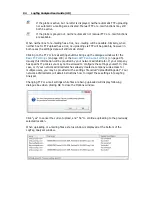
If the globe is active, and a small "F" is depicted in the lower right corner, 
automatic FTP uploading is activated. 


If the globe is active, and a small "e" is depicted in the upper right corner, 
automatic e-mailing is activated. 


If the globe is active, and both the "F" and the "e" are depicted, both automatic 
FTP uploading and e-mailing are activated. 

Содержание Analyzer

Страница 1: ...2 0...

Страница 2: ...in are fictitious and no association with any real company organization e mail address or person is intended or should be inferred Complying with all applicable copyright laws is the responsibility of...

Страница 3: ...LogTag s for next use 20 Starting and using the LogTag 22 LogTag light patterns 24 Retrieve information from LogTag 25 Preparing LogTag s for use 26 Getting a LogTag ready for use 27 Restricted Access...

Страница 4: ...ng statistics 76 Printing the results 76 Sending a file by e mail direct from Analyzer 77 Calling up previous results 79 Digital signatures 80 How secure is my data 82 Viewing file properties 84 Custo...

Страница 5: ...137 Getting updated software 138 Finding your software version 140 Getting more help 141 Appendix 142 Troubleshooting 143 Finding your computer specifications 144 Resolving USB Driver Problems 151 Ch...

Страница 6: ...explain and determine if this version of the guide refers to the version of the software being used The chapter Getting updated software on page 138 included later in this guide will help you through...

Страница 7: ...The process of installing the LogTag Analyzer software should be very familiar to users that have previously installed other software and therefore some experienced users may choose to only skim read...

Страница 8: ...ter Internet Explorer 6 0 or later 65535 16bit or more screen colors 1024 x 768 or higher screen resolution If you are unsure of what your computer specifications are please read the section about Fin...

Страница 9: ...eted as it is not required for using the software Only one file needs to be downloaded to enable installation of the software on your computer Once the relevant installation file has been downloaded t...

Страница 10: ...rating on Windows XP or Windows Vista these drivers will be available through the Microsoft Windows Update feature as an optional hardware update Upgrading from earlier versions If you are installing...

Страница 11: ...anted and erroneous results especially where passwords are affected Starting the software At the conclusion of the installation process the final screen will provide you with an option to immediately...

Страница 12: ...rtcut in the Start menu system If you are using Windows XP you may need to click on the All Programs item to locate the LogTag Analyzer shortcut like in the following picture If you are not using Wind...

Страница 13: ...it started and then retrieve the recorded information out of the LogTag The subsequent chapters will explain in more depth these steps and the various options available to you In This Chapter Connect...

Страница 14: ...B Interface Cradles as are needed and the computer supports may be connected The connectors for the serial RS232 communications ports typically look like the following picture Serial RS232 communicati...

Страница 15: ...section resolving USB driver problems on page 151 will guide you through the steps necessary to resolve any problems with getting USB Interface Cradles working on the computer If the computer is usin...

Страница 16: ...To begin the process of preparing a LogTag to record information first click the LogTag icon that is located on the toolbar see Menus and Toolbars on page 117 which will start the LogTag wizard The L...

Страница 17: ...ake sure you have not neglected to place the LogTag firmly in the Interface Cradle The Wizard is responsible for certain Action Steps and these are clearly listed at the left in the wizard window To g...

Страница 18: ...The software was unable to detect an Interface Cradle connected to the communications port or was unable to detect a LogTag in the Interface Cradle The LogTag is a single use logger and cannot be prep...

Страница 19: ...t to the next screen click on and the third wizard step screen will appear The software will automatically proceed to the next wizard step as if the user clicked on if each of the Interface Cradles de...

Страница 20: ...LogTag s for next use The last Wizard screen involves sending the new configuration data to each LogTag to prepare them for their next use While the software is sending the new configuration data to e...

Страница 21: ...lly prepared for its next use The LogTag failed to be prepared for next use Press to try again The battery within the LogTag is low and is unlikely to have enough capacity to record all the data you w...

Страница 22: ...lash on and off at the same time You may have the LogTag record as many inspection marks as you want while it is recording however only one inspection mark can be recorded per reading In other words i...

Страница 23: ...Chapter 3 Quick Start Guide 23 Only flashes if no alert condition is present...

Страница 24: ...en and red LED s displayed when pressing start mark button while recording to indicate an inspection mark in the software displayed directly after the start up signal following a push button start whe...

Страница 25: ...this Start button press red LED glows faintly This is by design but conveys no information Retrieve information from LogTag When you are ready to view the recordings that are stored within the LogTag...

Страница 26: ...out the entire 10 day period How often it should record the environmental conditions Under what conditions it should display an alert An alert indicates when the environmental condition being recorded...

Страница 27: ...e LogTag ready for next use This option is useful when you are unsure whether or not the readings stored within the LogTag have been previously retrieved and saved to disk 2 Click the Configure menu i...

Страница 28: ...and bob for example are different Various models also offer the option to also request a password when the logger is downloaded This function is enabled when configuring the logger by ticking the box...

Страница 29: ...option is selected If this upgrade is applied LogTag Analyzer 1 8r9 or later will be required to access the loggers Older versions will display an error message if communication is attempted When the...

Страница 30: ...creen have been made if any click to send the configuration information to the LogTag s The following table describes each configurable option that is permitted to change Function Purpose User ID This...

Страница 31: ...ssfully downloaded to the LogTag it will be placed into hibernation When the START MARK button has been pressed and held the LogTag will wake from hibernation and start recording with the parameters a...

Страница 32: ...elay of X Determines how long after the START MARK button on the LogTag has been pressed that it will actually begin to record the environment humidity and or temperature This feature is useful for ex...

Страница 33: ...his feature is ticked the upgrade will perform regardless whether any of the requires a password tick boxes are enabled or not If multiple units are configured at the same time using more than one int...

Страница 34: ...lease note that matching these to known conditions of interest in your monitoring program may require some information about the effects of exposure to different durations of out of range humidity and...

Страница 35: ...rt indicator will not activate Maximum value is 256 minimum is 2 After X alert readings have occurred W minutes Tick this box and enter a number into the adjacent field if you want to trigger an alert...

Страница 36: ...of range events equals 2 2 2 6 The alert condition is 7 total so the alert does not go off No Flashing Red Alert Indicator 4 readings out of range return to normal 4 readings out of range The first al...

Страница 37: ...e occurred 2 You can not enter a number into the After X consecutive alert readings field which is larger than the number in After X alert readings have occurred since the latter alert condition would...

Страница 38: ...out and cannot be ticked After X alert readings have occurred W minutes Readings above Readings below Tick the boxes next to Readings above or Readings below to establish whether only readings above a...

Страница 39: ...8 readings below 0 C do not count towards alert readings No Flashing Red Alert Indicator 4 readings of 20 C or above return to normal 4 readings of 20 C or above The first alert condition is not met...

Страница 40: ...otable exception for each range above or below you can only select either accumulative or consecutive readings but not a combination of both This does however give you the option to select e g a diffe...

Страница 41: ...ng from the alarm and statistics calculations PAUSED will now be shown on the display This allows the user to review the statistics or clear an alarm without causing an invalid reading alarm or statis...

Страница 42: ...pre start logging is enabled the LogTag will automatically start logging as soon as configuration is completed It will record at the same sampling interval as defined in the configuration and will con...

Страница 43: ...ou need perform a similar task on multiple LogTags whether it is retrieving readings stored within the LogTags and or preparing them for their next use The LogTag Analyzer software has been designed t...

Страница 44: ...will not compromise the structural integrity of the LogTag We do however recommend that the dead weight stress on the hole itself not exceed 5 pounds 2 Kg The sensor for the LogTag is also very respo...

Страница 45: ...the Alert and OK lights 3 Not respond to the START MARK button being pressed The only exception is when the LogTag has been configured for Push button start from hibernation in the configuration scree...

Страница 46: ...unable to set the LogTag to hibernation mode Once a LogTag has been successfully set to Hibernation mode it should be removed from the Interface Cradle before pressing any other button As soon as the...

Страница 47: ...date a useful feature if you require traceability This chapter explains how you can retrieve the recorded information stored within a LogTag and have the software display it to you on the screen in a...

Страница 48: ...eadings you will see an animated picture appear similar to the following picture 2 Click the Download menu item located in the LogTag menu This is the second quickest option as it does not include the...

Страница 49: ...s explained in Combining charts onto a single chart on page 64 you can save the current configuration by clicking on the toolbar icon or selecting the Save command from the File menu on page 119 Selec...

Страница 50: ...a file which when opened again will only display a selected time window of the recorded data The time window of this Selected LogTag Data file is defined through the zoom settings of the currently ac...

Страница 51: ...ed are still present in the file Any sltd file can be saved as a ltd file and when re opened all readings taken by the recorder during this trip will become available for viewing This can also be achi...

Страница 52: ...e menu on page 119 Select a file name and location for your PDF file Automatic generation of PDF files is enabled in the section about Exports and Reports on page 109 Here you can also define the comp...

Страница 53: ...etting Understanding the results The Data Screen is an all purpose data display The window appears inside the main LogTag Analyzer window and has a series of tabs along the bottom Each of these tabs c...

Страница 54: ...ics for display loggers The screens that are typically used are the first three Chart Data and Summary since they represent the normal usage of the LogTag The other Data Screens are included to deal w...

Страница 55: ...pears as a chart It might look something like this The display does not show all of the available data points For more detail you can zoom in and display just one small section of the charted data Usi...

Страница 56: ...ate a point based on chart data from a LogTag you can paste the picture of the chart directly into the letter When the mouse pointer is moved over the chart a small window tooltip is displayed near th...

Страница 57: ...on of readings currently being shown on the Chart screen Following is an example of the additional section of statistics that will appear within the Summary Screen when a section of the readings withi...

Страница 58: ...ata record you will see a summary of all the points that were recorded between each subsequent inspection mark Following is a picture of a portion of a Summary Screen showing the relevant information...

Страница 59: ...nge temperature and humidity ranges if applicable for the chart display The dialog shows the current zoom settings Click to apply your selected settings To return to the previous zoom level use the Zo...

Страница 60: ...ation will be displayed in the chart When you zoom the chart display the annotation will be zoomed with the chart readings To edit an annotation move the mouse pointer into the area of an existing ann...

Страница 61: ...s on the chart To save the annotations click the toolbar button or select the Save command from the File see File Menu on page 119 menu The annotations will be saved in a file with the same name as th...

Страница 62: ...ser Guide 2 0 Chart subtitle The chart subtitle is displayed and printed underneath the chart title To edit the subtitle right click on the area above the chart and select Edit Chart Subtitle from the...

Страница 63: ...command from the File see File Menu on page 119 menu If the LogTag Analyzer application is in Single Chart mode the subtitle and annotations for the currently active chart will be saved in a file wit...

Страница 64: ...ins an entry for each chart showing the chart name and the corresponding letter You can change the background color for the Multi Chart display through the Charts on page 90 section in the Options see...

Страница 65: ...Options see Customizing the software on page 86 Window To change the display color of individual charts sensors move the mouse pointer over a chart until the tooltip is displayed Right click then sel...

Страница 66: ...inal date time by selecting the Original start time button Click the OK button to display the change 2 Press and hold the CTRL key left click on the chart you would like to move and drag the chart to...

Страница 67: ...ayed to illustrate the original start time You can display the elapsed time instead of the date time by selecting the Elapsed Time option in the Chart Options dialog Charts on page 90 Aligning charts...

Страница 68: ...visible in the other chart tabs and are stored with the multi chart when saved Please note that following behaviour applies to these special chart tabs Zoom settings will not be transferred to the Av...

Страница 69: ...abs displayed can occupy large amounts of memory and run slow Therefore we recommend only turning the feature on when required Clicking on the highlighted average tab command will turn the average tab...

Страница 70: ...d at different times Starting with the earliest time present in the chart a value is created for each LogTag as if it had recorded a log at that time It is those values that are used to calculate and...

Страница 71: ...eading Standard Deviation and Mean Kinetic Temperature will not displayed for the relevant time interval Average Reading The Average Reading is the arithmetic mean of the sequence of data points It is...

Страница 72: ...readings For example if the arithmetic mean of the readings was 50 6 C and the standard deviation was 2 3 C then approximately 68 of the readings were between 48 3 C and 52 9 C 95 of all the readings...

Страница 73: ...oduct was thermally subjected to during the period of time the various temperature reading were recorded Mathematically the formula for calculating the mean kinetic temperature can expressed as illust...

Страница 74: ...ti a data point to include in the calculation in degrees Celsius For example if there were 5 data points to calculate the mean kinetic temperature of and they were 12 3 15 9 16 2 14 7 and 14 9 degrees...

Страница 75: ...gree Minutes calculation displayed will be based on the readings that were recorded above the ideal conditions The ideal conditions used in the calculation of the Degree Minutes formula are based on t...

Страница 76: ...s on page 89 for more information about configuring the chart statistics If there are readings beyond the limits of the sensor within the time interval being displayed the statistics for the relevant...

Страница 77: ...ng once on the Print icon located on the toolbar see Menus and Toolbars on page 117 or by clicking the Print menu item from within the File menu Sending a file by e mail direct from Analyzer You can s...

Страница 78: ...her than the LogTag Analyzer format specify the desired file formats in the Exports and Reports on page 109 section in the Options see Customizing the software on page 86 Window The data files will au...

Страница 79: ...the Windows Operating System including network and ftp locations Please refer to your operating system s help for more information Clicking the Open menu item within the File menu will achieve the sam...

Страница 80: ...Getting updated software on page 138 Digital signatures Support for digital signatures is primarily provided for compliance with the US FDA 21 CFR Part 11 regulation Electronic records and electronic...

Страница 81: ...ocated on the toolbar see Menus and Toolbars on page 117 which will display the File Properties dialog with the Digital Signatures tab already activated similar to the following picture Then click to...

Страница 82: ...n and security feature of the LogTag is that it will automatically insert error detection codes periodically during recordings which are used to detect corruption or manipulation of data Whenever thes...

Страница 83: ...Cradle are returning evenly to their normal position when the LogTag is removed Since the software does not modify any of the recorded data within a LogTag file at any time if the software can open th...

Страница 84: ...ng file properties The file properties which is accessed through the File Menu on page 119 and or through the toolbar command provides users with a brief summary about the data included within the fil...

Страница 85: ...xplorer and using the mouse click the right button over the file and select the Properties menu item with the left mouse button from the menu that will be displayed similar to the following picture Se...

Страница 86: ...explanation of each of these options so that users will be able to make the best use of the software In This Chapter General Settings 87 Summary Statistics 88 Chart Statistics 89 Charts 90 Automation...

Страница 87: ...etermine what units of measurement temperatures will be displayed in The options include Fahrenheit F Celsius C Kelvin K Use Font Determines what font to use to display and print information about Log...

Страница 88: ...User Guide 2 0 Summary Statistics This option allows you to specify which statistics are displayed in the Summary tab The statistics can be enabled or disabled by clicking the tick box for the relevan...

Страница 89: ...zing the software 89 Chart Statistics This option allows you to specify which statistics are displayed on the charts The statistics can be enabled or disabled by clicking the tick box for the relevant...

Страница 90: ...ayed graphically on the chart these become color background regions These are different colors for at or above high alert limit between high alert limit and low alert limit and at or below low alert l...

Страница 91: ...TRIX 8 has a published minimum temperature of 40 C Temperatures to 41 5 C may be displayed if the Show readings beyond specification is enabled however the accuracy of recordings between 40 and 41 5 i...

Страница 92: ...tion is being performed With this function enabled it is not necessary to go through the download wizard procedure This function is very useful when working with multiple LogTags This function can be...

Страница 93: ...networks Detailed explanations of how both FTP and SMTP work are beyond the scope of this manual however if you wish to learn more about FTP SMTP e mail and networking please refer to one of the many...

Страница 94: ...r the Basic SMTP and e mail settings on page 95 Usually this information will be provided by your network administrator If your company has specific IT policies you may not be allowed to configure the...

Страница 95: ...r format can also be e mailed or uploaded They can be selected separately for each transfer mechanism in the respective Settings dialogue and are independent of the settings in the Exports and Reports...

Страница 96: ...ess data by your network administrator we suggest you print the following table enter the data into the fields provided and keep it in a safe place Field What to enter Your details SMTP Server Enter t...

Страница 97: ...tion Name Enter the name as it should appear in the recipients e mail program This can be your name or someone else s name E mail address Enter the e mail address that the recipient can reply to by pr...

Страница 98: ...T OPTIONS EXPORTS AND REPORTS As a minimum you only need to provide an SMTP server address and one recipient e mail address for this function to work Every time you make changes to these settings you...

Страница 99: ...k for the correct format of the addresses but not for correctness of the e mail addresses Please note if you do not provide a correct return address you may not know that intended recipients are not r...

Страница 100: ...rver active even if currently no files are being e mailed This avoids having to exchange password and login information every time a file is uploaded therefore providing faster uploads especially if o...

Страница 101: ...ser name you have been allocated by your network administrator Password Enter the password you have been given by your network administrator Remote folder Enter the folder in which the data files shou...

Страница 102: ...n to an FTP server Every time you make changes to these settings you should perform a test by pressing the Test connection button LogTag Analyzer will check you have provided valid connection data if...

Страница 103: ...to internet connectivity issues due to an incorrect port number or due to a mis spelt name This message appears when either user name or password are incorrect Advanced FTP settings Clicking on the Ad...

Страница 104: ...ry to upload the file if previous attempts have not been successful Automatic Disconnect if idle LogTag Analyzer will keep the connection to the FTP server active even if currently no files are being...

Страница 105: ...he file reference is removed from this list the actual file is not deleted Changing this setting will take effect the next time LogTag Analyzer is started Display This determines how the information r...

Страница 106: ...on this button will display a popup list similar to the following picture to allow you select from the available elements To customize how the file name is created you may use one or more of the avail...

Страница 107: ...if there are only pre start recordings PRODUCTID The product identifier part number for the LogTag used to record the data SERIALNUM The unique serial number of the LogTag START The date and time the...

Страница 108: ...warning an already existing file with the same name regardless of the settings made in the Automation on page 92 options Uniqueness This determines how the software will manage information retrieved...

Страница 109: ...wed at a later date However it may be that the recorded data is to be regularly integrated with other data and or view the recorded data using software other than LogTag Analyzer Exports and Reports w...

Страница 110: ...list separator from the Regional and Language Options in the Windows Operating System which typically is a comma or a self selected separator instead to create CSV files In some languages however thi...

Страница 111: ...eparate the elements these spaces will appear in the same location in the date displayed The letters must be in uppercase or lowercase as shown in the following table for example MM not mm Characters...

Страница 112: ...ding zero for single digit hours 24 hour clock m Minutes with no leading zero for single digit minutes mm Minutes with leading zero for single digit minutes s Seconds with no leading zero for single d...

Страница 113: ...ommunication ports are checked for connected Interface Cradles This allows certain communication ports to be excluded which are not used to connect Interface Cradles to and or are regularly used for o...

Страница 114: ...ally only used within a multiple computer user environment and or if your organization requires compliance with the US FDA 21 CFR Part 11 regulations for use of digital signatures that are controlled...

Страница 115: ...e program is available for download from the LogTag Recorders website This section allows the time interval if enabled between each check for a newer version to be defined An interval of 30 days is re...

Страница 116: ...yzer_config_log_WW YYYY where WW is the current week number and YYYY is the current year Each week a new file will be generated Clicking on the button will allow you to select a folder of your choice...

Страница 117: ...e The toolbar provides quick access to some of the more commonly used functions within the menu system The menu system contains lists of all the operations and commands that are available to you while...

Страница 118: ...ple F2 or Ctrl O These represent key strokes on the keyboard that instruct the software to perform the appropriate command without out the need to select the menu or toolbar command When only one key...

Страница 119: ...variety of information that relates to a data set representing readings that were recorded over a discrete period of time by a single LogTag The File menu will appear similar to the following picture...

Страница 120: ...nges you have made to the LogTag file or Multi Chart configuration to your disk drive Save As This will display the Save As file dialog which will allow you to save a copy of the file currently being...

Страница 121: ...re then this command is not visible The section User Server on page 114 explains in more detail how to get the Analyzer software to connect to the User Server software Logoff user username see How use...

Страница 122: ...n the entire contents of the window is copied to the clipboard regardless of what part of the data you have scrolled to view Zoom Out This will undo the last zoom operation performed allowing you to s...

Страница 123: ...This will display a wizard to help you through the necessary steps to prepare LogTags for their next use This command is explained in further detail in the chapter Preparing LogTags for use on page 2...

Страница 124: ...is command is useful when you need to closely inspect and analyze different sections of the same data set Close Closes the currently selected window within the LogTag Analyzer software Close All Close...

Страница 125: ...he online user guide for viewing Requires Adobe Acrobat and or Adobe Acrobat Reader software version 4 or later to be installed on the computer LogTag Home Page This will open your default Internet br...

Страница 126: ...nd open LogTag files that contain previously retrieved LogTag readings Save a copy of the LogTag data to a file on your disk drive Opens the window that will allow you to print a copy of the LogTag da...

Страница 127: ...ps of readings between inspection marks Switches into Multi Chart mode which displays all currently open charts together in one window If additional LogTag s are downloaded or more files opened their...

Страница 128: ...hat only one page is displayed at a time Once this button is selected it will change to Two Page Two Page Selecting this button will change the display so that two consecutive pages are displayed side...

Страница 129: ...e LogTag Analyzer software usually by clicking the left mouse button on it or by clicking the right mouse button on the title bar see Menus and Toolbars on page 117 The commands illustrated in the fol...

Страница 130: ...corner of a data file window usually by clicking the left mouse button on it or by clicking the right mouse button on the title bar see Menus and Toolbars on page 117 of the data window These menu co...

Страница 131: ...egrate support for it correctly and seamlessly This chapter briefly covers some points of interest for computer network administrators In This Chapter Distributing software to workstations 132 Simple...

Страница 132: ...path setup iss Where a myserver my_apps_path represents the network path to the folder containing the installation of the LogTag Analyzer software b setup exe is the installation software As many diff...

Страница 133: ...g Analyzer on start up and replace the settings already present in the Options for Automation Creating such settings files requires a tool called LogTag Settings Editor which is available through your...

Страница 134: ...ation options is specifically prohibited through LogTag User Server users can still change FTP upload and SMTP mailer settings even after transfer from the UploadSettings dat Should it be necessary to...

Страница 135: ...he software before being permitted to use any of the features and functionality of the software For a user to successfully logon to the software the user must enter their username which the administra...

Страница 136: ...igits letters or symbols and or a minimum number of digits to be included in the password Please contact your network administrator if you have problems with the logging on the software Passwords shou...

Страница 137: ...137 In This Chapter Getting updated software 138 Finding your software version 140 Getting more help 141 C H A P T E R 9 Getting more information...

Страница 138: ...e relevant instructions to obtain a copy of the software The first option will download from the LogTag Recorders Internet site the relevant information about the latest version of the software availa...

Страница 139: ...wnloaded file to begin the installation Installing a newer version of the LogTag Analyzer software will update all the relevant program files It will not affect any of your LogTag data files or your c...

Страница 140: ...guide is 2 0 then the contents of this user guide refer to the version of software being used If however this window shows the software to be LogTag Analyzer 1 0 and the version of this guide is 2 0...

Страница 141: ...eview if you want to so that LogTag Recorders will be informed of the relevant information about your system in order to provide you with quality and useful assistance Please include in the e mail as...

Страница 142: ...142 In This Chapter Troubleshooting 143 Finding your computer specifications 144 Resolving USB Driver Problems 151 Sensor Responsiveness 169 C H A P T E R 1 0 Appendix...

Страница 143: ...oftware and place the LogTag into the Interface Cradle Download the LogTag If the LogTag can be identified by the software then the battery is good and the LogTag is OK I am unable to get a serial por...

Страница 144: ...If the LogTag has been configured to do continuous recording see Continuous operation on page 43 then as each block of 127 logs is started to be replaced with the latest readings the data integrity e...

Страница 145: ...Chapter 10 Appendix 145 b Once the Start button has been clicked you will see a menu appear c If your menu looks similar to the following picture click on the visible Control Panel item...

Страница 146: ...ng picture the Control Panel item is located within the Settings menu item e Within the Control Panel window there is a System icon For Windows XP users you may need to Switch to Classic View to locat...

Страница 147: ...t will display the relevant information for you about your system 2 To determine your screen resolution and colors a Open the Control Panel as explained in step 1 b Open the Display item c Click on th...

Страница 148: ...perties window you will see your current screen settings and you may also be able to change some of your display settings if you want 3 To determine your spare hard disk drive space a Open My Computer...

Страница 149: ...Chapter 10 Appendix 149 b Using your mouse click the button on the right over the drive that includes C in its description c Select Properties left mouse click from the popup menu that will appear...

Страница 150: ...at the top of the drive properties window will display the relevant information for you about your hard drive e If you have multiple hard disk drives installed on your computer you can repeat steps b...

Страница 151: ...driver online you will need to manually update the drivers on your system It is strongly recommended that the software is installed prior to any USB Interface Cradles being connected to the computer T...

Страница 152: ...socket USB sockets are typically located at the rear of the computer 2 Open the Control Panel This can be done by using the mouse to click on the Windows Start button typically located in the bottom l...

Страница 153: ...cture the Control Panel item is located within the Settings menu item 5 Within the Control Panel window there is a System icon For Windows XP users you may need to Switch to Classic View to locate the...

Страница 154: ...2 0 6 If your system properties looks similar to the following picture click the Hardware tab followed by the Device Manager button to open a view of the devices that have and have not been successfu...

Страница 155: ...pter 10 Appendix 155 7 If you system properties looks similar to the following picture click the Device Manager tab to view the devices that have and have not been successfully installed on the comput...

Страница 156: ...versal Serial Bus controllers entry to view all the USB devices that have been installed on the computer If the USB device driver installed successfully but has not yet started the following will guid...

Страница 157: ...rt indicated by the USB Interface entry appearing in the device manager with either the or the picture you may need to reinstall the USB driver files which is described subsequently If the USB device...

Страница 158: ...t is called Programs and Features and looks like this Windows XP and Windows Vista users may need to Switch to Classic View to locate this icon quickly Start open the Add or Remove Programs icon once...

Страница 159: ...ly update the USB driver files for Windows XP computers open the Device Manager The Device Manager can be started by opening the System icon located in the Windows Control Panel selecting the Hardware...

Страница 160: ...wizard to start similar to the following picture You can either let Windows search and download the USB driver online from Windows Update or select the Install from a list or specific location Advanc...

Страница 161: ...rivers i386 C Program Files LogTag Recorders LogTag Analyzer Drivers amd64 for 64 bit Windows systems You may use the Browse button in the window that appears similar to the following picture to help...

Страница 162: ...ogTag Analyzer User Guide 2 0 4 Once the driver files have been installed successfully you will see a window similar to the following picture You may now connect and start using your USB Interface Cra...

Страница 163: ...y reinstall the USB driver files for Windows 2000 computers open the Device Manager The Device Manager can be started by opening the System icon located in the Windows Control Panel selecting the Hard...

Страница 164: ...t button to display the popup context menu which will be similar to the following picture 2 Select the Properties option using the left button on the mouse 3 From the USB Interface Properties window t...

Страница 165: ...will device driver wizard will appear similar to the following picture click the Next button to continue 5 Ensure the Search for a suitable driver for my device recommended option is selected and clic...

Страница 166: ...B Interface Cradle driver files 7 When prompted for the location of the driver files enter the location of the installation of the software followed by the path to the USB driver files The default loc...

Страница 167: ...endix 167 8 If you have chosen the correct folder that contains the driver files for the USB Interface Cradle you will see a window similar to the following picture Click the Next button to install th...

Страница 168: ...ogTag Analyzer User Guide 2 0 9 Once the driver files have been installed successfully you will see a window similar to the following picture You may now connect and start using your USB Interface Cra...

Страница 169: ...y different temperature and then suddenly change again usually it is a gradual incremental process For example if the actual environment temperature changed from 15 to 45 over a period of 5 hours in a...

Страница 170: ......

Страница 171: ...20 121 123 127 135 136 139 D Dates and Times 108 111 Degree Minutes 75 Digital signatures 80 121 Display 105 Display Logger Alarms 40 Display readings after successful download 92 Display X items in m...

Страница 172: ...tricted Access Requirements 28 32 Restricting what users can do 134 Results from LogTag 25 47 123 Retrieve information from LogTag 25 S Saving a Multi Chart file 49 Saving LogTag Data 49 Selected LogT...

Отзывы: