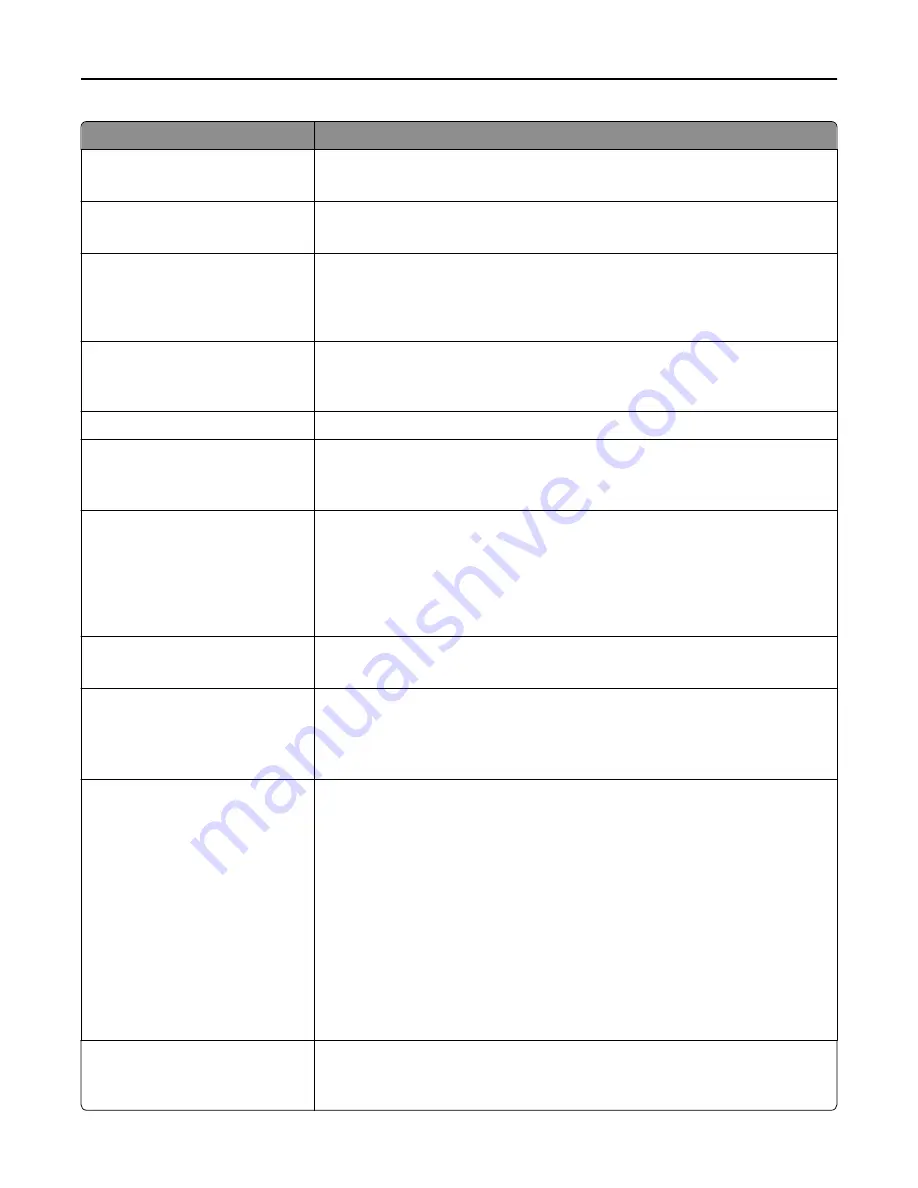
Use
To
Text/Photo Default
5–90
Set the quality of a text/photo image in relation to file size and quality.
Note:
75 is the factory default setting.
Photo Default
5–90
Set the quality of a photo image in relation to file size and quality.
Note:
50 is the factory default setting.
Use Multi
‑
Page TIFF
On
Off
Provide a choice between single-page TIFF files and multiple
‑
page TIFF files. For a
multiple-page scan
‑
to
‑
FTP job, either one TIFF file is created containing all the pages,
or multiple TIFF files are created with one file for each page.
Note:
On is the factory default setting.
Scan Bit Depth
1 bit
8 bit
Enable the Text/Photo mode to produce smaller file sizes by using 1
‑
bit images.
Note:
8 bit is the factory default setting.
File Name
Type a base file name.
Custom Job Scanning
On
Off
Copy a document that contains mixed paper sizes.
Note:
Off is the factory default setting.
Scan Preview
On
Off
Specify whether a preview appears on the display for scan jobs.
Notes:
•
Off is the factory default setting.
•
This menu item appears only when a formatted, working printer hard disk is
installed.
Background Removal
‑
4 to 4
Adjust the amount of background visible on a copy.
Note:
0 is the factory default setting.
Color Balance
Cyan - Red
Magenta - Green
Yellow - Blue
Enable an equal balance of colors in the output.
Color Dropout
Color Dropout
None
Red
Green
Blue
Default Red Threshold
0–255
Default Green Threshold
0–255
Default Blue Threshold
0–255
Specify which color to drop and to adjust the dropout setting for each color threshold.
Notes:
•
None is the factory default setting for Color Dropout.
•
128 is the factory default setting for each color threshold.
Contrast
0–5
Best for content
Specify the contrast of the scanned image.
Note:
Best for content is the factory default setting.
Understanding the printer menus
176
Содержание XC2130
Страница 1: ...XC2130 User s Guide September 2014 www lexmark com Machine type s 7527 Model s 496 ...
Страница 27: ...1 2 1 Memory card connector 2 Option card connector 5 Reattach the cover 1 2 Additional printer setup 27 ...
Страница 209: ...3 Open the top door 4 Remove the right side cover Maintaining the printer 209 ...
Страница 228: ...Shipping the printer When shipping the printer use the original packaging Maintaining the printer 228 ...
Страница 240: ...2 Open the top door Clearing jams 240 ...


