Install a simple-swap drive
Use this information to install a simple-swap drive.
Ground package before opening”
Notes:
• For a list of supported drives, see
https://static.lenovo.com/us/en/serverproven/index.shtml
• The drive bays are numbered to indicate the installation order (starting from number “0”). Follow the
installation order when you install a drive. See “Front view” on page 17.
• You can mix drives of different types and different capacities in one system, but not in one RAID array.
The following order is recommended when installing the drives:
– Drive type priority: SATA SSD, SATA HDD
– Drive capacity priority: the lowest capacity first
• The drives in a single RAID array must be the same type, same size, and same capacity.
Before installing a simple-swap drive:
1. If there is a drive filler installed, remove it and keep it in a safe place.
2. Touch the static-protective package that contains the new drive to any unpainted surface on the outside
of the server. Then, take the new drive out of the package and place it on a static-protective surface.
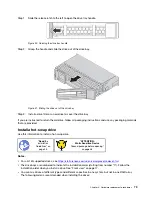
To install a simple-swap drive, complete the following steps:
Figure 55. Simple-swap drive installation
.
Hardware replacement procedures
83
Содержание ThinkSystem SR530
Страница 1: ...ThinkSystem SR530 Maintenance Manual Machine Types 7X07 and 7X08 ...
Страница 8: ...vi ThinkSystem SR530 Maintenance Manual ...
Страница 24: ...16 ThinkSystem SR530 Maintenance Manual ...
Страница 52: ...44 ThinkSystem SR530 Maintenance Manual ...
Страница 72: ...64 ThinkSystem SR530 Maintenance Manual ...
Страница 74: ...66 ThinkSystem SR530 Maintenance Manual ...
Страница 170: ...162 ThinkSystem SR530 Maintenance Manual ...
Страница 174: ...166 ThinkSystem SR530 Maintenance Manual ...
Страница 178: ...170 ThinkSystem SR530 Maintenance Manual ...
Страница 183: ......
Страница 184: ......


