


Tutorials: Setup Mode
Basics Of Using Riffs
13-57
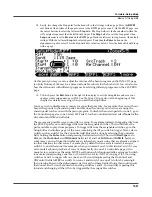
12. Press the bottom
Chan/Zone
button (to the left of the display) to move to the
RIFF2
page for zone
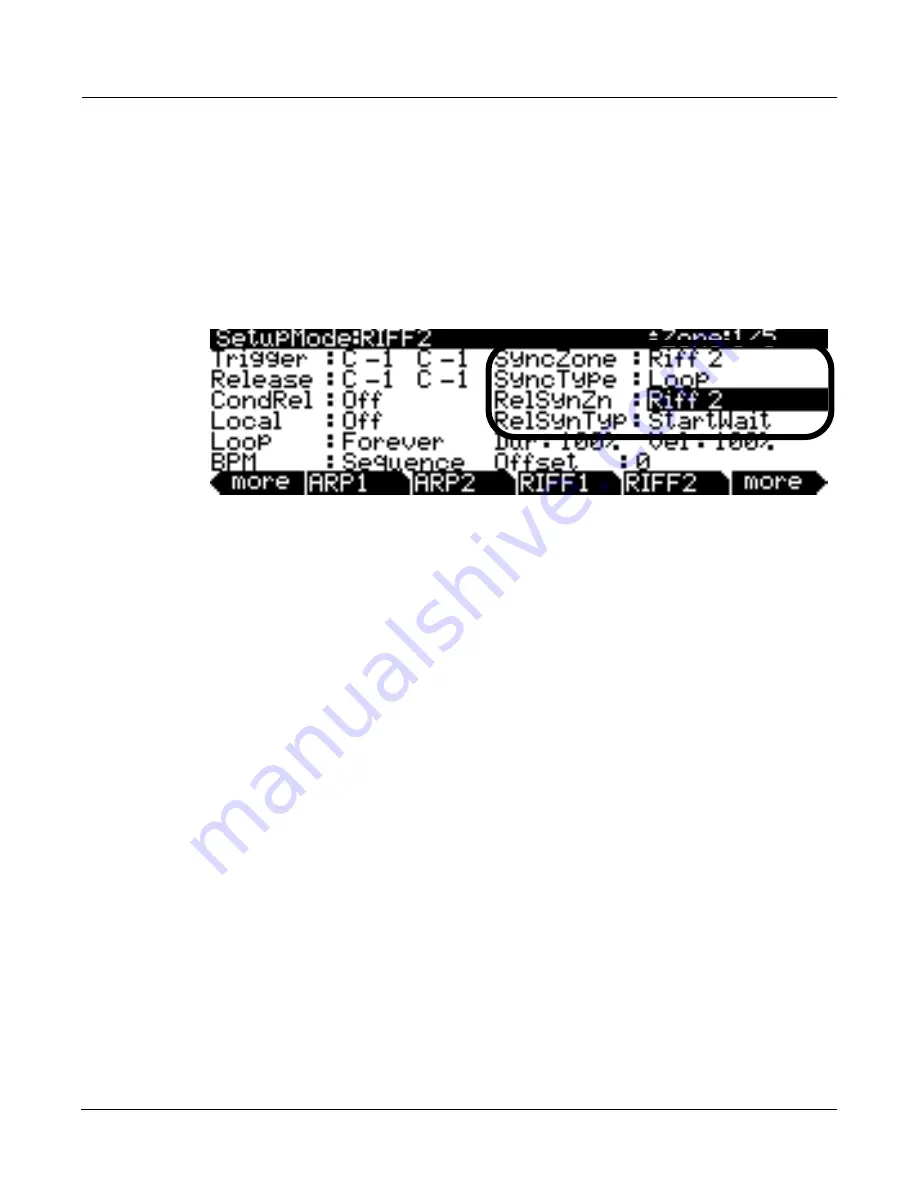
1. On the RIFF2 page for zone 1, use the cursor buttons to select the
SyncType
field and use the
Alpha Wheel to set this field to
Loop
(see below.)
Next, use the cursor buttons to select the
SyncZone
field and use the Alpha Wheel to set this field to
Riff 2
(see below.)
These settings make
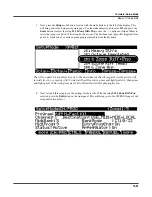
riff 1 wait to start until the loop point of riff 2 occurs. Next, use the cursor buttons to select the
RelSynTyp
field and use the Alpha Wheel to set this field to
StartWait
(see below.)
Next, use the
cursor buttons to select the
RelSynZn
field and use the Alpha Wheel to set this field to
Riff 2
(see
below.)
These settings make riff 1 wait to release (stop) until riff 2 starts.
With the settings described in steps 11 and 12 completed, riffs 1 and 2 should sync with each
other when triggering or releasing each. Follow these steps to see how the riffs sync. First, make
sure nothing is playing by pressing the front panel
Stop
button (to the left of the display,) and
pressing and unlighting any lit pads. Next, press and light pad 1 to start riff 1, then, press and
unlight pad 1 to release riff 1. Since riff 1 has its
RelSynTyp
set to
StartWait
and
RelSynZn
set to
Riff 2
, riff 1 is now waiting for riff 2 to start before releasing (stopping.) Next, press and light pad 2 to
start riff 2.
Since riff 2 has its
SyncType
set to
Loop
and
SyncZone
set to
Riff 1
, riff 2 waits to start until
riff 1 reaches its loop point. When riff 1 reaches its loop point, riff 2 starts, and riff 1 stops (because it has
been waiting for riff 2 to start.) In short, light and then unlight (a.k.a. trigger and release) pad 1 or 2 to start
riff 1 or 2. When you press the other pad, it will start the other riff when the playing riff reaches its loop
point, and stop that playing riff. This way, you can switch between the two riffs playing each song section,
and the transition will always be in sync. When finished, press
the front panel
Stop
button to stop any
playing riffs.
13. To finish, press the
Exit
button to the right of the display to exit the Setup Editor and save your
changes to this setup under a new ID# if desired.
See
The Setup Editor
section at the beginning
of this chapter for details on saving when you exit the Setup Editor.
Содержание PC3LE6
Страница 10: ...vi...
Страница 24: ...2 10 Startup Software Upgrades...
Страница 38: ...3 14 User Interface Basics Quick Song Recording and Playback...
Страница 42: ...4 4 The Operating Modes Using the Modes...
Страница 64: ...6 16 Program Mode The Program Editor...
Страница 134: ...7 70 Setup Mode The Control Setup...
Страница 138: ...8 4 Quick Access Mode The QA Editor...
Страница 194: ...10 34 Song Mode and the Song Editor Song Editor The EVENT Page...