SECTION 2 - GENERAL
31215923
2-11
Changing Hydraulic Oil
1. Use of any of the recommended hydraulic oils elimi-
nates the need for changing the oil on a regular
basis. However, filter elements must be changed
after the first 50 hours of operation and every 500
hours thereafter. If it is necessary to change the oil,
use only those oils meeting or exceeding the specifi-
cations appearing in this manual. If unable to obtain
the same type of oil supplied with the machine, con-
sult local supplier for assistance in selecting the
proper equivalent. Avoid mixing petroleum and syn-
thetic base oils. JLG Industries recommends chang-
ing the hydraulic oil annually.
2. Use every precaution to keep the hydraulic oil clean.
If the oil must be poured from the original container
into another, be sure to clean all possible contami-
nants from the service container. Always clean the
mesh element of the filter and replace the cartridge
any time the system oil is changed.
3. While the unit is shut down, a good preventive main-
tenance measure is to make a thorough inspection of
all hydraulic components, lines, fittings, etc., as well
as a functional check of each system, before placing
the machine back in service.
Lubrication Specifications
Specified lubricants, as recommended by the compo-
nent manufacturers, are always the best choice, how-
ever, multi-purpose greases usually have the qualities
which meet a variety of single purpose grease require-
ments. Should any question arise, regarding the use of
greases in maintenance stock, consult your local sup-
plier for evaluation. Refer to Section 1 for an explanation
of the lubricant key designations appearing in the Lubri-
cation Chart.
2.5
SERVICE MAINTENANCE COMPONENTS
Setting Scissor Arm Safety Prop
THE SAFETY PROP MUST BE USED WHENEVER MAINTENANCE PER-
FORMED ON THE MACHINE REQUIRES THE SCISSOR ARMS TO BE
RAISED.
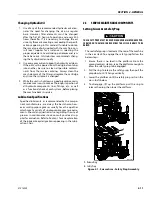
The red safety prop is located at the rear of the machine
in the armstack. To engage the safety prop follow the
below steps :
1 Ensure there is no load in the platform. From the
ground controls station, raise the platform enough to
allow the safety prop to be engaged.
2. Pull the ring to release the safety prop, then pull the
prop down until it hangs vertically.
3. Lower the platform until the safety prop rests on the
cross-shaft below.
4. To disengage, lift up the platform, pull the ring to
release the prop, then lower the platform.
1.
Release Ring.
2.
Safety Prop.
Figure 2-1. Scissor Arm - Safety Prop Assembly
MAF42870
1
2
Содержание ERT2669
Страница 2: ......
Страница 4: ...INTRODUCTION A 2 31215923 REVISON LOG Original Issue A January 08 2021...
Страница 12: ...viii 31215923 TABLE OF CONTENTS...
Страница 40: ...SECTION 1 SPECIFICATIONS 1 22 31215923...
Страница 58: ...SECTION 2 GENERAL 2 18 31215923...
Страница 187: ...SECTION 4 BASIC HYDRAULIC INFORMATION SCHEMATICS 31215923 4 11...
Страница 206: ...SECTION 4 BASIC HYDRAULIC INFORMATION SCHEMATICS 4 30 31215923...
Страница 221: ...SECTION 4 BASIC HYDRAULIC INFORMATION SCHEMATICS 31215923 4 45 Figure 4 33 Lift Cylinder MAF46290...
Страница 223: ...SECTION 4 BASIC HYDRAULIC INFORMATION SCHEMATICS 31215923 4 47 Figure 4 35 Leveling Jack Cylinder MAF46280...
Страница 225: ...SECTION 4 BASIC HYDRAULIC INFORMATION SCHEMATICS 31215923 4 49...
Страница 242: ...SECTION 4 BASIC HYDRAULIC INFORMATION SCHEMATICS 4 66 31215923...
Страница 307: ...SECTION 5 JLG CONTROL SYSTEM 31215923 5 65...
Страница 334: ...SECTION 6 LSS SETUP CALIBRATION SERVICE 6 12 31215923...
Страница 362: ...SECTION 7 GENERAL ELECTRICAL INFORMATION SCHEMATICS 7 28 31215923...
Страница 374: ...SECTION 7 GENERAL ELECTRICAL INFORMATION SCHEMATICS 7 40 31215923...
Страница 375: ......


