P/N 960-100929R_Rev. 7 {EDP #148849}
© 2017, JAPAN CASH MACHINE CO., LTD.
6 - 1
Next-Generation Banknote Acceptor Unit
S e c t i o n 6
7
This section provides Calibration and Performance
Testing instructions for the iVIZION
®
Series Next-
Generation Banknote Acceptor Unit and contains
the following information:
•
Tool Requirements
•
Installation Procedures
•
JCM Tool Suite Standard Edition Mode
•
Download Procedures
•
Calibration
•
Performance Tests
•
iVIZION Utility Tools
Tool Requirements
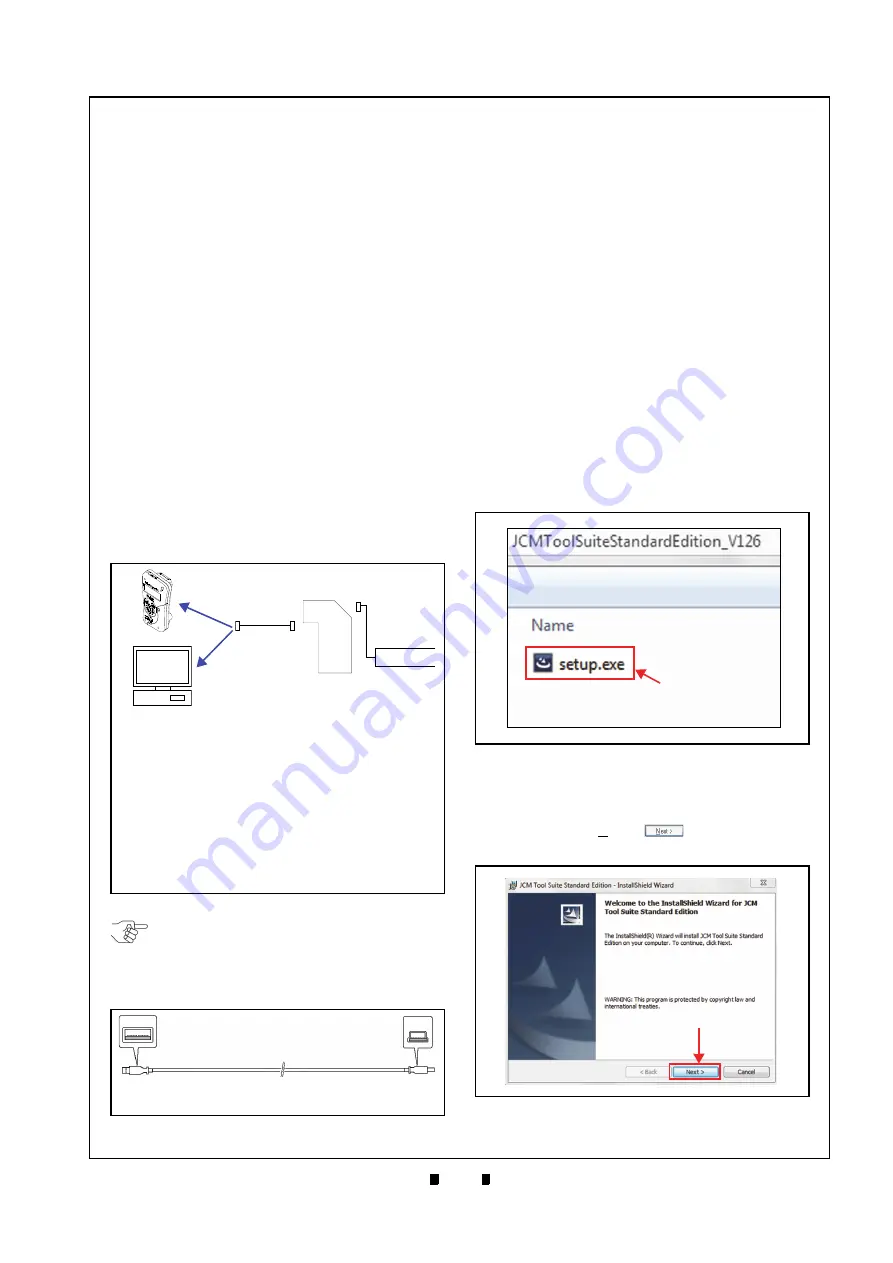
Figure 6-1 illustrates and identifies the tools and
equipment interconnects necessary to download
and install the iVIZION Device.
Installation Procedures
This section provides the JCM Tool Suite Standard
Edition installation procedure.
Application Software Installation
Perform the following steps to install the “
JCM Tool
Suite Standard Edition
” Application Software (refer
to Figure 6-1 and Figure 6-2 for the necessary
Tools and Connections and USB Cable Type
Requirements respectively).
1. Copy the “
JCMToolSuiteStandardEdition.zip
”
Application Software and extract on to the Desk-
top.
2. Open the Third Layer of the extracted Folder and
Double-click on “
Setup.exe
a
).
The “
JCM Tool Suite Standard Edition - Install
Shield Wizard
” Screen shown in Figure 6-4 will
appear.
3. Click on the “
Next>
” Button
a
).
6 CALIBRATION AND TESTING
Figure 6-1
Figure 6-1
Tools and Connections
a) iVIZION Unit
b) Power Supply
c) PC (OS: Windows
®
7/8/10)
d) USB Cable (Less than 3m)
d
1
) USB “A” Terminal Plug
d
2
) USB Mini “B” Terminal Plug
e) iVIZION USB Driver (usbivizion.inf)
f) Application Software*
(JCM Tool Suite Standard Edition).
g) Download Tool Device (DT-300 BlueWaveDX)
*. Containing USB Downloader, Sensor Calibration, Performance
Test programs and Utility Function.
a
b
d
d
1
d
2
e, f
c
g
OR
NOTE: For the download procedures with a
DT-300 BlueWaveDX, refer to the JCM
Global
®
DT-300
™
Series Download Tool
Operation Integration Guide (Part Number
960-000167R)
Figure 6-2
Figure 6-2
USB Cable Type Requirements
a) PC Side (USB A Terminal)
b) iVIZION Side (USB Mini-B Terminal)
a
b
Figure 6-3
Figure 6-3
Setup.exe File Location
a
Figure 6-4
Figure 6-4
InstallShield Wizard Screen
a


